
Brand New CSI-Station 2+ In Need of Calibration and Servicing
I bought a brand new CSI-Station 2+ soldering station because I needed some hot-tweezers for SMD soldering and I didn’t have much money to spend. It was only about $60 USD. This soldering station has hot-tweezers, #907M, and also an ordinary iron, #907N, that looks similar to the Hakko iron, #FX-8801, that I have.
But my Hakko tips will not go all the way down over the heating element in the CSI iron or tweezers because the heating element sticks out a little too far.
The hot-tweezers did not seem like they were getting as hot as the display said they were. So I got my Fluke 87V out to check. Sure enough the temperature was about 150⁰F less than it was supposed to be. The stored settings only allow you to adjust the temperature ±50⁰C.

I figured that I may as well take the soldering station apart and calibrate it on the board if I could. If I sent the soldering station back to Circuit Specialists, where I bought it, I would probably have to wait close to two weeks for them to receive it, and then send me another one.
And the next soldering station might be just like this one. As you can see in the photo above, I decided to go ahead and calibrate it myself and plugged the CSI station into my Tenma variable transformer.
Here is a photo of the particulars for the power transformer.
I have the board out of the station above. The soldering station seems to be well built for what I had to pay for it. The transformer, plastic, irons, wiring, and components seem to be pretty good quality. It is actually much better built than I expected it to be.
Here you can see the other side of the board after I removed it. I included the part number for the microcontroller-(MC), #S3F8S19XZZ-QR89, in the photo. You can click here to see a brief six-page datasheet for it if you would like to.
You can see the three VR’s on the left of the board. The center VR is marked V2. The one below it is V1, and the top one is V3. V1 controls the temperature adjustment for the fixed side of the #907M tweezers, and V2 controls the temperature adjustment for the movable side of the tweezers. V3 controls the temperature adjustment for the #907N iron.
Here is a look at the board from the opposite angle.
Above is a good look at the Triac’s and the 5V regulator. I could not see even a hint of thermal compound anywhere and figured that I better pull them and check to make sure.
As you can see, there was not even a drop of thermal compound anywhere! That is unbelievable to me! Anyway, I applied some good Arctic Silver 5 thermal compound on them and mounted them back to their respective heatsinks.
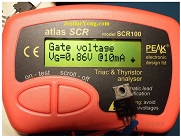
As you can see in the two photos above, I decided to have a look at the Triac’s and the 5V regulator since I already had them removed. They checked to be good with my Peak Atlas SCR100. I knew that they were good; but I was just curious and wanted to have a look.
I checked the 5V regulator with my Peak Atlas DCA75 Pro, but I forgot to take a photo of it. It checked to be 5.03V if I remember right.
Here I am adjusting the temperature on the fixed side of the tweezers. I adjusted V1 about one turn CW which raised it up to 600.7⁰F.
**I made sure to zero the stored temperature adjustment settings in the MC before taking the CSI soldering station apart.**
Above I am adjusting V2 for the movable side of the tweezers. I had to adjust the VR 1 ¼ turns CW which raised the temperature up to 600.5⁰F. Close enough for me!
Above I adjusted V3 for the iron 1 turn CW. That raised the temperature up to 610.9⁰F, which is too high since I have the soldering station set to 600⁰F.
I adjusted the VR a tad CCW to drop it down some. I figured that 603.5⁰F was close enough; so I left it there. 3.5⁰F is not going to make that much of a difference.
As you can see above, the CSI-Station 2+ hot-tweezers soldering station is back together and working at the correct temperature, relative to the display. Plus, I also know that the Triac’s and 5V regulator have a layer of Arctic Silver 5 thermal compound to help them make good contact with the heatsinks.
So, would I recommend this soldering station? Yes, absolutely! This soldering station is, as aforementioned, built with better quality than I expected. The board is also of good quality and I did not lift any solder pads even though it was not very easy to desolder the Triac’s and 5V regulator.
This is the only hot-tweezers soldering station that I have ever used, but it seems to be a pretty good deal to me. So I don’t have much experience with them. The fact that I only had to pay $60 USD for it and it is made using pretty good components, makes it well worth taking apart to calibrate it and add thermal compound to the Triac’s and regulator, in my humble opinion.
Plus, it gave me an excuse to write another article and let us have a peek inside!
I hope you guys enjoyed the article. Please feel free to leave any comments or suggestions that you may have below. See you guys in the next article!
Robert Calk Jr., is a Hobbyist from the U.S.A. that loves Electronics Device Repair. Please leave any comments or suggestions that you may have below. Thanks.
P.S- Do you know of any your friends who would benefit from this content that you are reading now? If so, forward this website to your friends or you can invite your friends to subscribe to my newsletter for free in this Link.
Please check out his previous repair article below:
https://jestineyong.com/sanyo-dp40142-led-lcd-tv-repair/
 (62)Dislikes
 (0)
(0)
15 Comments
Leave a Reply
Cancel reply


Parasuraman Subramanian
April 16, 2019 at 9:46 pm
Amazing! You handle such complicated calibrations with your state-of-the-art devices, like children playing around with their toys! Such ease and confidence shows what an professional expert you are! Hats off!
Mark
April 16, 2019 at 10:24 pm
Well done Robert on your repair. Good logical thinking.
Robert Calk Jr.
April 17, 2019 at 10:01 am
Thanks Mark. It was pretty straightforward actually, but I thought that yall might like to see inside of it.
Mark
April 19, 2019 at 7:56 am
I think any repair is good to share. If it makes it easier for the next guys with the same problem, then sharing is a good thing 🙂
Robert Calk Jr.
April 17, 2019 at 2:51 am
I am far from an expert, but thanks Parasuraman! There was supposed to be a link to a brief 6-page datasheet for the MC on the photo, and somehow it got lost. I will have to check with Mr. Yong to see what happened.
Albert van Bemmelen
April 17, 2019 at 3:27 am
Thanks for a well written expert report on the CSI-2 Robert!
The 6 page datasheet of the mentioned microprocessor didn't show however.
Sadly the CSI-2 can't be bought outside the USA through Aliexpress or eBay for the money you paid. And neither does it work on European 240VAC power lines.
And same goes for the Tenma variable transformer that will be at least 3 times more expensive if bought in the EU for 240VAC. Most electronics still are way cheaper in the USA. I however also use the English PEAK SCR100 tester because it is something that is worth buying because it supports higher gate currents for Triacs and Thyristors types that other meters just can't measure.
Robert Calk Jr.
April 17, 2019 at 10:11 am
Hi Albert. There probably isn't too much difference between the lesser expensive hot tweezer stations. You can probably find something similar where you are. The Tenma Isolation Transformer is not anything special either. I'm sure that you have something similar in your neck of the woods.
I love my Peak Atlas analyzers also. They all still work great!
Albert van Bemmelen
April 17, 2019 at 9:33 pm
I've ran a search before for the Tenma Isolation Transformer Robert. Over 200 Euro excluding the extra shipping and import charges that follow afterwards is just too much for what its worth.
And I do not know about any good similar Tweezer Station for the price you paid either. Maybe some other time they show up cheaper. Have you seen what can be done with the new affordable UM24(C) USB tool with bluetooth and its PC software? You can read Power, Voltage, Amps, and Internal resistance on any tablet, player or USB device with it. And for instance be able to check the quality of any internal battery with it.
Robert Calk Jr.
April 18, 2019 at 10:55 am
I haven't heard of that one. I have some YZX Studio USB power monitors. The green one has Bluetooth capability. I have the yellow, red, and green ones. I also have a few of their 3A USB DC adjustable electronic loads. I added multiturn Pot's and different power connectors on at least one of them.
Lynn Blakely
April 17, 2019 at 10:14 am
Robert: you did a good job calibrating that station. It is always interesting to look inside of a new piece of equipment. It was amazing to find no thermal conductive compound on the devices mounted to the heat sink. I am 78yrs old and find it difficult to quit electronics repair as there is always something new to learn. Thanks for your well pictured and explained article.
Robert Calk Jr.
April 17, 2019 at 7:47 pm
Thanks Lynn. I was hoping that some of yall would like a peek inside of it. Considering the quality of components used in the station, it was hard to believe their was no thermal compound. It wasn't necessary for the thermal compound to be conductive.
I am 58 and feel the same way. Hopefully I will make it to 78. lol!
Ian Corry
April 18, 2019 at 5:58 am
Great work Robert. Good to see the approach you made in getting it calibrated. I hope it serves you well.
Robert Calk Jr.
April 18, 2019 at 10:59 am
Thanks Ian. I hope it does well also. I may see if I can modify it to accept Hakko tips after I get caught up on stuff.
Steve
April 22, 2019 at 6:46 pm
Nice job good info for someone looking to buy one.
Robert Calk Jr.
April 23, 2019 at 8:00 am
Thanks Steve.