
Bulova Accutron Watchmaster 600

I mentioned in a comment to our friend Gerald Musy that I was going to clean, service, and repair if necessary a 1969(M9) Bulova Accutron “Tuning Fork” watch with a 214 three-wire movement that uses a PNP transistor. The later 214 two-wire movements use a NPN transistor. It is a watch my late father had in his drawer for decades, and as far as I know, never tried to get it to working.
According to what I have learned, some say that Bulova started using the two-wire movement around 1967 or so, so I don’t know if this three-wire movement is original or not. I don’t remember what my father said about it when I was a child, and we didn’t talk about it before he passed away.
After doing some research online, I figured that instead of potentially paying several hundred dollars having someone else do the work, I may as well spend the money on equipment, tools, manuals, and parts to do the work myself.
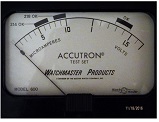
Plus, I’ll have most everything I need, except maybe parts, to service and repair other watches and clocks for myself and others. While researching and looking for tools, I found this factory Bulova Accutron Watchmaster 600 Test Set. It is a later model than the first test set they made that is designed to be used for the 214, and 218 Accutron movements.
For those of you not familiar with the Bulova Accutron, it is a watch movement that was introduced in 1960 utilizing a battery cell to power an electronic circuit and coils to control a tuning fork. The electronic circuit and tuning fork provide the frequency standard and control the indexing mechanism for its timekeeping: eliminating the old-fashioned balance wheel and hairspring escapement mechanism that’s been used for hundreds of years. I’ll explain more about the Accutron in the next article.
Considering the fact that this test set was made back in the ‘60’s, I fully expected to have to replace some components in it, especially the capacitors. But I didn’t have to! The components were all good! It looked to me that someone had previously sprayed some cleaner into the contacts to clean inside the selector switch. It was working well, so I left it alone.
I would like to have a schematic to show you, but I don’t want to take the selector switch apart and take a chance of something breaking considering how old it is, unless it was necessary. But RV1 controls the calibration of the 214 low amplitude voltage, and RV2 controls the 218 low amplitude voltage. RV3 controls the battery cell test circuit. I wish I could find a manual for it, but it seems like none exists.
Above, is a closer photo of the selector switches’ components. The components all look to be original! I couldn’t find any information about those capacitors using those numbers, so I believe they are original.
In this photo, I’m checking the calibration of the 214 low amplitude voltage used for adjusting the indexing mechanism with my trusty Fluke 87V. You can hopefully see the special connector that hooks to the movement while in its special 214 movement holder. There’s a better look at it in another photo further down this article. It looks good at 1.256V (unless further research says differently). The voltage for the 218 movement was off and required calibration. I calibrated it to about the same voltage as the 214 test connector, but forgot to take a photo of it. The battery cell test circuit was also out of calibration, and required adjustment. Then I rechecked the voltages again to make sure they didn’t change from calibration.
I’m going to need to recalibrate it anyway after I find a suitable diode for the 214 and 218 movements. I’ve spent several hours looking at datasheets trying to find the right SMD diode to use.
I ordered 5 different SMD diodes from 4 different manufacturers; 2 from Diodes Inc., 1 from ROHM Diodes, 1 from MCC Diodes, and one from Vishay Diodes. That should give me at least 1 that will work well for my purpose.
After much study reading information on websites and Accutron watch forums, it was mentioned that the 214 low amplitude voltage should be set at 0.95V, and the 218 set at 1.03V. After choosing the diode that I’m going to use, I calibrated the test set accordingly to output those voltages with the diode in the circuit. The diode that I’ve chosen is the BAV3004WS-7 from Diodes Inc. It will give me about 0.15V drop, and it is tiny and should be easy to hide. I may not even worry about hiding the diode since I’ll be using a dial on my watches, instead of converting them to a Spaceview. So I’m going to try this diode on both movements and see how it goes.
The Accutron’s were designed to use 1.35V Mercury battery cells that are no longer available. So to use the modern 1.5V Silver Oxide battery cells, I need to drop the voltages about 0.15V. Some say that we can just phase the indexing mechanism to compensate for the higher voltage, and others say it’s better to reduce the voltage with a diode. I’ve chosen to reduce the voltage – more about my reason why in the next article.
I thought about replacing all of the wiring, and replacing the selector switch components back with fresh solder to make it look better, but decided to keep the test set as original as I can, plus, it’s not necessary. I really love the nostalgia (and the smell) of old devices, and components (perhaps because I’m getting old myself – lol).
Included with the test set, I also received some movement holders, some small adjustment tools, and an index wheel pinion holder. One movement holder is for the 218 movement, and the others are for the 221 movements. The factory original 214 movement holders are hard to find, but I found one.
I also won an auction for a pretty 1969(M9) Accutron that runs good. It has a 2182 movement that has the sweeping second hand that Accutron’s are famous for, and has day/date as well. It’s running pretty fast, so I imagine that is because of the higher voltage of the Silver Oxide battery, and it hasn’t had a diode put in it or had the index mechanism phased for the higher voltage. No problem – I got it at a great price, and will fix it myself. It also needs the dial and hands cleaned and some fresh clear coat applied. The main things I love about it are the gold colored dial with roman numerals, and the original gold hands with the second hand that has the tuning fork symbol. Also, the crown is original with the tuning fork symbol. I didn’t realize how rare the tuning fork second hand was at the time of the auction.
Most Accutron’s that I have seen so far do not have that special tuning fork second hand. The watch has a nice leather band also, but I doubt that it is original. Here are some photos for you guys.
Notice that my Accutron 2182 that has the tuning fork second hand has its crown at the 4 o’clock position.
Here is a look at the Bulova Accutron 214 movement dial side down. The old gasket was so old and deteriorated that I had to very carefully scrape it off. Considering the possibility of the tiny gasket fragments getting inside the movement, and how long it sat in my Dad’s drawer with a cracked crystal, I’m not even going to think about applying power to it until its cleaned good, lubricated, and reassembled. I’ll have a good ultrasonic cleaner here soon so I can give it a professional cleaning.
But I do know that the indexing mechanism is free and the coils are good by plucking the fork with a piece of pegwood and observing that the wheels turn, and plus everything looks good. It looks better inside than I thought it would. More about the Accutron for you guys in the next article.
The watch with the tuning fork second hand is the one I bought that is running. The other Accutron is the watch that Bell Helicopter Textron gave my father for his 25th anniversary of being employed by them as a master machinist. It is an Accutron Quartz. It was made in 1991(T1). I have not been able to find another photo like it on the internet yet. The quartz movement in it is pretty accurate. To my knowledge my dad had never had it cleaned and serviced. The watch spent much of its life in the box without a battery in it. After my father passed away, I put a battery in it and started wearing it. I’m going to service them both myself after I finish with the 214. Every time I leave home I always have it with me because it’s irreplaceable. It has his name engraved on the back and no amount of money can replace it.
The photos above them are of the 214 movement. With the dial side up you can see the tuning fork, coils, and some of the electronics.
Here is the test set checking a Silver Oxide battery cell. When using the other functions, the battery cell is left in the test set battery receptacle (nest) to power the meter and watch while adjusting the movements and reading the current draw of the Accutron movements. You can also see the 214 connector better in this photo.
The test set was missing the plug tip for the 218 yellow wire that plugs into the 218 movement holder jack. It also has some damage to the case with a couple of pieces missing. The two screw anchors on the left side when looking at the front of the test set, where loose. I couldn’t find my epoxy, so I used some indoor adhesive to see if it would hold them in place. It should work since the screws don’t have to be tight.
The next photo shows the 218 movement holder and the piece of bar stock that I made a plug tip out of. The only bar stock I have right now is Nickle/Silver. After cutting, chamfering, and then cleaning up the piece with a file and sandpaper, it was time to solder the yellow 218 wire to the plug tip. The plug tip is 18.38mm long, with an OD of 2mm. It works perfectly.
In this photo, the Accutron Watchmaster 600 is outputting 1.2557V with my amazing Brymen 869s while checking the low amplitude voltage from the 214 movement connector. But as I mentioned earlier, I changed the output and will see how it goes.
Even though the case of this test set isn’t in perfect condition, it works great and seems to have all of the original components. The meter zeros and functions like a brand new one. I’m glad that whatever damaged the case didn’t damage the meter! I am really happy with this Bulova Accutron Watchmaster 600 Test Set. I took a chance and it payed off this time.
And also, I’m happy that I have some articles to write for you guys.
Above is a photo of everything I received with the Bulova Accutron Watchmaster 600 test set.
I received my factory original 214 movement holder in the mail a couple of days ago. It wasn’t cheap, but it was the only one I could find. So, I’m thankful to have it. All I need now is my ultrasonic cleaner. As soon as I get everything together, I’ll start on the project. I’ll probably have to break the Accutron article up into two articles. We’ll see. I hope you guys enjoy this article and the coming articles on the amazing Bulova Accutron(The watch that hums!).
Robert Calk Jr. is a hobbyist from Texas, USA who loves Electronics, and now, Horology.
Please give a support by clicking on the social buttons below. Your feedback on the post is welcome. Please leave it in the comments.
P.S- Do you know of any your friends who would benefit from this content that you are reading now? If so, forward this website to your friends or you can invite your friends to subscribe to my newsletter for free in this Link.
Please check out his previous repair article below:
https://jestineyong.com/lights-of-america-shop-light-repaired/
 (101)Dislikes
 (0)
(0)
21 Comments
Leave a Reply


Albert van Bemmelen
December 19, 2016 at 9:22 pm
Great article Robert! I immediately will mention it to a friend of mine who is a graduated watchmaker. I think it will be most interesting for him to read what equipment you use and had bought. Good work! PS: maybe you could also have used the great Tektronix 2465 scope in your article we both share to show some of the signals?
Robert Calk
December 20, 2016 at 2:23 am
Thanks Albert. I will check it out in the last article. The circuit is supposed to run at 360Hz. The biggest problem that I've ran into is that my camera microscope is inadequate to see the tiny index and pawl finger jewels on the index wheel. I'll have a microscope by the first week of January.
Parasuraman S
December 19, 2016 at 11:05 pm
Great efforts! Shows how keen and deeply interested you are in reviving antique devices! What you are experimenting is an area, very few would venture to try! Hat's off, though I do not wear any! (LOL)
Robert Calk
December 20, 2016 at 8:38 am
Thanks Parasuraman.
Gerald Millward
December 19, 2016 at 11:57 pm
Robert, truly fascinating and a great change for me from repairing laptops! I look forward with anticipation to the next phase of the project.
Robert Calk
December 20, 2016 at 8:39 am
Thanks Gerald. It's always fun learning new things.
Suranga Electronics Sri Lanka
December 20, 2016 at 2:09 am
Hello Mr.Robert.
Wow.. Very nice Great Article .
And more informations. Thanks Mr.Robert calk.
Robert Calk
December 20, 2016 at 8:40 am
Thanks Suranga.
Anthony
December 20, 2016 at 4:31 am
Hi Robert, I thoroughly enjoyed reading your article on this fascinating project you are undertaking! A really detailed
and thorough explanation with terrific clear photos to boot. I've not tackled any kind of watch repair myself apart from changing batteries so it was very entertaining reading your article and learning something different from what we
normally see here. I'm looking forward to the second half of your story and I am very much hoping it all goes exactly
to plan for you !
Best Regards
Robert Calk
December 20, 2016 at 8:42 am
Thanks Anthony. I will do my best. It will take two more articles.
Mark
December 20, 2016 at 6:01 am
Well done Robert! There's some complex repairs to a simple design
Robert Calk
December 20, 2016 at 8:53 am
Thanks Mark. It's amazing that they could build devices like that way back then. In the first article of the Accutron watch, I'll go into more detail about the design. The index wheel is only 95/1000th of an inch in diameter, and has 300 teeth!
Gerald
December 20, 2016 at 8:41 am
Thanks Robert, this is the way to go. I was indeed waiting for those articles as the Bulova Accutron has been fascinating me since my teenage... Enjoyed your article and waiting for more.
Cheers,
GM
Robert Calk
December 20, 2016 at 10:39 pm
Thanks Gerald. It is pretty fascinating. I'm glad you enjoyed the article.
Yogesh Panchal
December 21, 2016 at 3:21 pm
Sir,
Excellent!
Thanks for the sharing your experience.
Robert Calk
December 21, 2016 at 11:25 pm
Thanks Yogesh. I'm glad you enjoyed the article.
mahmoud_tajpour
December 23, 2016 at 7:01 am
Hello dear Robert very nice,very excellent I enjoyed of your best work.i wish you are healthy and successful.
Robert Calk
December 24, 2016 at 8:42 am
Thanks Mahmoud. I wish you the best also, and have a Happy New Year.
Humberto
December 31, 2016 at 9:45 pm
Hi Robert. Your efforts were valuable. Congratulations.
Happy New Year for everybody.
Robert Calk
January 4, 2017 at 11:43 am
Thanks, Humberto. Happy New Year to you also my friend.
Francisco M Yruegas III
February 1, 2021 at 9:31 am
Great post! Im new to collecting and quickly fell in love with the Accutron 214. I decided unlike yourself that I want to learn to repair these beauties. I purchesd a tester and just won an auction for Accutrons universal movement holder 300. Finding the plastic movement homder part # 9914 is quite difficult to find.
I'm sure I'll happen on to one eventually.