
HP 2400 Scanner Repaired


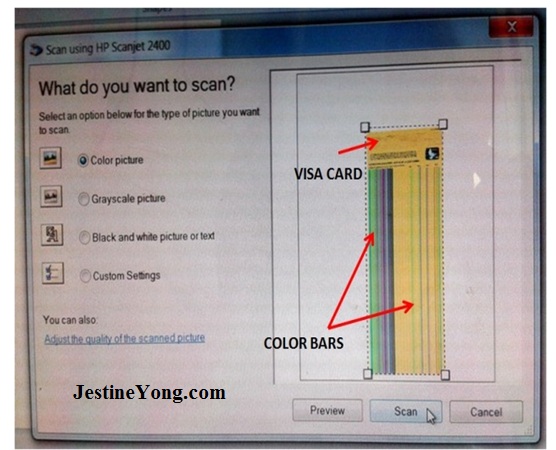
A customer came to my workshop with his HP 2400 Flatbed Scanner unit stating the problem; while he is scanning anything he is getting some “COLOR BARS” on the scan image. I put one scrap visa card in the scanner and when scanned the image I found the same problem as stated by the customer.
The first thing I did was to check on the power adapter output voltage. It was 12 volt and steady. This had proven that the power supply was not the cause of the problem. The next step was to remove the scanner cover and check the internal parts.
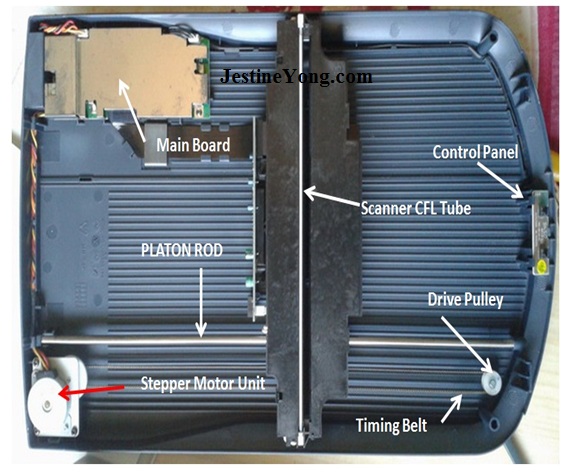
Everything is seems to be ok as I did not found any suspicious damage. So I had decided to just do the cleaning/servicing work. I removed the front glass and cleaned the glass with the Glass Cleaner (you can use damp lint free cloth with mild soap).
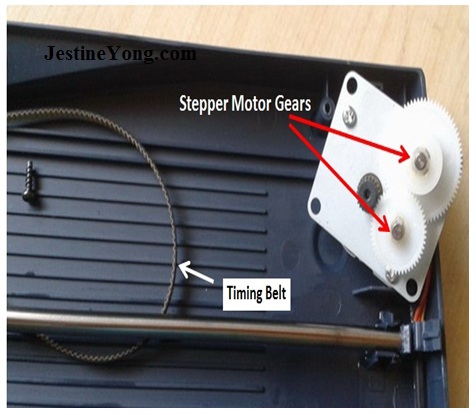
Now I have cleaned everything inside the scanner but while moving the Scanner Unit I found the unit moving on the Platen Rod was not smooth hence I cleaned the platen rod with isopropyl alcohol and then applied little machine oil and white grease on platen Rod. I also lubricated the timing belt pulley and stepper motor Gears.
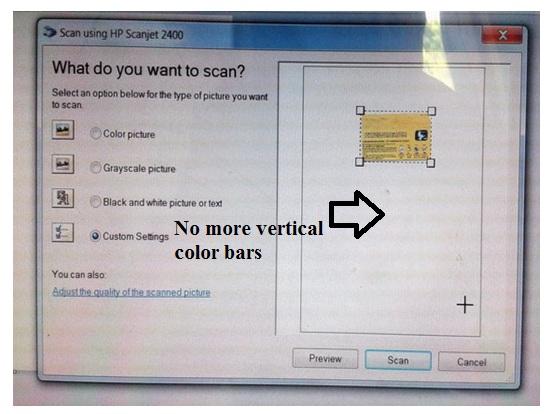
After the servicing process I put back everything that I have removed and tested the unit. I was delighted that the problem had been solved. You can check out the photo below where there were no more vertical color bars.
This article was prepared for you by Yogesh Panchal who works as a Computer Hardware Engineer in Mumbai India.
Please give a support by clicking on the social buttons below. Your feedback on the post is welcome. Please leave it in the comments.
P.S- Do you know of any your friends who would benefit from this content that you are reading now? If so, forward this website to your friends or you can invite your friends to subscribe to my newsletter for free in this Link.
 (138)Dislikes
 (1)
(1)
10 Comments
Leave a Reply
Cancel reply


Humberto
November 21, 2014 at 11:09 pm
Good repair Yogesh Panchal. Keep up
Merlin Marquardt
November 21, 2014 at 11:18 pm
Interesting. So the problem was that the moving parts were not moving well/properly so cleaning and lubricating fixed the problem? Very nice.
Robert
November 21, 2014 at 11:38 pm
Good job, Yogesh. Thanks for sharing your repair with us. That is the first time that I have seen inside one of those devices. It would have been nice to see the PCB and components.
sushanta halder
November 21, 2014 at 11:55 pm
I am a printer repairer.some time I found that same problem of scanner.then I just replace the scanner ffc cable.and the problem solved 90% cases.
moshe
November 22, 2014 at 5:13 am
Very very nice job Yogesh..despite being in the electronic age the problem is sometimes just plain ole mechanical!
Mark
November 22, 2014 at 10:36 am
Hey Yogesh,
Well done with your repair. Sometimes we start to look for a complex fault, when it can just be lack of maintenance or misuse.
As they say - always start with the basics.
Waleed rishmawi
November 22, 2014 at 11:56 am
Sometimes cleaning is the best answer to Maxine problems. Keep up the good work
beh
November 22, 2014 at 12:04 pm
dust and heat are killing the electronics as well as electrons yes you did this and thanks for sharing with us
Osman ALSinnary
November 22, 2014 at 3:55 pm
Nice to share this valuable Topic
This is one of the mechanical problems affecting Image processing .
Same problem I faced with my BenQ Flatbed scanner 5 years ago & used same procedures to repair .
Many Thanks ...
Charles Bartlett
November 24, 2014 at 11:15 am
Very good job Yogesh. Very interesting that dirty components and lack of lubrication caused this. Many times cleaning potentiometers, lubricating gears, cleaning moving parts solves the problem.