
LG Microwave Oven MS3840SR Repair
One of the earliest electronic repairs I did was on a microwave. It seemed fairly basic in construction and with a little help from my friends YouTube & Google, I was able to carry out a successful repair. I now had a chance to expand my skills with another microwave (I have done several since).

The customer complained about the microwave working as normal, but the food would not heat. From experience, I had already decided where the possible fault may lay, but I have been caught out before by just repairing by experience, instead of diagnosis, so I was determined to carry out tests and let the results lead me to the correct conclusion.
Sure enough, after trying to heat a glass of water for 30 seconds, the fault was confirmed – no heating occurred even though the power supply, all the display, turntable motor and other features were working as normal.
WARNING:
Firstly you MUST drain the main capacitor, whose job is to effectively double the already high voltage of the secondary circuit of the transformer. You should not do this by shorting the terminals with a screwdriver or something similar. You should use a load of some description, such as a high wattage globe or high Ohm resistors.
I have made a capacitor drain using a plastic pair of tweezers with 2/ 550 Ohm resistors in series, covered in shrink wrap. This works well when draining the residual voltage of capacitors. After this step has been done, always check for remaining voltage with a multimeter.
After removing the casing, a good visual inspection was carried out. The power supply fuse was intact as I suspected and 240 Volts was being provided at the transformer primary circuit. It appeared that the supply voltage and system was operating correctly. Next, the high voltage circuit needed to be tested.
NOTE: This circuit uses up to 5kV and is very dangerous. Use extreme caution for both the safety of yourself and care of your equipment. Most multimeters, for example are only rated up to 1kV. (This is how I blew up one of my multimeters on my first microwave repair)
I have done several microwave ovens & have found that the magnetron is often the source of the fault, however, as I said, I wanted to test the complete system.
Firstly I tested the high voltage fuse and this was found to be blown. These are special fuses 850mA with a 5kV rating. The correct one must be used. Any variation can cause other problems.
What had caused the fuse to blow? These were expensive and I couldn’t just fit another one in the hope that the fault was a random problem. I needed to search further.
The high voltage diode needed to be checked. Due to their high resistance, they can not be tested with a normal diode tester. They need another form of testing. This can be accomplished by using a 9 Volt battery (in this case measured 9.69 Volts), together with your multimeter in series, on the voltage range. In this case, the reading should drop to about 6 Volts for a healthy diode. The voltage drop can be seen by using a multimeter across the diode itself. This showed a reading of 3.28 Volts.
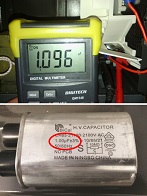
Next the high voltage capacitor needed to be tested. Bridge the 2 output terminals together. This allows the capacitor to discharge. Connect a capacitance meter on the 2 outer terminals (there are actually only 2 terminals – these are just joined). When removing the bridge wire, the meter should slowly climb up to the correct reading. This is noted on the side of the can. The example shown below (right) is 1.00uf, however the one used in the microwave read 1.10uf and so the reading below was within specifications.
As already stated, due to the extremely high voltages produced by the secondary circuit in the transformer, it is difficult to test for maximum output under load. However the resistance readings could be noted:
Primary windings (0.9Ω)
Primary to the body of the transformer (no continuity)
Filament winding (0.6 Ω)
Filament to the body of the transformer (no continuity)
Secondary winding to body of the transformer (95.5 Ω)
All readings were found to be within specifications.
The next step was to check the condition of the magnetron itself. As the shielding was removed the fault became obvious. The magnetron contains 2 circular ferrous magnets that help distort the path of the electrons which create the oscillating microwaves that cooks your food. One of these was cracked. This would not create the field distortion in the center vacuum tube.
At least the reason for the blown fuse could now be determined.
However after pricing a new magnetron and comparing the price of the microwave (which by the way was only out of warranty by about 6 months), it was determined that the repair using a new magnetron would outway the price of a new microwave.
Don’t panic! I haven’t finished yet!
After checking my collection of salvaged microwave parts, I found another LG magnetron. However, this suited a 900W and not a 1100W oven that I was working on. After consultation with the customer, it was agreed that it was worth the effort to try and repair the oven.
After all the components had been refitted to the oven, including the 900W Magnetron, I decided to use the old globe trick in place of the fuse to make sure the circuit was performing correctly. But I did not realize that I was now testing a high voltage circuit, up to 5kV!
The globe glowed very brightly and then produced a blue flash before the filament broke! At least I knew there was high voltage now operating through the circuit….
I felt I could confidently install the high voltage fuse and finally test the microwave.
A glass of water in for 30 seconds and now hot water was produced. With the customers’ approval, the microwave was used to cook our evening meal and proved to be in good working order and no noticeable difference was noted of its power output difference.
Sometimes we need to think outside of the box to save these appliances from recycling or worse yet – landfill.
Sorry guys, I didn’t get a chance to do a video on the repair this time. Next time I’ll do one for those interested.
This article was prepared for you by Mark Rabone from Australia.
Please give a support by clicking on the social buttons below. Your feedback on the post is welcome. Please leave it in the comments.
P.S- Do you know of any your friends who would benefit from this content that you are reading now? If so, forward this website to your friends or you can invite your friends to subscribe to my newsletter for free in this Link.
Note: You can check out his previous repair article below:
https://jestineyong.com/samsung-p5110-tablet-touch-screen-replacement/
 (155)Dislikes
 (0)
(0)
15 Comments
Leave a Reply
Cancel reply


Gerald Musy
February 6, 2017 at 10:40 am
Hi Mark,
Wonderful, thank you for sharing. When I saw the little lizard on one of the picture I knew that the article was from you 🙂 Actually I had already recognized your excellent writing style. Very informative and well done.
Cheers,
GM
Mark
February 6, 2017 at 2:58 pm
Thanks Gerald,
Yes, after our shift, I finally found the lizard and his friends - so keep a look out in future articles and videos!
Albert van Bemmelen
February 6, 2017 at 12:14 pm
Interesting story about using a 900 Watt Magnetron 'tube' instead of the original 1100 Watt 'tube' Mark!
I understand that the Customer now only has to recalculate his cooking Time to that of a 900 Watt Microwave Oven.
When a food manufacturer tells me on his product to cook my meal on 4.5 minutes on 800 Watt but my Microwave Oven is only 700 Watt, I always recalculate the needed cooking time by calculating the total Energy needed and divide that by 700 Watt. (which is Power times seconds, because the dimension of Power is Energy divided by time so we have to multiply it by time to get the Energy in total). Which gives me the needed cooking time in seconds for my Microwave Oven. Divided by 60 seconds gives me how many Minutes (but counting in for instance 1.35 minutes being 81 seconds is however more complex). But I always wonder if my Samsung Microwave Oven hasn't degraded somehow in giving its 700 Watts of Power after already being used for the last 26 years?
Mark
February 6, 2017 at 2:57 pm
Hey Albert,
Thanks for all the calculations, but I think the elderly lady will just adjust accordingly!
I don't know how long it will last, but it has worked perfectly since and I have a very happy customer & I am happy being able to save it from the tip for (hopefully) many years to come.
Hopefully it still has many more Watts to offer!
Albert van Bemmelen
February 6, 2017 at 4:41 pm
I guess that using another 900 Watt 'tube' depends only on the filament current it is able to handle, and that the used Capacitor still oscillates in the Circuit with the same frequency? And maybe only with a smaller Microwave 'tube' with smaller constructed Magnets and Cooler Blades?
Yogesh Panchal
February 6, 2017 at 2:28 pm
Mark.
Well done!
Anthony Paterson
February 6, 2017 at 4:12 pm
Hi Mark,
Since the demise of CRT TVs the humble microwave is now the most dangerous, and potentially lethal, appliance in domestic use. Thank you for insight into you discharge gizmo and the tip for testing the high voltage diode using a 9V battery. The old AVO Multimeter used to have two battery sources and on the high ohms range would have been able to test this diode but not too many of those around now. Keep up the good work - I always enjoy reading your articles'
Mark
February 6, 2017 at 8:58 pm
Thanks Anthony,
As I mentioned, I fried one of my multimeters during one of my earlier microwave repairs - a lesson well learned!
As a hobbyist, I am constantly learning and always humbled by the wealth of experience on this blog.
Robert Calk
February 6, 2017 at 10:08 pm
Thanks Mark. We need to be very careful. In electronics, impatience can kill.
Bulent NUR
February 6, 2017 at 11:14 pm
Good job, nice informative and photologic :).
Ulises Aguilar Pazzani
February 7, 2017 at 11:35 am
Mr Rabone nice article interesting
suraga Electronics
February 7, 2017 at 3:16 pm
Good Repair job Mr.Mark.
And I Got More information.
Thanks !
Humberto
February 8, 2017 at 2:53 am
Hi Mark, great repair. Good explanations and images too.
Parasuraman S
February 8, 2017 at 1:47 pm
Very, very informative article. You have done more or less a 'biopsy' of this oven, so that students like me can learn a lot! Many thanks!
Tito Kanshulu
February 10, 2017 at 3:25 am
Mark, you must be a good teacher on the chalkboard. I like the way u explain these things. Thanks for the information. Like Musy, I,also, saw the lizard. kkkk