
No Power in ATX Power Supply Repaired-3 Components Replaced
Received one Desktop PC with no power symptom- diagnosed as follows:
Checked power cable found ok with 230 v at the other end, checked computer ON/Off switch found ok. There was burnout smell in the SMPS and I concluded the problem is in SMPS and not in the motherboard. Now disconnected the SMPS from Motherboard and took it out for further diagnosis. After opening the case I used a blower to blow away the dust.
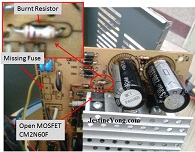
After cleaning I did not find any burnt mark on PCB. As for the main fuse, it was blown into pieces. Next, with my visual inspection test with the help of a magnifying glass, I saw one burnt resistor- see the photo below:

I began to check on the components in surrounding area and I have found one Mosfet CM 2N60F and STC945 NPN transistor open circuit. If you want to learn how to check electronic components, you can check out Jestine Yong’s ebook HERE. Below is the location of the bad components.
Here are the three faulty components:
I replaced the parts and tested it using a 100 watt bulb to make sure no more short circuit in the circuit board. I had to connect it to a ATX power supply tester. The result was good because the bulb lights up for 5 seconds and then went off. The fan started to turn. After that I checked on the output voltages and all were within range.
Once I found that the power supply was working fine, I turned off the supply and removed the light bulb and put in the main fuse. I then assembled back everything and retested again the power supply before sending it back to the customer.
Thanks!
This article was prepared for you by Yogesh Panchal who works as a Computer Hardware Engineer in Mumbai India.
Please give a support by clicking on the social buttons below. Your feedback on the post is welcome. Please leave it in the comments.
P.S- Do you know of any your friends who would benefit from this content that you are reading now? If so, forward this website to your friends or you can invite your friends to subscribe to my newsletter for free in this Link.
Note: You can check his previous article in the link below:
https://jestineyong.com/humax-set-top-box-fault-finding/
 (114)Dislikes
 (0)
(0)
18 Comments
Leave a Reply
Cancel reply


Parasuraman S
June 22, 2016 at 11:46 pm
Good job! Expert diagnosis and solution!
Bibin augustin
September 21, 2018 at 4:23 pm
Can you tell me or show me a clear picture of the resistors in the primary side
I have same amps but 3 resistors are burned down i don't know which is those resistors
manoj
April 27, 2021 at 9:00 pm
sir in my atx short circutly resistor burned and black content is flowed in few area and atx is not working do i need to change the resistor??
Albert van Bemmelen
June 23, 2016 at 12:39 am
Good job Yogesh! It is a good thing that the defect semiconductors are normally easily bought on E-Bay or Aliexpress.
Sadly recently however someone on Aliexpress sold me 20 USED SSH 7N90A Mosfets. Of which 8 of them were completely shorted and useless! Why I had sent a complaint to the Seller but his only reaction was "be patient". And this only reply already twice in almost 2 weeks. Strange things are
Albert van Bemmelen
June 23, 2016 at 12:41 am
happening lately in China.....
Anouar
June 23, 2016 at 3:03 am
Great article ,thank you brother Jestine
Jestine Yong
June 23, 2016 at 2:08 pm
Hi Anouar,
You are welcome and special thanks to Yogesh too for contributing the article.
Jestine
Peter Owens
June 23, 2016 at 8:38 am
"I had to connect it to a ATX power supply tester."
Albert what exactly is this, & more to the point where to buy & cost?
Could you have confidently completed this repair without using this tool?
Thanks
Albert van Bemmelen
June 23, 2016 at 2:58 pm
Hi Peter. I do not know what type of Tester Yogesh exactly used. But I have used this one ($6.5 dollar) with an LCD. See: http://nl.aliexpress.com/item/1Pcs-Free-Shipping-Computer-PC-Power-Supply-Tester-Checker-20-24-pin-SATA-HDD-ATX-BTX/32608264895.html?spm=2114.010208.3.19.5DsMTj&ws_ab_test=searchweb201556_0,searchweb201602_1_10037_10017_405_404_507_10032,searchweb201603_1&btsid=116dd132-6c22-43b2-a6b5-d2d956dd2569
I could have tested the Supply also by connecting it to a pc Mainboard, and even by just connecting the powerbutton wire connection and measuring all voltages with a standard Digital Universal Meter. But is easier and quicker with the given ATX LCD Tester. (And you can't blow up any mainboard accidentally either).
suranga bandara, Suranga Electronics
June 23, 2016 at 1:04 pm
Mr- Yogesh Panchal,
Very Good Repair Job. Thanks.
Francis Fernandes, Mumbai, India
June 23, 2016 at 2:39 pm
Mr Suranga,
May I take a little of your time to consult you on a problem I have in a SMPS board of a DVD player. Thank You.
In the SMPS P.S. I came across a 8 pin DIL IC (4 pins + 4 pins) which had blown. The Ic had exploded probably because of overheating. The No. was not fully visible. Only I could read something like 5808. I tried to find this data on the NET but the data was of an LED whereas the IC in the circuit seemed to be a oscillator. Six pins were earthed and only 2 pins were connected to the SMPS transformer so I feel it must be a oscillator. Could you throw some light on this problem. Thanks, very much.
Albert van Bemmelen
June 23, 2016 at 5:02 pm
Hi Franzis Fernandes.
I tried to help you but it looks like your 5808 8-DIL
IC does not exist as being a PWM controller. So I think
that if you use the correct typenumber with first
previous IC nametype Characters. You probably are able
to find its Datasheet In Google. And the correct
replacement chip. Good Luck !
janyves
June 26, 2016 at 8:54 pm
Sir... Great job! I tried to enlarge the pics to see how you connected the 100w lamp test. But my sick phone wouldn't do that(no thanks to @Hp ) for failing to fix my slate 6. I want to see how tha lamp is made to limit current while testing devices. This is my first time seeing the atx power tester.
Paris Azis
June 26, 2016 at 10:51 pm
Good job Yogesh!
Yogesh Panchal
June 27, 2016 at 12:58 am
Janyes,
Just remove the Fuse and connect 100 W Bulb Across fuse in series.
(in place of fuse - after removing the fuse ).
After applying power to equipment
1) if bulb Light up initially bright then goes dim that min there is no short circuit .
2) if bulb Light up Bright and stay Bright that mean there is some short circuit.
Yogesh Panchal
June 27, 2016 at 12:59 am
Thanks to everybody for your comments.
Ulises Aguilar Pazzani
March 14, 2017 at 9:52 am
Mr Panchal great fix Fix
playit
March 18, 2020 at 1:23 am
i am trying to fix mercury 400w psu.i was getting only 5vsb,then i was trying to fix open resistor in R23,i connected through hole 1.5k/0.5w ,it worked but i tried to solder little more for better fix but the pads came off both sides.. so i got frustrated and was carried away ,was trying to bypass some ,i saw smoke coming but couldnt say from where.. so then i came to know one of 4148 diode pair wasnt working,then i bought a new one and fixed it ,now i have put resistor from one end where i get 16v and joined other end to jumper which goes to primary side i guess,at other other side of jumper i get only 0.76v .. by the way.. please reply me anyone..i am so stuck. i dont know if its normal or not ,i should change the h945p 8b3 transistors or the diodes..pls help,thanks