
Packard Bell Easynote TS13 SB 041NL Laptop Repaired
Recently I was asked to repair a Packard Bell Easynote TS13 SB 041NL Laptop.
The computer Mainboard was completely dead, and as often in these cases also was the original Lite-on Power Adapter. And because of it also the Battery Pack was completely empty, as both facts are related. This repair will be a perfect example how to repair almost any computer Mainboard that even doesn’t work with another brand new Adapter attached anymore!
After a new working 19V 3.42A Adapter was attached we first have to measure if the Vin voltage goes into the Mainboard without any problem. But the in-going 19V Vin voltage was reduced to about 0.68V or less, and some Mosfets got extremely hot instantly.
First I replaced both P-channel PQ6 and PQ7 input regulating Mosfets after it turned out they were not working . But still the input voltage collapsed to a measly 0.68V again and nothing worked because of it. And because I measured a shortcut to ground on the mainboard input right after both Mosfets it was no use to replace them again just now.
Obviously there was another reason that still kept the Laptop from powering up. And because it can be a shorting component on the Mainboard, but also can be a shorting Multilayer PCB Mainboard itself, we have to take extreme measurements to find the exact cause.

Both Mosfets PQ6 and 7 normally protect the Laptop and Battery Pack from over-charging, and when they switch off (open Drain-Source connections) Vin is kept from going through. Below page 41 of
the Packard Bell compal_la-6973p service manual that makes it more visible how the protection circuit around PQ6 and PQ7 works. On resembling Mainboard circuits both Mosfets are named PQ7 and PQ8 with other differences too, but overall the way how they operate is the same.

Click to enlarge the schematic
Previous photo shows the Model Label on the Laptop Bottom. And the Power Supply below is what you need in this case to find the problem causing culprit. I used a KPS 3010D adjustable Power Supply for this. That unit easily gives up to 10 Amps that can be set at a voltage of 19V we now need.
I found the Service manual almost identical to that of the Easynote TS13 SB 041NL at these links:
http://www.s-manuals.com/notebook/packard_bell_easynote_ts11
http://www.s-manuals.com/pdf/motherboard/compal/compal_la-6901p_r2.0_schematics.pdf
Below a bigger picture of the Input circuit around PQ6 and PQ7.
As you can see both gates are controlled by PQ8 and PQ13 and other components. Together with the circuit around controller PU1 the Battery gets charged (or not). Depending on the precision current measuring Resistor PR14 (1%) with marking R020 , PU1 checks the going-in-current to the Battery Pack on pins 19 and 20 (labelled CSIN and CSIP).
Next we have to use the presented (or another short circuit proof) Power Supply at a decent high enough current at 19V. And we attach the Plus of our Input supply Voltage right behind both now removed PQ6 and PQ7 mosfets at the right side of PR14 (to prevent also blowing up our measuring
resistor in the process). Of course our input voltage now still collapses but since I had set the current to about 6.5 Amps, something must get hot somewhere on the Mainboard as a result. And because of that short circuit also the original Power Adapter was killed without doubt.
Although the hot spot can be found with a IR Temperature contactless measuring Gun, the spot can be so small that it takes too much time to find it that way. So I tracked all components fast by using my fingers while checking the entire Mainboard. And next photo shows the cause of our dead mainboard AND dead original Power Adapter!
The red circled capacitor had turned into a resistor that got very hot because of our much higher than normal input current. And if we look at our Service manual on page 42 it shows the here very tiny PQ20 and PQ22 Mosfets. We also see that it was the 3.3Volt Mainboard circuit that had a Short circuit in it why nothing worked and also why the Power Adapter previously got defect.
The PU2 controller on that page 42 controlled the 5VALWP output voltage on its right side, and the short circuited 3.3VALWP output voltage on its left. And because both voltages always need to be present, our Laptop kept completely dead for a good reason. The cause was a shorted Capacitor that had turned into a hot 68 degrees Celcius Resistor that also was a visible change into a darker brown color compared to the Capacitor left from it. In below Circuit it shows the Capacitors that all were shorted to ground because of only one bad Capacitor in parallel that stopped the entire Mainboard from working! In another incredible repair I did, it was the Multilayer Board that was the cause of the collapsing Vin Adapter voltage.
So now again it was only a very small component that needed to be replaced at again almost no cost to make this Packard Bell Easynote Laptop Mainboard fixed like a new one! (Not bad for a Mainboard that still costs about 135 Dollar/Euro second hand?).

Click to enlarge the schematic
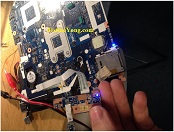
On one of the previous photos both wires attached to the Vin input connector were used to check if the repair was successful before the Board was completely build back in again.
After I replaced the bad tiny Capacitor, and also PQ6 and PQ7 (by a type P-channel 4407 Mosfet), next Photos show that the Laptop finally worked again and that Windows was Back!
I am sure that anyone will benefit from using a Heavy Duty Power Supply the way I did in this repair. It surely will save you much time and frustration. This method helped me very often in the past.
In the way described it saves you the time to having to check every single Capacitor or component.
And since time is money and both are limited, I wish you good luck in your next repair too (although it probably has nothing to do with luck, but only with good science)!!
Until next time. And I hope you enjoyed it as much as I did!
Albert van Bemmelen, Weert, The Netherlands.
Please give a support by clicking on the social buttons below. Your feedback on the post is welcome. Please leave it in the comments.
P.S- If you enjoyed reading this, click here to subscribe to my blog (free subscription). That way, you’ll never miss a post. You can also forward this website link to your friends and colleagues-thanks!
Note: You can read his previous repair article in the below link:
https://jestineyong.com/tda2658-ic-replaced-in-philips-color-monitor/
 (121)Dislikes
 (0)
(0)
38 Comments
Leave a Reply
Cancel reply


Mohamed Sittiq M
November 5, 2016 at 1:06 pm
Excellent repair work
Albert van Bemmelen
November 5, 2016 at 4:12 pm
Thank you Mohamed Sittiq M. My friend Chafik who owns a Shop was happy I could repair his customer's rather new Laptop (2010?). Ordering a new Mainboard would be out of the question because of its high price. And that would have meant no successful repair, no income, and an unsatisfied customer too.
Parasuraman S
November 5, 2016 at 2:07 pm
You always score high because of your proficiency, technical knowledge and skill! A very good article and very useful info!
Albert van Bemmelen
November 5, 2016 at 3:49 pm
Thank you Parasuraman_S for your, as always, very positive replies!
Waleed
November 5, 2016 at 2:25 pm
that is the best way to deal with such shorts. that is the way I do things. congrats on the successful repair and thanks for sharing. have a blessed day
Albert van Bemmelen
November 5, 2016 at 3:59 pm
Thank you Waleed. Indeed our repair methods are mostly based on the same principles repeatedly. And I also used my hands before to trace for a hotspot on one of the Boards in my Tektronix 2440 Memory Oscilloscope repair. Like most of the often simple electronic formulas are always the base of any repair.
And have a blessed day too!
Yogesh Panchal
November 5, 2016 at 3:09 pm
ALbert,
That is what we expect always from you! truly professional approach.
Thanks for sharing.
Albert van Bemmelen
November 5, 2016 at 6:54 pm
Thanks Yogesh, for your good trust!
In Dutch we can say it is good to have "Kennis en Kennissen"
which in English would be as much as having "knowledge and
acquaintances". But the latter in English doesn't sound as
good as it sounds in Dutch. Which is often normally the other
way around in both languages.
Mark
November 5, 2016 at 4:23 pm
Well done Albert!
I like your logical way of following the schematics in your diagnosis. It is the only way to find faults and the reason for their failure.
Albert van Bemmelen
November 5, 2016 at 6:45 pm
Indeed Mark, where would be without any Service Manuals and Schematics.
It saves time and always helps to get a clear view.
Imran
November 5, 2016 at 4:52 pm
First of all thanks for sharing the knowledge and definitely this will increase your knowledge more. secondly thanks for sharing the power supply model and rating as I was very confused that which one i should buy. may be I need you assistance some time in fixing laptops
I am still learning how to fix these small problems.
Gerald Millward
November 5, 2016 at 6:13 pm
Professional job as always Albert.
Albert van Bemmelen
November 5, 2016 at 9:57 pm
Thank you Gerald for your kind reply!
Albert van Bemmelen
November 5, 2016 at 6:42 pm
Thank you Imran. You're welcome to ask me any question
I can help you with. Provided I know the answer. And I
am glad that the article helped you to pick a good
Power Supply. I bought it recently and it already served me well!
Hicham CHAMSI
November 5, 2016 at 6:54 pm
Congratulations Albert,
Really your knowledge in repair field is fully updated.
Good known gsm and computer troubleshooting method,
sincerely i applied it in my welding repair boards,
I don't find ever any difficulty with shorts issues.
Thanks and keep up sharing with us your repair events.
Albert van Bemmelen
November 5, 2016 at 9:42 pm
Thank you Hicham Chamsi. You say you applied this method on your
welding repair boards? Do you mean to say that you often have
Spot Welder Machines that need repair? I just had bought one,
the 709a+ 2 in 1 station, for welding Battery packs, that
I hope will function as soon I have a slow type 16A Automatic Fuse
installed (or a newer one since it already is 32 years old).
My current Weber 16A Fuse doesn't handle high switch-on currents
and blows immediately. At my friends and family this 230V AC
Spot Welder Machine functions splendidly! But now I have to
wait for the housing association to fix the problem.
Hicham CHAMSI
November 6, 2016 at 2:00 am
Besides this, have you got some experience with HP3458A!
I have error message 205, still I make big effort to fix this.
But any help on this HP3458A you are welcome.
Regards
Albert van Bemmelen
November 6, 2016 at 11:17 am
I found this HP manual for your device Here
It says on page 4-10 following: "TEST VALUE OUT OF RANGE" See text.
And most and your HP Device Service Manual can be found HERE
Hope this helps to solve the problem.
Bulent NUR
November 5, 2016 at 7:24 pm
Great job, very complicated!
Albert van Bemmelen
November 5, 2016 at 9:56 pm
Hi Bulent NUR. It only looks complicated because it is in fact
an easy repair! It only requires you to examine the very good
Service Manual for your model Laptop that often can be found
on the Internet. And if you can't find an exact match, it doesn't
really matter cause the working principles of many different Laptops is almost equal.
Only repairing Apple products and their special tiny
micro components like also can be found in Mobile Phones
can be a real problem to fix. Replacement Parts practically
can't be found and if you are able to buy them are almost impossible to solder.
Paris Azis
November 5, 2016 at 10:38 pm
Hi Albert
Correct troubleshooting strategy! Interesting repair case as well.
Albert van Bemmelen
November 6, 2016 at 12:00 am
Thanks Paris. Have you seen what Fantastic things nowadays
can be accomplished with an old Microwave Transformer?
Maybe you've already build such an 'Iron Melter' or
cheap 500 Amps 'Spot Welder'?
I therefore save every used Microwave Transformer I can find.
Only finding the thick enough Copper Wire is still a big problem.
Lad
November 6, 2016 at 5:38 am
Hi Albert,
Excellent repair lecture.Thank you for sharing.
Can you please answer these questions?
It is a very good( yet simple) idea 'something must get hot'
But what if a hot circuit is hot because of another IC that
was damaged and takes a lot of current. E.g. FET transistor
is controlled by an integrated circuit and this integrated
circuit became damaged and as a result it takes a lot of current
that goes through FET too and hence that FET is hot also.
Another example. FPGA circuit is rather hot. Do you thin
it is bad or there is another part around that causes FPGA te be hot?
Is there also a solution for your method?
How did you find out that 6.5A will be good enough( not high or low)
to find out the culprit?
Thank you
Albert van Bemmelen
November 6, 2016 at 10:55 am
To hopefully answer your questions Lad: the 6.5 Amps were just picked.
If it would have not been enough I would have turned it up even higher.
But keeping in mind that some other Mosfet circuits could have been at
their max forward current, it is safer to start lower first.
And normally that kind of current also would have charged the
Li-ion Battery that still wasn't attached while testing for a short circuit.
So it worked. And about other parts becoming rather hot too,
like GPUs or CPUs, it happened that they got hot and didn't work.
There was no video output and/or the laptop was still dead.
In the past it than helped to replace Video Board and/or CPU.
Exchanging the CPU is easy because it is on a socket, and
replacing a GPU chip is best done when it is on a videoboard
(they work on low voltages too like about 1 Volt DC CPUs).
And it happened that a capacitor had turned into an short circuit
on such a videoboard too. But now since these GPU's chips are
integrated on the Mainboard it is harder to replace them by a
new chip (and worse by bga reballing where all 500 or more
solder ball-grid-array contacts need to be renewed too.
Because GPUs are not placed on a Socket like CPUs are.
Hence where the BGA problem resides. Because there are no pins
anymore just solder balls. And short circuits underneath
bga mounted chips are easily made while hotfixing which sometimes
can help to restore bad contacts between bga chip and the Mainboard).
About FPGAs: I am starting to use FPGAs and learning how to program
these in VHDL. And one of my new FPGAs didn't work and also became
rather hot unexpected. It turned out that it probably died while
connecting to a little bit too high voltage (there are 5V DC and
also 3.3V versions. And 3.3V doesn't survive on a 5V level. And
voltages must be between tolerances of around max +0.1V to be safe!).
In conclusion, you can't be sure if a chip or another circuit draws
too much current also. That's why checking all Mainboard supply voltages
(CPU often less than 1V DC, 3.3V, 5V, 12V and Vin Power Adapter)
is a first step to check. Because in the given repair article I in
fact did the same. Too low voltages are a clear indication that a
sub-circuit part does not work because of an error. Any Board voltage
has a large current limiter, which mostly looks like a grey square
coil, and a pullup and pulldown Mosfet circuit. Because any source
voltage will be leveled between the higher input plus pole voltage
and ground very fast by chip control.
A current limiter of for instance 3 Ohm at a source voltage of
3.3V limits the max current to a maximimum of 3.3V/3 Ohm = 1.1A.
But those components almost never go bad. Mainboard Fuses do!
So start checking those too. And don't get confused thinking that
a precision measuring resistor is a current limiter or a fuse either!
There are Fuses on the CFL Background inverters and often in other
circuit parts too. I hope this explanation answers your good question.
Anthony
November 6, 2016 at 4:22 pm
Great detective work there Albert and also your
logical reasoning as to why you investigate the
fault in this manner is very educational and informative!
Visual inspections with a good magnifying glass or
microscope as well as relying on our other 4 human senses
are also very helpful tools in looking for faults in
electronic repair. Thanks for sharing your repair
stories here with us !
Kind Regards
Albert van Bemmelen
November 6, 2016 at 8:17 pm
Thanks Anthony. In fact this way of detecting Short Circuits
I had mentioned already as Posts a couple of times before.
Because I learned this trick at one of my previous jobs at
my former employer 'CoreTek/Laptronic' in my hometown where I
fixed Laptops and other Devices. Mainly by hotfixing mainboard
which in itself wasn't an exiting job at all. Because the
chemical smells weren't healthy and the bga repair success
factor questionable.
And also in a simular repair article where it was the mainboard
itself that shorted Vin coming from the Power Adapter. But this
repair was very recent and a good example how to proceed.
And it at least is way more satisfying than just Hotfixing
mainboards! Repairing mainboards on component level is the
part I really enjoyed at my former work (I had lots of spare
parts laying around on unrepairable older mainboards I could
fix new boards with and I learned a lot because I had some
freedom to learn myself new repair tricks. Like when I figured
out how to reprogram those new SO-8 Serial Flashable Eeprom
chips with corrupted BIOS files in it, to bring back to life
dead mainboards by soldering those chips back after reprogramming!
I even learned lateron in my freetime how to repair Sony Vaio's
that lost their Login password and how to make them Bootup
again by removing the password check. Never a dull moment
in electronics!
Anthony
November 7, 2016 at 2:50 am
Thanks Albert,
sorry about my post it seems some of the words
were chopped off so I hope you could read it ok.
Thanks again for your explanation and how you
were able to devise your fault finding techniques
when you come across these situations. I enjoy
reading your articles very much and look forward
to your next repair story as I always learn a
thing or two from them !
Best Regards
Albert van Bemmelen
November 12, 2016 at 10:24 am
It was caused by the long Link I placed in one of my previous posts that made the Google Chrome browser present a faulty screen. MS IE browser did it right without removing the Reply buttons or cutting off any words and sentences.
Luckily Jestine found the cause of the screen error and fixed it! (The man is a wizard!)
Ulises Aguilar Pazzani
November 7, 2016 at 11:55 am
Mr Bemmelen , great fix Sir,and thks again I
will by a power supply 10 amp
Albert van Bemmelen
November 7, 2016 at 5:45 pm
Glad you liked the repair Ulises!
Mathew Charles Karonga
November 7, 2016 at 11:17 pm
Thanks albert for excellent repair lecture and subsequent
responses to technical questions raised thereafter, I am
still learning how to fix electronics gadgets be informed
that we are benefiting from your articles keep on posting sir
Robert Calk
November 8, 2016 at 3:26 am
Good job, Albert.
Albert van Bemmelen
November 8, 2016 at 2:14 pm
The reply button seems to be gone to be able
to answer new posts, so I hope my reply to
Mathew Charles and you Robert do show up here.
I thank you both for your kind comments. And
hope any new readers do not get disappointed
if I do not answer any new questions after this.
Humberto
November 9, 2016 at 12:21 am
Hi Albert, good method you have used to
repair this laptop. The solution was efficient 100%.
Humberto
November 9, 2016 at 12:47 am
I forget saying in my previous comment
that thanks a lot for mentioning the websites.
Albert van Bemmelen
November 9, 2016 at 3:16 pm
Thanks Humberto. I keep every new website
link I find in a File that helps me if
I want to search for a subject I need later on.
Albert van Bemmelen
November 9, 2016 at 7:46 pm
Thank you for your kind reply Mathew Charles
Karonga. (I do not see any reply buttons so
my reply follows here instead after yours).
Yes, after most articles I try to be as
informative as possible in answering all
questions. I'm glad they are valued!
Ruben
December 31, 2016 at 2:00 pm
very good job, thanks for sharing.