
Servicing Coby LCD TV Monitor

This belongs to one of my colleagues in the hospital. The complaint was that it had shaking lines on the screen and picture could not be viewed. But when I checked the set on my work shop, it was found dead! I opened the set and after cleaning it thoroughly, discharged the main capacitor in the SMPS primary section and checked for any visually detectable faults such as bulgy capacitor, burnt components etc. Could not find any.
Applied power and checked the output voltages and found nil. The fuse was intact and the tank capacitor was getting fully charged with around 305V DC. Discharged the capacitor and checked the primary of the SMPS using my Blue Ring Tester. Only one LED lit indicating that all was not well either in the primary or secondary. Checked all components in the primary and could not find anything wrong. No ESR problems on any of the capacitors! Checked the components in the secondary and found dead short in one place where two Diodes were connected in parallel. (Unfortunately I forgot to take snaps of the boards!) One diode was SB360 and another was SD360. Why two different types were used in the same line parallel beats me!
In this SB360 was dead short, but SD360 was not! Since both these diodes were not available in the market, I used two MUR460 in its place. Since I could not find any other defective components in the secondary, I connected power and switched on. The power on LED lit, but there was no backlight. Switched off and removed the backlight connector and noticed that it had burnt marks! Both the male and female connectors had burnt marks. Just see the pictures below:
So, the reason for the lines seen on the screen came to fore! It was arcing here! Since such connectors were not available in the market, I picked up one old DVD connector male and female. Marked the colours of the wires on the board. Removed the male connector from the board using Hot Blower. Scraped and cleaned the surface. Pasted the three pin DVD male connector in its place and soldered it from behind, leaving the centre pin. Slid out the wires from the burnt female connector, inserted two sleeves and joined the DVD connector ensuring that the wires go to the correct slots. It was a perfect fit! Slid the sleeves properly over the solder joints and fixed it in place with insulation tape.
Connected the power and switched on. Bingo! The display came on!
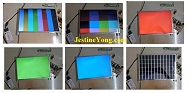
I used my VGA Tester (Recently added to my tools from Aliexpress) and tested the monitor for all its functions:
Up to this stage, I was checking the set by connecting the boards keeping it on my table, with a sheet between the mother board and the panel, and keeping the power supply and control switches on the sides.
Disconnected the power and dismantled the boards and panel and started reassembly.
Connected to power after completion and found it to be working perfectly fine. So, connected a video input from my set top box (for a change, as you all might have got bored with my Sherlock Holmes videos – LOL):
Added the SD360 to my collections and gave only the shorted SB360 to the customer:
Another job completed satisfactorily without my usual ‘going around the world’ experiences!
This article was prepared for you by Parasuraman Subramanian from India. He is 68 years old and has more than 30 years’ experience in handling antique equipment like Valve Radio, Amps, Reel Tape Recorders and currently studying latest tech-classes conducted by Kerala State Electronics Technicians’ Association. He has done graduation in BBA degree, private diploma in Radio Engineering and retired as MD of a USA company. Presently working as Consultant to Hospital and other institutions.
Please give a support by clicking on the social buttons below. Your feedback on the post is welcome. Please leave it in the comments.
P.S-If you enjoyed reading this, click here to subscribe to my blog (free subscription). That way, you’ll never miss a post. You can also forward this website link to your friends and colleagues-thanks!
You may check on his previous repair article below:
https://jestineyong.com/servicing-two-valve-radios/
 (76)Dislikes
 (0)
(0)
7 Comments
Leave a Reply
Cancel reply


Henrique Jorge Guimarães Ulbrich
December 26, 2017 at 11:36 pm
Very good, Parasuraman!
James Jackson
December 27, 2017 at 4:34 pm
Good job, have seen several of those same sb360 diodes bad last couple of years
Suranga Electronics
December 27, 2017 at 12:01 am
Nice Repair Mr. parasuraman.
Thanks..
R Murali
December 27, 2017 at 12:02 am
Great.Thank you, Sir for sharing the technical valuable inputs
Albert
December 27, 2017 at 10:04 am
Nice repair and interesting VGA tester Parasuraman. Could com in very handy if the price is right. I already own one simple DIY vga tester with 16 test modes build around an at 12MHz overclocked PIC 16F84 circuit. And since vga connectors become scarse because HDMi takes over, my next screen tester must have that signal output connection too.
Robert Calk
December 27, 2017 at 6:44 pm
Good job, Parasuraman.
Ramehskumar M Solanki
January 12, 2018 at 7:50 pm
Good job, Parasuraman Sir.