
VA6520 Infrared Thermometer Repaired
Several years ago, I asked one of my students to replace the battery in the Infraredthermometer. He came back to me and said he had broken the wire on the circuit board to the 9 volt battery connector. That was understandable as the wires are very weak and thin. I asked him to solder the wire back onto the circuit board and that’s where it all went wrong. Although he had been trained, he just continued to heat the board until he seemed to melt everything in sight. Needless to say I was not particularly happy! We had a quick look and it was decided that since it was a cheap unit, we would just buy another one.

In the meantime, he had broken another wire of the sensor.
So this article is not about finding that elusive fault and after careful testing and diagnosis is found and repair carried out.
This article is about having a look at what others have done before you start your testing/diagnosis/repair and finally retest. It is easy to go in guns blazing (I have done it myself) and do things that are either unnecessary or wrong, because someone else has had a go at it before it has been handed over to you.
In this case, as I said, wires had been broken off and attempted to be resoldered.
I must say, the initial fault was not the responsibility of the student. Before I got the thermometerup and running, I had to solder the wires several times, because they are so weak. At this stage I haven’t replaced them with more durable ones, as I just wanted to see if I could get it to work again. That will be a job for another day……
So, I set up the thermometer on my circuit board holder (kindly made for me by a friend using a 3-D printer). I then was ready to solder the remaining wire back on to the circuit board. Something just didn’t seem right. At that point, I just couldn’t put my finger on it, but something just didn’t look right! So I had a close look – I put it under my LED magnifying light.

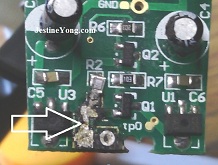
You can’t really see it in the photo as I had unsoldered the wires at this point and as you can see he did some damage with too much heat.
Where I have circled it is where the red wire had been soldered. It just didn’t look right. Then it dawned on me that when he had finally managed to solder one wire back on, it was in the wrong place! If you look at the top of the circle there is a minus sign and that is what caught my eye. So, I checked for continuity between the hole at the left of the circle and the positive of the capacitor. You guessed it, the positive was on the left and not where he had soldered it.
I then looked at the R2 resistor and thought that it had moved when he soldered the wire back on, but looking closer, I believe that this was done by rough manufacturing. I have not done any reflow work with SMD components before, so I am working in ‘baby steps’.
I checked for continuity between R2 and the positive terminal and tried to move it and it seemed to have a good connection. That will be a job for another day……
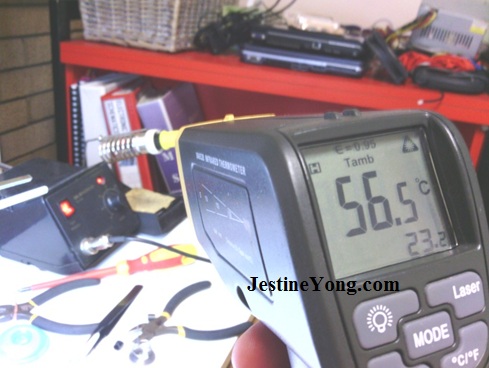
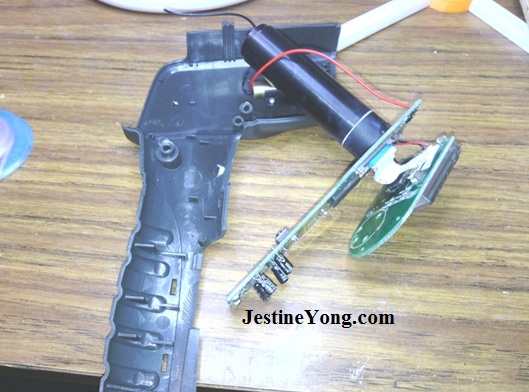
So after soldering wires in the correct direction and soldering the other broken wire back onto the sensor, I reassembling the unit and was able to get it going again. I tested it on my soldering iron and got a fairly accurate result.
I guess the moral to my very long-winded story is that we don’t assume things. Being in the Automotive trade for many years has taught me that. Everyone wants to have a play with their car before they hand it over to you because they can’t fix it. It can happen in any trade. Don’t assume anything. Communication with your customer can save you lots of time and effort. Don’t be afraid to ask questions and make sure you ask the right questions.
- When did you notice that it wasn’t working?
- Did something happen before this stopped working?
- How long has this been a problem?
- Has someone else had a look at it before you brought it to me?
- How much money do you want to spend on this before I stop?
Diagnosis it the most important step in the repair process. If we keep studying, learning from others that have a good knowledge and are willing to share, such as Jestine’s site and be willing to share our accomplishments with others (both the successes and failures), we can be successful in our chosen field or hobby.
Our curious minds keep our lives interesting!

This article was prepared for you by Mark Rabone from Australia.
Please give a support by clicking on the social buttons below. Your feedback on the post is welcome. Please leave it in the comments.
P.S- Do you know of any your friends who would benefit from this content that you are reading now? If so, forward this website to your friends or you can invite your friends to subscribe to my newsletter for free in this Link.
You may check out his previous article below:
http://www.jestineyong.com/pioneer-sm-700-amplifier-repair/
 (111)Dislikes(0)
 (4)Dislikes
 (0)
(0)


