
3D Printer Repaired

A workmate of mine teaches 3D printing courses. In the classroom he has 3 set up for use with the students. At home he has 2 for personal use and has been able to make components for sale on the internet, including difficult to find model train parts.
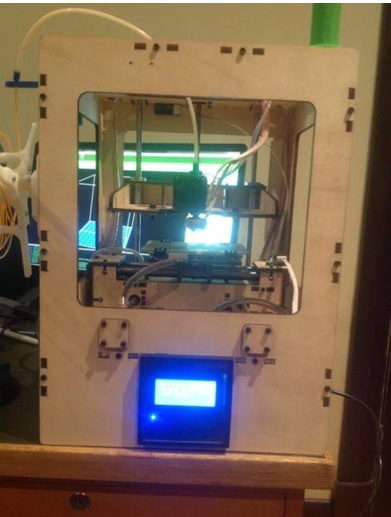
His Thing-O-Matic 3D printer was not printing correctly. This system uses a computer aided program to move a board and the printer head itself in all axes (x, y, and z axis), therefore allowing 3D printing to take place. Also the plate itself has a heating element fitted, so that the plastic will stick to the plate and not move during the process.
The printer has a maintenance test that you can run to help diagnose faults. I was able to run the program and found that all axes were working correctly. My workmate stated that often the project would start to lift during the printing process. Therefore, I focused my attention on the heating element on the board.
Part of the maintenance programming is running a current test to the board. A request can be entered and then a recorded temperature is taken. I noticed that the current request did not match the actual produced current.
Fortunately, I was able to easily access a schematic and the wiring was quite simple.
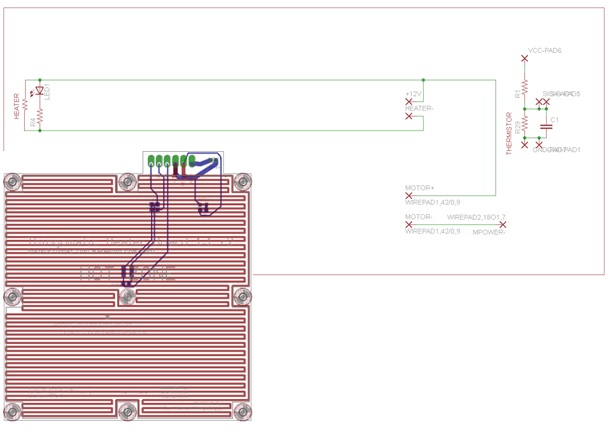
The heater circuit was basic and only consisted of a thermistor, a resistor and an LED. After checking for voltage at the heater, I only measured 4 Volts and not the required 12 Volts. After tracing the circuit back to the connector, the problem became obvious. The wiring had been stretched and as a result, the wiring had broken internally, but allowing the protective plastic to remain intact.
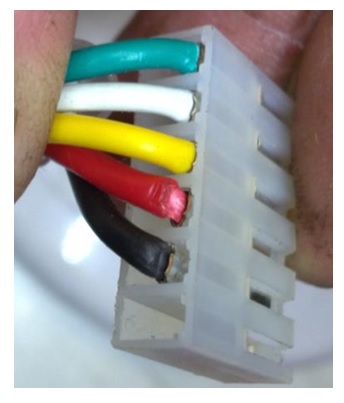
After closer inspection, I noted that both the positive and earth wires had suffered damage. I repaired these wires and made sure the terminals were correctly retained in the connector. I ran the maintenance program and now saw the measured current match the requested current. My workmate was happy to have his 3D printer up and running once again.

To show his appreciation for the repair to his printer, he made this circuit board holder for me. It has been invaluable when soldering small boards with SMD components, which I used recently in a Plasma TV repair.
So, I had the opportunity to carry out an electronics repair, make a workmate happy again and get a circuit board holder made for me as well. All things considered, I think this was a very favorable repair!

This article was prepared for you by Mark Rabone from Australia.
Please give a support by clicking on the social buttons below. Your feedback on the post is welcome. Please leave it in the comments.
P.S- Do you know of any your friends who would benefit from this content that you are reading now? If so, forward this website to your friends or you can invite your friends to subscribe to my newsletter for free in this Link.
Note: You can check out his previous repair article below:
https://www.jestineyong.com/plasma-tv-recycled-for-education/
 (115)Dislikes
 (0)
(0)
9 Comments
Leave a Reply
Cancel reply


Bernie Scott
October 7, 2015 at 9:05 pm
Good job...I like that board holder....I was going to buy one but now, after seeing this I can probably make an adjustable one similar to yours...
Cheers....
Albert van Bemmelen
October 7, 2015 at 11:34 pm
Your Workmate was very grateful that you could fix his Thing-O-Matic 3D printer. And he was so happy that he was being able to create something with his 3D printer afterwards for you. That's what I call a win-win situation. And thanks for the schematic Mark.
aziz
October 8, 2015 at 12:00 am
Thank you very much for 3D printer
Paris Azis
October 8, 2015 at 12:05 am
Good Job Mark.
Best Regards
Robert Calk
October 8, 2015 at 2:12 am
Nice job, Mark. I've been thinking about getting myself a 3D Printer.
Albert van Bemmelen
October 10, 2015 at 9:21 pm
Hi Robert, I have a manual operated 3D machine at home already, being a cheap hotmelt glueing pistol. So I was thinking of buying a CNC machine to be able in producing pcb electronic boards. A 3D machine is nice to build puppets and stuff but can't normally make pcb's. But there are machines from a certain firm that can do both because of the detachable Head.
Edd Whatley
October 8, 2015 at 3:58 pm
GOOD SHOW!. . .and even on a new age product that most service persons normally would not be associating with . . .as of yet.
But in now having viewed the wiring (the end RED and Black) their appearance, particularly the RED one suggest of overheating to melt the insulation to some degree.
Any chance that you know/knew the current/wattage being pulled by the heater unit.
And could it be on up in the HIGHER amps, such that poor connectivity to that crimp connector might have lead to progressive oxidation of the connection, with progressively less contact area such that it created enough heat to cause some melting of the insulation around it and an eventual open connection.
After some operation time with heater activated, do those wires exhibit any heating when touched with a finger ?
In a LOOOOONG time condition like this, the Delrin/nylon/plastic insulator takes on a discoloration, which yours is not showing.
That massive board holder and its solidity and its appearance seems to be a product of his using quite a bit of his time machining it from stock , and NOT being a 3-D printing task.
Edd
Mark
October 9, 2015 at 5:18 am
Thanks for your comment Edd. I seems that the Red and Black wires were stretched causing the broken wiring. There was no indication of poor continuity causing arcing and eventual break down. It appears more of a mechanical damage than a electrical fault. This unit has been operating for over 2 years now without any failure (I only found this article I started writing the other day) and so I feel that it is a successful repair.
He was happy to make a PCB holder for me and there is plenty of free designs out there. I personally chose this one due to its sturdy design and was there during the making process. It has turned out to be a very useful tool.
We have been using and teaching 3D printing at our college for about 4 years now. Replacement parts that have been made that are difficult to access and even a little statue of YODA! 3D printing is definitely the way of the future. You may be interested in the link below on Bioprinting.
http://www.theaustralian.com.au/news/health-science/absolutely-biofabulous-bioprinting-to-regrow-damaged-body-parts/story-e6frg8y6-1226919277874?nk=b608308261a657b438fc17067d33d2d8-1444338822
Australia is one of the world leaders in this area.
Amazing technology!
Thanks again for your comments
Yogesh Panchal
October 8, 2015 at 4:18 pm
Good job Mark and yes congratulations for PCB Holder.