
ACER Desktop Motherboard Repaired

One of my techie colleagues sent me this Computer Motherboard for repair. he is not familiar in component level repair. This article is for them who are familiar about the Computer Hardware and not for newcomers because Computer motherboards are having more complicated things to learn and it is not possible to cover all things in short. But you will definitely learn the process of troubleshoot and testing method which is applicable to any electronics repair.
Symptom: Problem stated by the technician, when power up the motherboard CPU Fan is just spins & stops in few seconds No POST beeps. On visual inspection all seems OK no physical damage.
Commonly this problem is related to VRM Section which supplies V-core Voltage to CPU for working. So removed the CPU FAN & checked CPU for heating generally it is getting hot around 40°C on normal working. When motherboard is ON touching by the finger on it you will feel Heat on CPU. But in this case CPU is not getting hot that indicates CPU is not getting proper voltages to work or CPU itself is BAD. So decide to do some Voltage testing. First checked PS-ON Green wire voltage for 3.3v.

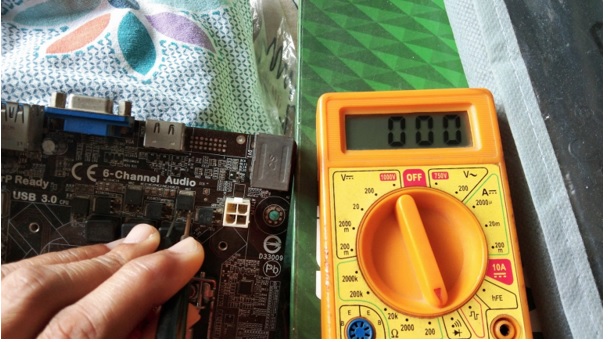
Voltage is OK that means motherboard powering On Voltage section is OK. Now on other side checked for 12V on ATX 4-pin supply for V-core, here I found No Voltage.

I removed this connector and checked for 12V on connector.

After removing the connector I am getting 12V on the connector now this is the culprit area of VRM Section. Because of some component is Short circuit in this area. For reconfirming of short circuit I re plugged the cable back into the socket it is showing same symptom. In case of short circuit it is always advisable to check the circuit on cold testing by multimeter.
NOTE: Remove CPU,CPU FAN,RAM, CMOS Battery & any Connector connected on the board before starting cold testing on the motherboard or it will lead you false reading/result on testing by multimeter beep mode because each & every IC is having Loop back of some signals to each other.
So first checked 12V Socket for internally shorting and yes all four pins showing internally short here two pins on notch side are 12V & opposite two pins is Ground. Now I have to check each Mosfet which are installed in Main Mosfet & Supporting Mosfet sequence in three phases.

On testing VRM area each & every components showing short circuit. I.e. Here Mosfet showing full short Gate to source.
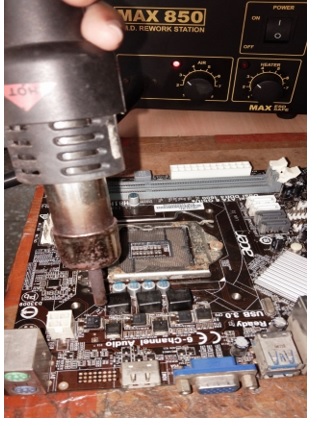
Now we have to check each & every components out of the Motherboard & find out which component is causing the problem. For this type of symptom main culprit is either Mosfet or VRM IC. So with Help of Hot air station I managed to remove first main Mosfet.
After removing the Mosfet I have checked for the shorting on trace Pad from where this Mosfet was removed.

And now Gate to Source shorting is gone. Also checked all other MosFet now none of them are showing shorting. If after removing the Mosfet still I am getting beep on this trace that means still some other components also shorted.
Arranged the working Mosfet from my junk box & replaced.

Now reassembled the board for testing by putting back CPU, CPU FAN /RAM & CMOS Battery. Now CPU fan is spinning continuously and got single beep of Life. Of course POST BEEP and Motherboard is now working.

This article was prepared for you by Yogesh Panchal who works as a Computer Hardware Engineer in Mumbai India.
P.S- Do you know of any your friends who would benefit from this content that you are reading now? If so, forward this website to your friends or you can invite your friends to subscribe to my newsletter for free in this Link.
Note: You can check his previous repair articles on JBL Cinema SB150 Wireless Bluetooth Soundbar Repaired
 (83)Dislikes
 (0)
(0)
14 Comments
Leave a Reply
Cancel reply


Albert van Bemmelen
April 2, 2022 at 1:46 pm
Very nicely detailed article with excellent mainboard repair instructions! That I'm sure even a beginner will understand!
Yogesh Panchal
April 4, 2022 at 1:50 pm
Thanks!Albert,
In fact process of troubleshooting is same in all electronics device. but now a days companies are putting their full efforts by making their products Complicated and non repairable.
Parasuraman S
April 2, 2022 at 3:26 pm
This is a very good professional fix. Only experts like you can handle such jobs! I keep always away from computer board servicing!
Yogesh Panchal
April 4, 2022 at 1:59 pm
Thank you! Sir,
Most important thing for this type of motherboards you have to keep some old non working motherboards with you for parts.
Paris Azis
April 2, 2022 at 3:29 pm
Good job, Yogesh. This type of failure is one of the most complicated to troubleshoot, because of the very low resistances involved in this circuit and the fact that the three buck converters are connected in parallel. This practically means that if (for example, in reference to your schematic) the low side mosfet of the second converter is shorted to ground (D to S), then this short reflects to the rest two converters, due to their parallel output connection. Taking into account the very low resistances involved, spotting the culprit is really a difficult task...
Yogesh Panchal
April 4, 2022 at 2:12 pm
Thanks!Paris
You are Right all three phases behave the same & troubleshooting is also time consuming because all components in the circuit is showing short to ground and you have to remove each component and test the component as well trace pads for reconfirming the short till you find the culprit.most tedious job is laptop motherboard where they put at least 10 to 15 tiny capacitors on O/p Circuit. if one bypass capacitor is shorted to ground all capacitors behave the same.
Babu M S
April 2, 2022 at 10:57 pm
Very good repair work.I never touched computer mother board.Since lack of knowledge of the said board.Thank you very much for your detailed article.
Yogesh Panchal
April 4, 2022 at 2:18 pm
Thank You! Babu M S.
All new technology is designed to works on this principles.the thing is to keep update our self if we are in Repair field.
Anwar Shiekh
April 3, 2022 at 4:44 am
40°C is body temperature, perhaps you meant 140°C
Yogesh Panchal
April 4, 2022 at 2:29 pm
Anwar Shiekh
In normal working condition Intel CPU will heat up between 40° to 60° & in AMD CPU Normal range is Between 75° to 95°.
Mark
April 3, 2022 at 11:06 am
Well done Yogesh
Yogesh Panchal
April 4, 2022 at 2:29 pm
Thanks!mark
Waleed Rishmawi
April 4, 2022 at 3:50 pm
very nice detective work and good repair instruction. I always repair laptops but not attempted to do a desk top but next time I have one for repair, I will do my best. thanks man and have a blessed day
Yogesh Panchal
April 4, 2022 at 10:55 pm
Thanks! Waleed,
all the best...........