
DIY: Samsung Tablet Repair Tips That You Should Not Miss!
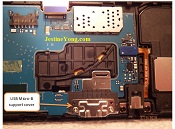

This is a Samsung Galaxy Tab A SM-T350 8 inch tablet that the children play with. The problems with it were that it was not charging, and the digitizer was loose. My sister bought a new battery for it believing that the battery was the problem. I put the new battery into it, but the reason it was not charging is because the charge-adapter port was damaged. It uses the ubiquitous USB Micro-B.
In the past, replacing these Micro-B ports was a pain in the neck for me! I used my soldering iron, hot-air rework station and everything but a hammer, and would sometimes nearly burn the motherboards up – I did burn the first one up. Using Chip-Quik (CQ) should make removing the damaged charge port much easier with less heat transferred to the motherboard. Below are a few photos of the inside.
In the previous photos I have the motherboard removed. I put plenty of flux around the charge port and melted the CQ all around it (Bend the CQ real slow or it will snap). You need to make sure that the tiny leads have plenty of CQ on them or you might damage the SMD pads while removing the charge port. You could cut the pins with a sharp razor blade first just to be on the safe side if you wish. *If you are doing your own repairs, then be sure to use hand and eye protection*
The charge port was removed very nicely – the quickest and easiest time I have ever spent on removing one, and the only way I will ever do the job from now on if I have anything to say about it. The CQ is kind of expensive, but worth every penny as far as I’m concerned. *(Be sure to wick away the CQ from the board!)*
I couldn’t get the old solder out of the two tiny pin holes in the above photo to save my life! I tried everything I could think of. So I gave up and just drilled them out with a tiny drill bit about 0.40mm OD in my Dremel 7700.
I installed the new charge port with my rework station, but my solder paste was too old and really made a mess of things! I had to use some more CQ to remove it again. I didn’t check the solder paste before using it, which was a big mistake! I even had to use some sandpaper to get some of the old paste off. I didn’t use sandpaper on the tiny pads much because I was afraid I might pull some of them up. The tiny pads cleaned up good enough for the pins to lay pretty flat but they looked terrible. Luckily after all that mess the board and charge port was not ruined, but it made my work look shabby as you can see in the above photo. Yuck!!
In the next photo I show both sides of the new (messy) charge port soldered onto the motherboard. I used my Hakko soldering iron this time after removing all of the CQ and tinning the pads with good leaded solder. It doesn’t look as good as it should but it is soldered well. I learned some valuable lessons on this repair. The next charge-adapter port that I replace will look much better. Now it’s time to start on the digitizer.
In the above photo I have the 3M 300LSE 9495LE double-sided tape installed onto the digitizer. I bought two rolls of the tape; one 10mm wide, and the other one 2mm wide. After cleaning the inside of the digitizer very well, I peeled off the paper and installed it onto the tablet. I forgot to heat the tape up first before installing the digitizer so I hope I don’t have to reapply it. But I have plenty of the tape if I need to reapply it. And the more I do it the better I will get at it.
In the next photo everything is back together and the tablet looks good. And more importantly, it is charging nicely!
**Side note: If you don’t like wearing pants at the bench like me, then cover your legs with a towel or something when using the Chip-Quik because it will ball up and roll off of the motherboard easily. Luckily, it cools quickly on skin and won’t burn too bad, but it will wake you up fast! lol! After applying the CQ, you can heat it up to remove the charge port with your iron or hot-air, it’s up to you. And as I mentioned before, be sure to wick away all of the CQ before soldering the new charge port onto the board or it will lower the melting point of your solder **
I hope yall enjoyed this article. Until next time, have fun fixing electronics devices!
Robert Calk is a hobbyist from the USA who loves Electronics, Leatherworking, and Watchmaking.
Please leave any comments you have below. Thanks.
P.S- Do you know of any your friends who would benefit from this content that you are reading now? If so, forward this website to your friends or you can invite your friends to subscribe to my newsletter for free in this Link.
Please check out his previous repair article below:
https://jestineyong.com/sensio-bella-blender-repair/
 (87)Dislikes
 (0)
(0)
23 Comments
Leave a Reply
Cancel reply


Parasuraman
April 6, 2018 at 12:32 pm
Oh! What a thing to do and what all one can do; a lot of stuff to learn! Many thanks for sharing!
Robert Calk
April 6, 2018 at 2:01 pm
Thanks Parasuraman. You would think that after learning electronics for several years now I would know better. But we can never forget Murphy's Law. And I should know better than "assume" anything. Had I checked the paste first( would have taken 30 seconds...) I could have saved myself some time and grief.
Charles
April 6, 2018 at 1:11 pm
Thanks Robbie have two samsung Tabs on my desk awaiting repairs with charging problem was a bit hesitant to start working on them, so your article came at the right time and gave me much confidence wil follow your method and will be very carefull not to overheat the pcb and avoid messing up
Robert Calk
April 6, 2018 at 2:10 pm
Good to hear Charles. The Chip-Quik has a low melting point and stays molten pretty good. It can help if you solder a little bit of leaded solder onto the charge adapter ( that I forgot to mention in the article) before you solder the CQ on it. Even after my mess-ups you can see in the photos that the MB still looks like new. You should have no problem.
Albert van Bemmelen
April 6, 2018 at 3:29 pm
You are a real pro in replacing micro parts Robert! And in the meanwhile you make the best advertisement that Chip-Quik possibly could get.
Although I never used Chip-Quik myself I always managed to successfully replace bad broken micro USB ports without it. And it is very expensive why apparently for instance Aliexpress doesn't sell it?
But I found this article about a much cheaper product with almost the same characteristics. But the link to that product on eBay sadly didn't exist anymore. It was very interesting and also mentioned that Chipquik melts at 136 deg F ((58 deg C). The article can be found on http://eab.abime.net/showthread.php?t=66541 .
Maybe someone is able to find what much cheaper product they were talking about?
Robert Calk
April 6, 2018 at 5:28 pm
Hi Albert,
Do you mean this "Fast Chip"?
https://www.amazon.com/FAST-CHIP-Removal-Rework-Lengths/dp/B00OOBIJ6I/ref=sr_1_1_sspa?ie=UTF8&qid=1523006731&sr=8-1-spons&keywords=fast+chip+kit+for+quick+smd+removal&psc=1
It's cheaper than Chip-Quik but I'm not sure how well it works. I'll have to give it a try. I doubt that I will get any free CQ from the advertisement. It just makes life easier.
Albert van Bemmelen
April 7, 2018 at 3:10 am
I never heard about Fast-chip. In the article I read about Rose's metal and about Virgin-Ammaloy or something similar. Rose's metal was sold on eBay but it was sold out now. But I read that it was made in the USA and send from France?
Robert Calk
April 8, 2018 at 9:57 pm
It seems like there are many different kinds of low melt solder out now. Competition always helps to bring the price down. Soon it will cheap enough that everybody will be using it because it makes the job of removing IC's and connectors so much easier and cleaner with less heat transferred to the motherboards.
Yogesh Panchal
April 6, 2018 at 3:39 pm
Good job! sir,
Chip-Quick is bit expensive and sir how about Hot air workstation using for this job.
Robert Calk
April 6, 2018 at 5:30 pm
You can use hot-air. I used my soldering iron.
Mark
April 6, 2018 at 8:45 pm
Hey Robert,
Good job with a very fiddly repair. I have recently done a similar repair on a Samsung Galaxy Tab 4 10.1. Lots of patience needed and a steady hand.
Congrats on your successful repair!
Robert Calk
April 6, 2018 at 10:55 pm
Thanks Mark. And if we were not born with patience, we need to have discipline.
Mason Sarles
April 6, 2018 at 9:38 pm
Robert,
Thank you for your experience and the free lessons in Electronics. I do mostly vintage tube stuff and am slowly doing more with SMD. I love this site and thank you to all who contribute.
Mason
Texas
Robert Calk
April 6, 2018 at 11:01 pm
Thanks Mason. I also live in Texas. I love this site as well. You are welcome. And we need to thank Mr. Yong for having a place where we can share articles and learn from one another.
Suranga Electronics
April 7, 2018 at 1:17 am
Hi.Mr.Robert,
Very Good Services Tip.
Thanks.!!
Robert Calk
April 7, 2018 at 9:20 am
Thanks Suranga. I'm glad that you enjoyed it.
Anthony
April 7, 2018 at 6:17 pm
Very good interesting article Robert ! You're very skilled at those tiny fiddly repairs that most
techs would not be confident in carrying out ! Keep your interesting articles coming please!
Cheers and Kind Regards
Robert Calk
April 8, 2018 at 3:48 am
Thanks Anthony. I'm more skilled now than before I made that repair for sure. I also had to redo the digitizer. I didn't know to use primer before applying the tape for the digitizer. My primer will get here next week in case the tape doesn't hold this time.
Robert Calk
April 10, 2018 at 11:05 am
I also used a press to help seal the tape better this second time. According to the information that I've found, you can stack about 5 heavy books on top of the tablet or phone to use as a press to help bond the sticky-tape. There are press's available that also use heat that claim to bond the sticky-tape in minutes.
I used my press that I bought for making leather/Kydex sheaths and holsters. It is made of 1/4 inch plate steel with heat resistant foam pads, but no heat.
I just checked the tablet and it's getting loose at the corners a little bit. So here in the next few days, I'll reapply the tape for the third time using the prep that came in the mail today. Then I will put it in my press for a few hours and see how that does.
I might change my mind and just trash this 3M tape and go with something else because I cleaned the surfaces spotless and I'm thinking now that the problem is with the tape itself.
moshe jacobson
April 10, 2018 at 5:06 am
Hi Robert
Now that was one fine article & repair job you did!
As a hobbyist one lives & learns a lot, but don't get to do the same type of repair often enough for it to become 2nd nature.
As a matter of curiosity, what microscope is that in your photo?
Robert Calk
April 10, 2018 at 8:52 pm
Thanks Moshe. That is very true and one of the drawbacks of being a hobbyist. Making mistakes is one way of doing a job enough to learn more. lol
My microscope is an AmScope 3.5X-180X Trinocular Stereo Microscope with 144-LED Ring Light and 3MP Camera. It is pretty good, but when you use the camera it blocks the left eyepiece. I didn't know much about scopes when I bought it or I would have paid a little more and got one that is a true Trinocular. But it does the job ok.
Humberto
April 11, 2018 at 2:52 am
Hi Robert, you have done a professional job. Congrats.
Robert Calk
April 11, 2018 at 10:04 pm
Thanks Humberto.