
Examining And Testing A Small Universal FDC To USB Adapter
A few months ago I bought a very small but almost complete 26 pins Floppy Disk to USB Controller interface (FDC to USB). It was originally designed to work with a 26 pin flatcable floppy drive. And the small adapter interface board had only the Vcc (5V), D- , D+ (data) and GND (0V) on the USB 4-wire cable connector marked. All other 26 flat cable connector pins were unmarked. And only 13 of the connector connections were separately placed with solder pads for the intended interface connections. Which were pins 2,4,6… up to last pin 26. The 13 uneven other side connector pins 1,3,5… up to pin 25 are connected to +5V or to ground, or unconnected, and are of no concern to us to determine the active interface wire functions.
No instructions were included at all. And the only 26 pins floppy drive I had was sadly wider than the 26 pin flat cable connector that was used on the FDC adapter interface. And soon after I got the ordered adapter, I got 6 more from a friend who noticed they were incompatible with the standard 34 pins FDD connectors. And he also had no idea how to use them with a standard 34 pin FDD.
Next screen copy shows this UF001F interface board on a website that showed a very high over-priced example of this board.

Although this small interface design with the tiny 28 pins CMOS controller chip is a real miracle that is worth good money, for above price they could almost include a matching Floppy Disk Drive!
Previous photo showed the 13 even connector pin pads that are the real active interface connections. After examining many photos of other 34 pin to 26 pin interfaces I found out that the first pin on the right of the 26 pin connector is pin 1. Which makes the first pad on the right pin 2 etc.
So still without instructions on how to exactly connect this masterpiece of an interface to a standard 34 pins FDD is a problem. And because that information was not yet published I just started testing this FDC with one of my 3.5 inch FDD’s. Below photo shows how I connected a pin to all pads on which I then easily could plug on the Arduino style Female to Male wires to make connections to a standard 34 pin Flat cable. Next photo shows all connections I made after I was finished.
The 4 wire usb cable connected with red wire to +5V, black to GND. And white to D- (right next +5V), green to D+ (right next to GND).
And if we only use the even pin inputs on our 34 pin cable (which we’ll know when we measure the uneven connector pin side 1-33 that all are only connected to ground) we can find the right pins for our interface configuration. Of course I also found several 26p to 34p circuits too but they all were wrong in pin numbering and because none of them did really function! A Yamaha interface had the 26p pin numbers the wrong way numbered, and none of the circuits in the tests worked because pin 10 DRIVE SELECT 0 on the 34p connector never worked. And after more tests I finally found that only pin 4 DRVSEL of the 26p connector to the 34p connector pin 12 DRVSEL1 worked!
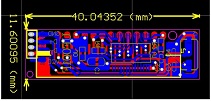
Above pcb design was the only thing that one of the sellers shared on information. What 28 pins smd chip is used still remains a secret!
Next photo shows all pin functions of the small interface board after I knew that the interface worked by successfully reading and writing floppy disks on several different 3.5” drives. Plus it shows the label of the first 34 pin FDD that worked. A Sony drive. Of course provide your FD drive with its own usual 4 pins power supply (so don’t use the 5V from your computer USB connection for it!).
After all connections were made to the standard 34 pin FDD connector, including using pin 12 DRVSEL1 instead of DRVSEL0 pin 10 the only thing that took some time was installing the right FDD driver. As soon as the FDC interface board is plugged into the PC USB port that TEAC 001 driver is almost immediately found. But the FDD driver is next which may require some more runs and maybe a Windows reboot. But if that is done path DRIVE A: is straight added to the desktop file search options. Below follows a short spec list (in Dutch) of this nicely designed FDD USB interface. That for the technical part also explains the 12 MHz circuit speed, current in use, and max operating voltage.
Above photo of one of the now successfully working tested FD drives on the right also shows the pin functions on the even connector pinrow. The odd 1 to 33 ground pins are mostly the bottom row pins of this drive connector when the drive is correctly horizontally placed with the shown side on the photo being the bottom side. Last screenshots show the successfully offline installing of the FDD Windows 7-32bit driver. But I also tested this interface successfully on my Windows 10 laptop.
And in case that your FDD didn’t work on the 34 pin connector selected DRVSELB 12 connection (which in my case was when a direct connected flat cable without twisted wires was used). Then simply try DRVSEL0 pin 10 instead.
I now also will mention all 34 pin cable connections because other pin configurations were wrong and not the ones I used here. As mentioned before GND for all pins 1,3,5,7, to pin 33.
Pins 4 and 6 N.C., pin 8 Index, pin 10 Drivsel0 (not used in my case), pin 12 Drvsel1 (used),pin 14 N.C., Pin 16 Motor, pin 18 Dir, pin 20 Step, pin 22 Wdata, pin 24 Wgate, pin 26 Track0, pin 28 Wpt, pin 30 Rdata, pin 32 Side1 , pin 34 Ready.
Now that all FDC interface connections are known, installing the Windows driver is probably the only thing that may not instantly work. In that case also try another USB port on your computer that can solve remaining issues. I used one of the 2 USB hubs on my externally to my quad-core PC USB 3.0 port connected Seagate 4TB HDD, which worked perfect in very fast reading and writing with all inserted 3.5 inch floppy disks.
However in case you keep getting the screen message to format the not empty good floppy disk, know that you are almost there with finding the right connections and installed Windows driver. Because I got that annoying error previously too! But in the end managed to get everything working, and now record its success by writing this article!
Albert van Bemmelen, Weert, The Netherlands.
Please give a support by clicking on the social buttons below. Your feedback on the post is welcome. Please leave it in the comments.
P.S- If you enjoyed reading this, click here to subscribe to my blog (free subscription). That way, you’ll never miss a post. You can also forward this website link to your friends and colleagues-thanks!
Note: You can read his previous article on How To Obtain EEprom Bios Firmware
 (47)Dislikes
 (1)
(1)
26 Comments
Leave a Reply


Carlo Alberto Birocco
October 13, 2021 at 6:25 pm
Another beautiful sharing!
Thanks a lot, Albert!
I'm servicing a Yamaha sequencer, that has even a floppy drive damaged!
Your detailed report definitively help me to fix it.
Have a nice day
Carlo Alberto
Albert van Bemmelen
October 13, 2021 at 7:44 pm
Glad to hear that Carlo Alberto! Have a nice day too and let's hope it helps to fix your Yamaha sequencer.
Also know that there is also a second motor control pin on the 34 pin FDC connector that also depends on which of the mentioned DRVSEL pins 10 or 12 that is used. This relates also to the twisted or not twisted 34 pin flatcable connector that is used.
Parasuraman S
October 14, 2021 at 11:12 am
Oh! My God! You always accomplish almost all the impossible! Hat's off!
Albert van Bemmelen
October 14, 2021 at 2:28 pm
Like you I like things to work and I often have a bad day if they don't. Like my Tektronix 2 Channel 300 MHz 500 MS/s Digital Oscilloscope that I this week upgraded by replacing the two original 28 pins 32 year old unsafe mainboard battery backupped 32k SRAM memory chips with FerroMagnetic FM1808 static RAMs. And after that completely re-calibrated the oscilloscope again internally AND now also externally. Without ever having to worry that the scope in time will lose its firmware and also its calibration after the mainboard battery is drained. The same I previously also did for my Tektronix 2465 oscilloscope by replacing the original 24 pins 4464 8k memory chips by FM1608 RAMs.
Albert van Bemmelen
October 14, 2021 at 2:42 pm
PS: Although it is obvious to always connect the ground (gnd) from the small FDC board with the ground (pins 1,3,5 to pin 33) pins of the FD Drive in order to make the Floppy Drive controller circuit to work, it wasn't mentioned in the article but is imperative not to forget this! And for this the pad on the left from FDC pad pin 26 is a suitable groundpin that can be used. (The yellow wire on the left in the photos).
Albert van Bemmelen
October 19, 2021 at 6:34 am
Another thing that I noticed is that not all 3.5 inch FD Drives require both 5V and 12V from a power supply. Some drives only need power from a single external 5V supply. And know that those that also require the 12V extra voltage supplied most likely will make mechanicle noises from the steppermotors that fail to work on the only 5V provided. And as soon both voltages are provided those drives also work splendidly.
Yogesh Panchal
October 14, 2021 at 3:34 pm
Albert,
Thanks! for informative Article.
Albert van Bemmelen
October 14, 2021 at 4:31 pm
No problem Yogesh! As long as the manufacturers and sellers fail in supplying the needed technical information we simply have no other choice than to examine and supply them ourself.
Imoudu Onwumah
October 14, 2021 at 11:37 pm
Thanks for your article,I did enjoy it,however I always avoid laptop & desktop repairs because of their complications.
Albert van Bemmelen
October 16, 2021 at 7:53 pm
You are of course right about that. We sadly most of the time don't have any other choice if we still want to keep using those after they stop working.
Paris Azis
October 15, 2021 at 7:14 pm
Very interesting article,Albert. It will help many repairers I believe. Thank you for sharing it!
Albert van Bemmelen
October 16, 2021 at 7:45 pm
Hi Paris. I hope you still have the time to enjoy a little electronic repair once in a while. And hope that the recent weather disaster with the rains causing heavy flooding in Athens didn't affect you in any way!
Anwar Y Shiekh
October 16, 2021 at 9:48 am
Most impressive (as always), but a USB floppy drive is about $20
Albert van Bemmelen
October 16, 2021 at 7:38 pm
Yes Anwar, USB memory sticks are cheaper too. But in this case it is not about the money but about being able to build and use old(er) hardware with software. And I already had 7 of these small FDC boards without any info so had to find out how to use them. That's why I also build the Amiga Floppy Reader project from Rob from the UK and the ADF Copy hardware from Nick from Germany. And the Retro Component Tester from Stephan from Germany. See these links: https://nickslabor.niteto.de/schaltplan-zur-adf-copy-hardware/
https://www.youtube.com/watch?v=pmBH2EMWn5U
https://8bit-museum.de/sonstiges/hardware-projekte/
And the best part is if every project that is build also immediately works afterwards! And also can be used to test and build new tools with too.
Richard
January 1, 2022 at 12:04 pm
I read your log. Impressive
Can you help me out. I have an old Toshiba laptop, still with MS-Dos 3.30. The external floppy disk is not functional anymore ( needs a new belt, but not available anywhere) so I decided to go all digital. Can you advise me an alternative for this 3.5 FDD with 26 pin connector? I'm looking for a FFD Emulator with flash memory, like the FDD-UDD 26144 from Aliexpress, but it needs a driver (on CD). Do you know the solution?
Albert van Bemmelen
September 29, 2022 at 12:02 am
Sorry for the very late reply. Normally we do not look at older posts of older articles. Maybe this will help replacing your old drive belt?:
https://www.ebay.nl/itm/114303598050
And in case you need an external digital drive maybe this is a good and cheap replacement which normally is a 34 shugart bus interface port?:
And with this adapter board you make the replacement drive 26 pins.
Albert van Bemmelen
September 29, 2022 at 12:21 am
For more info on the 26pin and 34pin interface pin settings see here Richard: https://www.vogons.org/viewtopic.php?t=19074
Albert van Bemmelen
October 6, 2022 at 6:10 am
By-the-way: The 26 pins FDC controller presented in the article was tested working excellent on both Windows 7 computers and on Windows 10 computers. So there would be no real reason why it should not also work on older computer OS systems too. But in case it did not work on your computer you probably may also need to install the correct Windows driver for it. This FDC USB adapter was also found to be of excellent use for easily testing those older 3.5 inch Floppy Disk Drives. Bad drives may look like working well on a standard (ISA slotcard or mainboard chip) floppy controller but definitely will fail on this compact FDC to USB miniboard controller. Those drives are most likely unreliable and therefore to be used for scrap parts only.
Albert van Bemmelen
October 13, 2022 at 2:32 am
PS: The FDC to USB module in this article probably won't work on Windows 3.30 when there simply is no USB port present on those now most likely too old computers. But there are now excellent small IDE to SD card adapter boards available to at least replace those old and heavy internal hdd drives with.
Berkan özdemir (translating to sword,self-iron)
February 13, 2024 at 2:57 pm
Hi i'm the mechanical technical services on embroidery machines i like to biild different new parts or component for the machines and i see the converter secret this pcb works with ft232 smd if i helped i will be happy. I try some convert floppy disk drive to usb in a machine head also machine head is using the windows ce and didnt work with the expensive emulators i mean richpeace,gotek and bita. if i do the correct solution it will be use any machines i guess because my project is connecting via wifi with usb i got some programming feature. Would you like a help me?
Albert van Bemmelen
February 24, 2024 at 12:11 am
If I understand you correctly Berkan, you are trying to get the special embroidery machines working with a floppy disk interface. And your embroidery machine only provides in a ft232 serial interface connection? The FDC floppy shugart bus interface is a multi wire 'protocol' interface and the serial RS232 interface only uses 2 wires RX, TX, plus gnd normally. See for instance here for the Shugart bus FDC interface connections which also differs from the Wifi to USB connection you are trying to get working: https://www.bytedelight.com/?p=1418
Of course this means that you can not get those two different interfaces connected to each other without some intelligent electronic expansion adapter. Likely with some kind of small memory buffer to adapt the two different interface communication speeds. Sadly I have no embroidery machine and neither know how they work to be able to determine if what you want is possible without too high costs. I am however surprised that none of the available Floppy drive emulators you mentioned are of use because if I remember it correctly some do work specially on embroidery machines. Like this one:https://www.amazon.com/fosa-SFR1M44-FU-Embroidery-Converter-Interface/dp/B07K88L86N
If your embroidery machine(s) only provide in a serial bus interface then I guess there is no real use to add a floppy drive anyway, because there is no way to select the files on diskette. And only older (desktop-)computers did have a standard RS232 port and a floppy drive too. Which is no longer a standard.
Albert van Bemmelen
February 24, 2024 at 12:39 am
I understand that Windows CE you also mentioned normally doesn't support rotating media like FDC floppy drives or hard disks. But apparently this SUPER DISK Drive product does, see: http://www.bophoto.com/WinCE/Articles/Floppy.html
Best of luck!
David
June 16, 2025 at 1:06 pm
I bought one of these little things expecting to find a standard floppy drive connector on one side and a standard usb connector on the other side. How wrong was I. I have a few soldering skills but after reading your description I thing I have wasted my time and money. Luckily I didn’t pay much for it. The seller must have trouble shifting them because he threw two in. So I even have a spare.
Maybe if I become a expert one day I’ll have a go at it.
Y. K.
November 12, 2025 at 9:29 pm
Hello! Thanks a lot for providing such an exhaustive report. Could you please tell (if you have checked that), does this controller support 720kb floppies? Useful to copying data to old MSX computers, where floppy drives don't support 1.44mb format.
Albert van Bemmelen
June 10, 2026 at 7:15 pm
Sorry Y.K. I do not have or use any old MSX computer so can't tell you if this module will work in those computers. But I guess that since normally the floppy drive hardware and the used ds or dd dual density floppy automatically selects its correct data format. If so that also should support MSX data floppies. Let me know if it worked.
Paulo Lopes
May 23, 2026 at 5:35 am
Excellent post! It helped me a lot, and I appreciate your time and effort. Sharing information like you did is amazing. Thank you!