
Grundig TV Repair Tips- China Kit and Rejuvenation
This Grundig CRT CTV Model No.T21-3245 belongs to my colleague working in the Hospital. Though he had told me long back, about complaints of bizarre colors, various intermittent problems in the CTV, he had taken it to a nearby repair shop, as per his dad’s advice, as transporting the CTV to my home, which is far away, was considered as a second option. But it failed again with more problems and was brought to me. As usual, I opened the CTV and did a thorough cleaning job. On visual examination, I concluded that the CTV is an Indian make, with Video and some other board fit vertically on the main PCB, a technology prevalent almost about 15 to 20 years back. When I connected the PCB and switched on the CTV, the secondary power supply was present and HV required for anode was also there, though looked very weak. Raster was fully dark, indicating that RGB was not opening.
This problem could be due to (1) Heater voltage not enough (2) Defect in beam control (3) Screen voltage control in LOT (FBT) defective (4) Weak Picture tube. So I followed the methods and tips suggested by Humphrey Kimathi in his book CRT Television Troubleshooting Guide, Chapter 11. More or less, the CRT was suspected. This is a thin neck (narrow neck) tube. In order to check the defects in the PCB, I had to connect it to a Thick Neck CRT lying with me, which I use for testing purposes. So, I took extensions of the CRT socket by connecting wires to a thick neck CRT socket. I marked the Grid, heater and RGB Cathode connectors on the Thick Neck CRT Socket in order not to make a mistake. When I opened the cover of the Focus pin on the CRT socket, I was surprised to see that it was open! See pictures below:

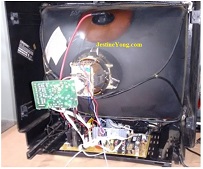
Since I had already done the wiring, I decided to complete the connection. I soldered the Focus wire to the thick CRT Socket, and connected the PCB to my Testing CRT and switched on. Same dark picture. So, I increased the screen voltage and could see the raster vaguely, with a lot of vertical and horizontal dancing lines with bizarre colors, indicating several problems in the PCB, mainly in the video section. Since I knew that working on this old PCB and/or obtaining replacement parts might cost a fortune, I decided to replace the PCB with a readily available China Kit (ES Board) which comes with its own Remote Control and all other required fittings. Here are the pictures of the new PCB :
and that of the old PCB:
Connected the new PCB to the Grundig CRT and found same result of dark raster! Then I knew that the CRT requires rejuvenation. So, removed the PCB, did the CRT rejuvenation as did by me in the past. Please read my previous article https://jestineyong.com/restoration-of-a-samsung-crt-tv-by-rejuvenating-crt/
Reconnected the PCB and switched on the CTV. Adjusted the screen voltage and focus properly. The image was too good for a CRT that has completed almost 15 to 20 years! Please see pictures below:
In order to fit the PCB, we need to do a bit of modifications inside the cabinet. We have to fix the control panel in the front (Please see picture above, where you can see the control panel fit at the bottom front). The AV input connector has to be fixed on the Rear Cover from outside. The connecting wires have enough length for that. The Degaussing coil connectors may have to be removed from its connector and inserted or soldered directly on to the board.
The CRT Earth Wire has to be soldered. The PCB holding brackets may have to be cut or removed to accommodate the PCB. We have to seat the PCB in such a way that it does not obstruct the back cover. Since the two speakers of the CTV were fit on the rear cover, I had to extend the two speaker connectors that come with the new PCB, to reach the rear. Look at what I had to do on the cabinet in order to fix the new PCB:
After all these combinations of carpentry, masonry, smith, mechanical and what not work, I finally fit the PCB in its proper place:
The Thick Red Wire that goes to the anode has to be routed keeping it away from the CRT and we may sometimes have to insert plastic lids, by cutting in to the center!
Fixed the back cover, run the CTV for several hours and as it functioned very well, returned it to the owner. As per a feedback received from him later, the entire family is very happy with its performance! A laborious job completed satisfactorily to save a nicely working Grundig CRT TV, one of my passions!
This article was prepared for you by Parasuraman Subramanian from India. He is 66 years old and has more than 30 years’ experience in handling antiques equipment Valve Radio, Amps, Reel Tape Recorders and currently studying latest techs classes conduct by Kerala State Electronics Technicians’ Association. He was a BBA graduate, retired as MD of a USA company.
Please give a support by clicking on the social buttons below. Your feedback on the post is welcome. Please leave it in the comments.
P.S-If you enjoyed reading this, click here to subscribe to my blog (free subscription). That way, you’ll never miss a post. You can also forward this website link to your friends and colleagues-thanks!
You may check on his previous repair article below:
https://jestineyong.com/no-disc-error-dvd-player/
 (98)Dislikes
 (0)
(0)
12 Comments
Leave a Reply


Albert van Bemmelen
August 20, 2016 at 4:13 am
As soon I read the title of your repair I knew it could only be from one person. Indeed very nice detailed TV CRT picture! Again well done although I not really know what Board or Tools you exactly used to do that. Like the China made Kit ES Board you mentioned? So this repair still is something I myself therefore would not undertake. Too many unclear proceedings remain.
Parasuraman
August 22, 2016 at 10:10 am
I shall address replacement of PCB in another separate article with pictures and DOs & DON'Ts. Kindly wait.
Albert van Bemmelen
August 23, 2016 at 4:47 am
Thank you dear Parasuraman Subramanian. I will, and look forward to that !
suranga bandara, Suranga Electronics
August 20, 2016 at 2:07 pm
Mr- Parasuraman,
Good Repair tip for Old CRT TV Model.
Thanks !
beh
August 20, 2016 at 2:56 pm
Hi Parasuraman Subramanian
thanks for article kindly tell me how much was the total cost
of customer
thanks
regards
behzad rasteen
Parasuraman
August 22, 2016 at 10:03 am
The new board costs Rs.1050. Commercial Technicians charge anything between Rs.2000 to Rs.2500 totally and retain the old board either for salvaging useable parts or sell it to scrap dealers for a price. I charge only Rs.500 to cover my costs, and do return the old board to customer as a principle with an advice to sell it to a scrap dealer. This customer, therefore, got his CRT TV rejuvenated and serviced for Rs.1550 (around US$23).
Gerald
August 20, 2016 at 2:56 pm
Hi Parasuraman,
This is equivalent to a heart transplant, very impressive! Congratulations and thanks for sharing your always fantastic repairs.
Cheers,
GM
Jim, Jimstech
August 20, 2016 at 3:59 pm
Great work.!!! such repair works usually gives us a great pleasure as a technician.
Yogesh Panchal
August 20, 2016 at 10:15 pm
Good work! sir.
mahmoud_tajpour
August 22, 2016 at 4:04 am
Hi Parasuraman I repaired plenty of this kind of TV but you do a great work congratulate to you I wish you are successful I enjoy.
Robert Calk
August 24, 2016 at 5:50 am
Nice job, Parasuraman. Thanks for sharing.
Humberto
August 25, 2016 at 10:48 pm
Hi Parasuraman, you have done a great repair. Congratulations.