
How To Repair And Servicing IBall PC SMPS

This iBall PC Computer SMPS belonging to a technician friend of mine, was given to me very long back for trouble shooting, as it became defective after a lightening attack. As he is focused on servicing only logic boards of Air conditioners, Washing Machines, Microwave Oven, Induction Cookers etc., he did not get time to do it himself. After reading Jestine Yong’s wonderful Book on SMPS servicing, I always enjoyed servicing SMPS of any device and liked the challenge it throws, however tough it might be! After a successful service of another SMPS recently and in a good mood, I decided to give a try on this too, as my memory was fresh with handling this device.
On opening and checking, I noticed that the fuse was shattered in pieces and I quickly disposed it off as glass pieces are always dangerous, if left lying around! After cleaning the inside thoroughly, I brought it to my work table for further investigation. Removed the PCB out, disconnecting the three wires from AC inlet, and the connector of SMPS. Observation and cold tests conducted using Multimeter revealed C1815 Broken, a couple of resistors burnt and broken, 18V Zener shorted, 1.5Ohm Resistor open, Opto-coupler shorted and Mosfet shorted! ESR of 47Mfd/50V was out of safe limits!
Checked Primary of HT Transformer using Blue Ring Tester bought from Jestine Yong long back and found it to be ok. So, replaced all the components carefully. To know the value of burnt resistors, I checked the board of a working iBall SMPS that I had with me and it was 100 ohms and 47 ohms respectively. Luckily the boards were identical! Retouched all the solder joints. Cleaned the PCB thoroughly using IA and brushed any excess flux and/or drops or spills of solder.
Connected a Bulb in place of Fuse and inserted a wire shorting the Green Pin and Black pin in the multi connector, and powered the SMPS on. The SMPS cooling fan purred smoothly, indicating that all is now well with the SMPS. Disconnected power supply, discharged high voltage capacitors and replaced the fuse.
Put the board back into its case and re-soldered the three AC inputs. (Earth, Phase and Neutral in its appropriate pins)
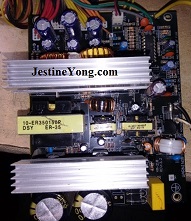
See how a thorough cleaning has made the components as well as the board shining like new! (I really enjoy doing this!)
Checked the SMPS again and it worked well:
Another job completed to my satisfaction. (I am yet to take up a couple of other Power supplies that I had picked up along with the above SMPS).
This article was prepared for you by Parasuraman Subramanian from India. He is 66 years old and has more than 30 years’ experience in handling antiques equipment Valve Radio, Amps, Reel Tape Recorders and currently studying latest techs classes conduct by Kerala State Electronics Technicians’ Association. He was a BBA graduate, retired as MD of a USA company.
Please give a support by clicking on the social buttons below. Your feedback on the post is welcome. Please leave it in the comments.
P.S-If you enjoyed reading this, click here to subscribe to my blog (free subscription). That way, you’ll never miss a post. You can also forward this website link to your friends and colleagues-thanks!
You may check on his previous repair article below:
https://jestineyong.com/servicing-frontech-atx-power-supply/
 (95)Dislikes
 (0)
(0)
11 Comments
Leave a Reply
Cancel reply


suraga Electronics
March 11, 2017 at 5:04 pm
Very good Power
Supply Repair Mr- Parasuraman,
Thanks for informative.
Albert van Bemmelen
March 11, 2017 at 6:08 pm
The cleaning part you took very serious
Parasuraman. I most certainly wouldn't because I only use my 8 bar air compressor to clean the dust out if needed. But you as always took also the cleaning part into extreme! It looks so spick and span like it was never been used. You also found a 47uF bad e-cap like is often the case. And there were so many parts defect, even the opto-coupler, that it is almost incredible you got it working. A pro job indeed!
Paris Azis
March 11, 2017 at 10:50 pm
Good job, Parasuraman. Thanks for sharing it.
MABROUK MEDALI
March 12, 2017 at 2:10 am
very nice work, Mr Parasuraman, i love your work.
Robert Calk
March 13, 2017 at 4:17 am
Good job, Parasuraman.
Ulises Aguilar Pazzani
March 14, 2017 at 9:36 am
Mr Subramanian great job Sir , You are right this smps are nice to work and them
Yogesh Panchal
March 15, 2017 at 12:43 am
Good job! Sir
Samsudeen
March 15, 2017 at 11:51 am
Its impressed me,really super
Thank you for your article
Humberto
March 21, 2017 at 8:40 pm
Good repair Mr. Parasuraman. The Preventive Maintenance is always neccesary for giving more life to the equipments.
Ivan
May 10, 2020 at 3:27 am
Thanks king
Injamul Haque
June 7, 2020 at 3:43 pm
I need a help from you bro..
Please help me bro please
Please tell me
What is the name and number of 8 pin ic in this smps circuit board? It is located beside small transformer..
I have same model smps but that ic burned
I can't see the name or number of ic
Please tell me bro