
How To Repair Kasa Water Pump
Believe it or not, Australia is the driest consistently inhabited continent in the world. Antarctica is drier, which is even stranger, given that it is almost all ice. However, here in Australia, most properties value the use of rainwater by installing and maintaining rainwater tanks. On our property, 3 separate rain water tanks are used with a total capacity of 10,500 Lt, which is by no means a large amount compared with many other households.
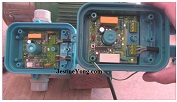
So when the rain water pump refused to pump, it was considered an urgent repair. The pump used in this system is a KASA brand, which is Australian owned, but may be Chinese built. On the front panel of the control box, a failure light could be seen, which was an indication that a fault was present.

The main connector from the control box to the electric motor was a C13 female to 3-pin plug, which is identical to the normal AC cable we attach to the power supply on a desktop computer. To test if the electric motor was working was as simple as by-passing the control box and directly powering up the electric motor.
The motor fired up (this was only done for a short period of time, so that actual pump components aren’t run without water and overheat), so a faulty electric motor could be eliminated from the diagnostic path.
After removing the control box cover, the voltages could be tested. Although the supply voltage was acceptable with 240 volts, only 111 volts could be seen feeding the motor when the ‘on’ button was pressed. Clearly we had a fault within the circuitry in the control box.
This pump uses 2 reed switches to control when the pump is turned on and off, using pressure acting on a diaphragm to move a magnet across the reed switch. Both of these were tested for continuity when moving the magnet across the switches and found to be working correctly.
After testing all the on-board components (diodes, capacitors, resistors etc), the main IC was suspected.
To be honest, I haven’t had a lot of experience testing IC’s, so this was a good opportunity to learn ‘on the go’. The IC to be tested was a HEF4093B which is a Quad 2-input NAND Schmitt Trigger. This is made up of 4 individual, 2 input NAND gates and each input uses a Schmitt trigger circuit. I found the truth table revealed an easy testing procedure that helped me isolate the fault.
After removing the IC from the circuit board and installing it onto my bread board, I was able to make up a testing circuit. By using an LED, I was able to see if all sections of the IC within the circuit were working correctly.
Next, by looking at the datasheet, I could see how the IC was meant to operate. The ‘Truth Table’ showed what outputs would be triggered by providing voltage at certain inputs.
For instance, if 5 volts (high) was provided at the first NAND gate on pin 1 and a low voltage (usually 0 volts) at pin 2, then the output (pin 3) would become ‘high’ or what has been provided as the supply voltage (5 volts in our case).
The only instance where the output (pin 3) would be ‘low’ (or 0 volts in our case), would be when both input pins (1 & 2) have a ‘high’ voltage (5 volts). This function applies to all 4 NAND gates.
In other words, if I applied voltages to both inputs of the NAND gate, the LED on my bread board which was connected to the output through a resistor, should go out.
After using this testing method on the bread board, I was able to see that the 4th gate was not operating and therefore this gave me confidence that the fault was with the chip. However, I couldn’t find a through-hole IC that I could purchase in Australia that would suit the circuit. SMD IC’s were readily available, but I chose to use a complete control box, which was cheap and was delivered to my door within 2 days.
For my own curiosity, I checked the design on the new control box compared to the old one. Most of the changes seemed to be transferring the circuit to SMD’s and an extra varistor had been installed. I assume this was an updated circuit that helped fix some of the issues that the earlier design had.
At this point I decided to also modify the main AC cable. The original installer had made up an extension cord about 400mm long, which didn’t even reach the power outlet! I simply used a spare power cord out of the many that I have collected over the years. I was able to connect this directly to the control box and eliminate the extension cord all together. Making a longer single cable not only made the connection safer, but also less inclined to create poor continuity in the future.
After installing the control box to the pump and the rainwater pipes, priming the water system was necessary to remove any air pockets. After leaving the tap open and activating the pump all air was removed and the system was once again up and running, ready for the next rain to fill the tanks.
If you are interested in this repair, you can see a video on my channel following the link below.
This article was prepared for you by Mark Rabone from Australia.
Please give a support by clicking on the social buttons below. Your feedback on the post is welcome. Please leave it in the comments.
P.S- Do you know of any your friends who would benefit from this content that you are reading now? If so, forward this website to your friends or you can invite your friends to subscribe to my newsletter for free in this Link.
Note: You can check out his previous repair article below:
https://jestineyong.com/quick-guide-external-hard-drive-data-recovery/
 (64)Dislikes
 (0)
(0)
20 Comments
Leave a Reply
Cancel reply


Waleed Rishmawi
May 21, 2018 at 6:50 pm
very clear detailed article. thanks for sharing. I have learned a lot form you today. have a blessed day
Mark
May 22, 2018 at 5:52 am
Hey Waleed,
Thanks for that. The only time we stop learning is when we stop living! I learned a lot from this repair.
Parasuraman
May 21, 2018 at 7:08 pm
Excellent! Very timely remedy!
Mark
May 22, 2018 at 5:52 am
Thanks Parasuraman
Andrew F. ali
May 21, 2018 at 8:02 pm
A very innovative method of tracking down the faulty part/component for this repair. Nice reading. I enjoyed this article.
Mark
May 22, 2018 at 6:04 am
Hey Andrew,
I later found out that I could have got the IC I needed here in Australia. Very frustrating as I really would have liked to repair it at a component level. Live and learn!
Albert van Bemmelen
May 21, 2018 at 8:15 pm
Nice going Mark and I wish you enough rain for the land! I was surprised though that you not yet owned one of those little portable CMOS/TTL digital IC testers. It would have saved you some testing time on the experimenters board.
Mark
May 22, 2018 at 5:50 am
Hey Albert,
As a hobbyist, I have gathered quite a few tools, but still have quite a few I probably need still. Do you recommend anyone in particular?
Albert
May 25, 2018 at 8:32 am
Mark, I own these on Aliexpress sold good testers which you'll find when searching on "multi-functional led & ic tester".
Portable tester1
Portable tester2
These universal testers are capable of testing much more than only CMOS or TTL ICs. Transistors, Zeners, Leds, Amplifiers, Opamps, and even Optocouplers can be tested. And they do not even need an 9V blok battery to function because 1 or 2 cheaper AAA or AA batteries suffice!
Mark
May 25, 2018 at 7:59 pm
Thanks Albert - I'll chase those up 🙂
Anwar Shiekh
May 21, 2018 at 9:18 pm
I always like when a part has been redesigned, for I feel the replacement has probably addressed deficiencies in the original and will probably last longer.
Mihai
May 22, 2018 at 12:52 am
Good job Mark ! I learn a lot from your experience !
Mark
May 22, 2018 at 10:27 am
Thanks Mihai
Mark
May 22, 2018 at 6:06 am
Hey Anwar, you are right. Maybe that's why the complete part was so cheap. After some research, it seems like a fairly common problem and that's why it is so easily available. Just a shame that I didn't get to repair it fully at a component level, but at least I was able to correctly diagnose it 🙂
Robert Calk Jr.
May 22, 2018 at 10:25 am
Good job, Mark. If the owner didn't have much money you could've used a DIP to SOIC adapter, and then used the SMD Quad Nand.
Suranga Electronics
May 23, 2018 at 1:42 am
Good Job Mr,Mark.
Well Done..
Charles
May 23, 2018 at 1:54 pm
Excellent repair however the control board was not saved still from trash after identifying the faulty and time invested hopefully you will find the ic and reuse the control board elsewhere.Have also learnt a lot from your repair
Mark
May 24, 2018 at 7:20 am
Hey Charles,
Thanks for your comment. You will be happy to know that I always strip down any boards for useful components and also here in Australia we have an 'E-Waste' recycling system that tears down electronic systems for their metals and other useful materials.
Mark
May 24, 2018 at 7:18 am
Hey Robert,
Didn't think of that -thanks. But for the price of the control box assembly, which included mechanical and hydraulic components as well and taking into account the age and look of the unit inside, it still seemed the best option.
I will keep in mind using an adaptor next time.
Thanks for your comment!
Robert Calk Jr.
May 26, 2018 at 2:14 am
Hi Mark,
I don't remember hearing what "the price" actually was. But if the customer can afford the price then replacing the unit would be a good idea.