
Make A Very Cheap Power Adapter Of Defect Electric Tooth Brush Charger
This article shows that it is possible to use most chargers from modern but now defect electronic toothbrushes as a very cheap and safe power adapter. I already had collected several of these defect toothbrush chargers after the toothbrush with motor had quit working. See next photo. And some probably came from my brothers or sisters.

In these chargers mostly a NiMH 1.2V rechargable battery inside the toothbrush gets charged with the inside coil that induces the current coming from the charger base when the toothbrush is placed up or into the base. It this way works like the primary and secondary coil of a transformer.
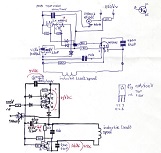
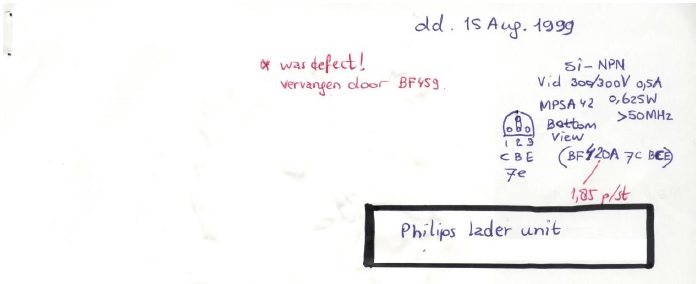
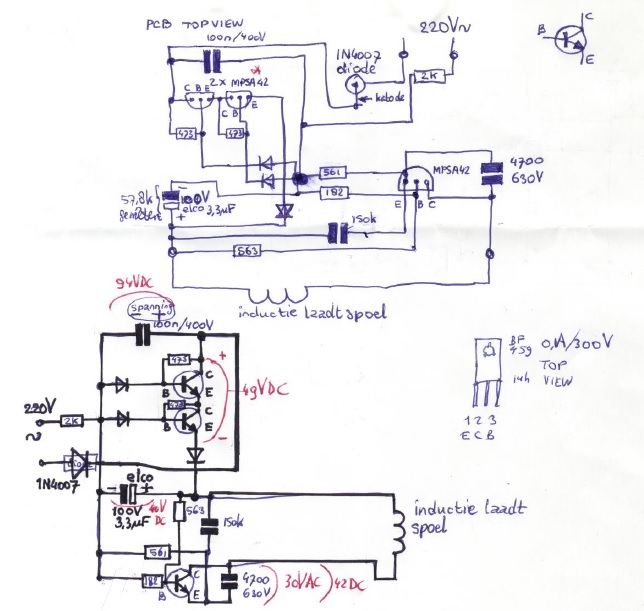
But the charger base is more complex then just being a transformer. Next circuit is one example I found in my brothers Philips toothbrush charger base a long time ago. In his base one of the MPSA42 transistors was defect why his toothbrush no longer charged. And I was able to fix his toothbrush by replacing the transistor with a BF459 that also was a 300V type.
Because the charger base uses this oscillator circuit it also regulates and controls the maximum power that induces into the toothbrush to charge the internal battery. Of course this also limits the maximum amount of energy that can be used for our intended charger adapter.
In my own defect toothbrush from seller ‘Kruidvat’ with model name Ultradent I noticed a single small diode with only a small pushbutton on the pcb. The diode rectifies the induced coil voltage in the toothbrush to create the DC voltage necessary to charge the NiMH battery. And this was already my second defect toothbrush from that seller why I bought other new and better toothbrushes from other sellers. And the motor in my now defect toothbrush still worked but now probably needed more current to start rotating. And the mechanic construction was no longer trustworthy either.
Next photo shows that according to the ‘label’ on the bottom of the charger base the dissipated power is just 3.5 Watt. And the charger works from 100V to 240V AC 50 or 60 Hz. And most likely is safe and at least also splash waterproof!

I scrapped the toothbrush plastics and all other useless parts and kept the toothbrush coil and started testing the induced voltage after rectifying using a BYW178 diode.

Above photo shows the coil in the base on the left photo, and the max measured open DC voltage.
And I at first used a 78L09 and a 7809 rectifier to test if I could use my digital 9V LCR tester. But sadly that only showed the message on the display a couple of seconds that the applied voltage was too low to operate on. Probably also because it uses more current for its backlight. But it already worked!
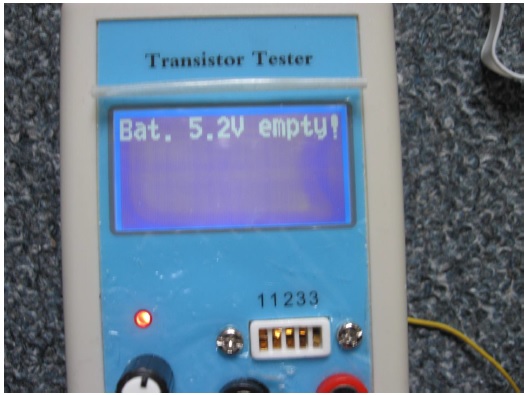

The digital LCR tester normally used a 9V battery to operate on but even when I used a 3300uF 16V parallel e-cap to buffer the energy, or even a 5.5V max DC supercap made no positive change here. Even without any voltage regulator the voltage was still a bit too low. (always be careful not to destroy your expensive devices under test because the open voltage is often much higher than the voltage when a load is applied on the output!). But luckily here not too high either to instantly destroy my digital LCR tester. Maybe using a Schottky diode as rectifier will make a difference here. But I was unable to quickly find one.
So I next tried if my future cheap adapter at least could feed my 6V multiband FM receiver in previous photo. And that worked splendidly! And worked on all frequencies on all bands! Normally this 6V radio automatically plays on my living room windowsill when the sun starts shining on my small solar panels in front of my window.
Next photo shows the 112mA DC measured short current through the coil on the 2A DC scale of my old DMM.

With this last photo all we now need to do is to glue the coil into the base so that it is correctly positioned generating the highest induced voltage from the base. Just use a hotmelt glue gun to cover the coil with the rectifier circuit into the charger base. And if you own a 3D printer maybe print a nice case to house the adapter in. Or try also a diode bridge plus a good e-cap to decouple any left AC parts in the output voltage of our cheap self made safe DC adapter! (Maybe using a diode bridge makes it possible to generate enough energy to also feed devices like my here not entirely working 9V needing digital LCR tester).
I hope this cheap and easy DIY adapter will find many new ways to be of good use!
PS: The measured shorted AC current of the coil on my DMM meter’s 2A AC scale was at least about 50 mA! And the open AC voltage was about 7,78V on the 20V AC scale of my DMM. Which is compared to the labelled 3.5 Watt mentioned power dissipation on the AC mains at 230V AC probably at least about a tenth of useful output adapter power for us to use. (7,58 x 0,05A = 0,389 Watt). But of course only when the measured output signal is a correct shaped AC signal. Keep in mind that we here not have the usual principle of a transformer because of the primary electronic controller in our charger base!

Albert van Bemmelen, Weert, The Netherlands.
Please give a support by clicking on the social buttons below. Your feedback on the post is welcome. Please leave it in the comments.
P.S- If you enjoyed reading this, click here to subscribe to my blog (free subscription). That way, you’ll never miss a post. You can also forward this website link to your friends and colleagues-thanks!
Note: You can read his previous article on AFK-BM2 Baking Machine Repair
 (49)Dislikes
 (0)
(0)
9 Comments
Leave a Reply
Cancel reply


Parasuraman S
April 9, 2022 at 10:32 am
Sky is the limit for your wonderful and exciting ventures! Many thanks for writing such a detailed article and sharing it here!
Albert van Bemmelen
April 9, 2022 at 1:57 pm
Afterwards I of course also tried the 3.5 Watt toothbrush charger with a diodebridge and a large 16V capacitor on my LCR tester. This time the LCR tester worked splendidly in the first 8 to 10 seconds it worked. And I even was able to test components as long as the voltage was high enough to keep the 9V tester working! And in my article the given values on the measured current and voltage in my coil were still valued too low. Because the measured current and voltage were even better when the coil was exactly placed giving 60mA and 11.78V. And this 3.5 Watt charger operates at its best on 5V to 6V devices. I also tried some of the other 1 Watt toothbrush chargers and noticed that they also gave a high open voltage but likely were less useful used as power adapter compared to the 3.5 Watt charger in the article.
Waleed Rishmawi
April 9, 2022 at 3:43 pm
that is an interesting challange. I am going through a repair challange at the moment. I have an ultr violet dental light and it works on 5 volts but somehow someone connected it to a 12 volts not paying attention to the voltage polarity and he messed up the charging ic and I am still looking for one and so far no luck. so hopefully I will be able to repair that and share it with you guys. have a blessed day
Albert van Bemmelen
April 9, 2022 at 5:14 pm
What type of charging chip are looking for Waleed?
Waleed Rishmawi
April 10, 2022 at 7:56 am
VA7208. Found it on line but not locally
Yogesh Panchal
April 10, 2022 at 1:02 am
Good Fix! Albert,
Mathew Charles Karonga
April 10, 2022 at 4:33 am
Greetings Mr AVB
Thank you for the detailed post which is easy to follow and read and you are always there to share educative and yet very informative tricks of the trade and we are getting a lot of help from you article keep sharing your knowlege,
Albert van Bemmelen
April 11, 2022 at 1:41 am
Many thanks for your appreciative comment Mathew!
Andrea Del Corso
June 13, 2022 at 9:53 pm
Come al solito..un bel lavoro di informazione.Grazie!
================
As usual .. a nice job of information. Thanks!