
Rusted And Corroded Crystal Oscillators Found In Cambridge Audio AZUR-540C
I request you all to view this link, which gives a history of this set: Toroidal Transformer Failed In Cambridge DVD Player | Electronics Repair And Technology News (jestineyong.com) As many images of the set were already given, I am providing only those which are related to this article.
After the visit in October, 2019, this DVD player visited me again in October, 2022 with the complaint that it was dead (No display). [Looks like this DVD player’s birth month is October (LOL)] The customer had got it checked locally and found that the power supply was working, but system did not respond.
I opened the set and rechecked and confirmed that the power supply was ok. I dismantled the board and opened the black cover that housed the system control ICs. I also saw a dead insect inside, which probably did not cause any damage to the board.

Now look at what I saw inside:
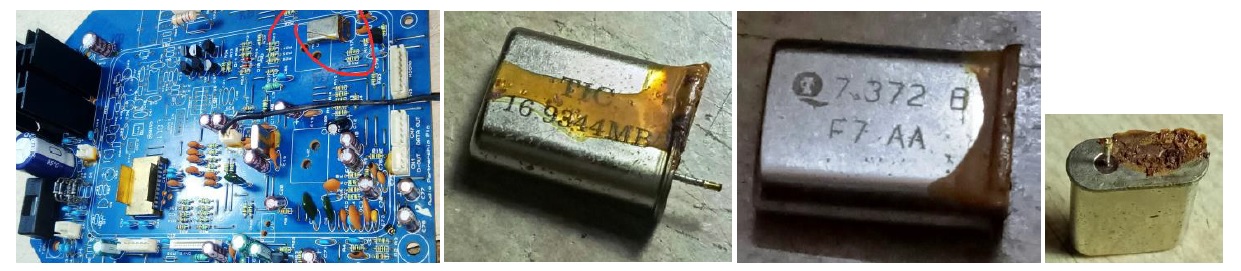
One leg of 16.9344 and both legs of 7.372 crystals were rusted and broken! This is the result of the gum used to fix it on the board, which is a common fault in many sets.
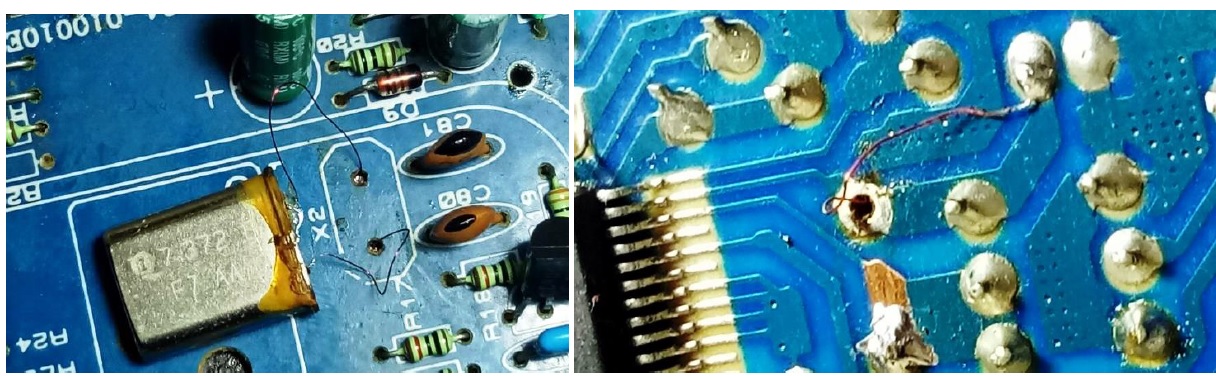
As my search for these crystals did not yield any fruitful result, I ventured to solder wires on the broken legs. I cleaned the area thoroughly and also cleaned the broken tips and applied flux. I used the following new addition to my workshop, a new OSS Team T-12X soldering station with five additional tips of different types:

Using its BLS Tip, which is very sharp and setting the temperature to 350◦C, I used a thin jumper wire and soldered it effectively on all the three pins! Then stuck the 16.9344 crystal flat on the board and soldered the wires on the other side. For the other one leg broken crystal, I soldered one leg on the board and soldered the wire on the other side.
I checked the electrolytic capacitors and found these to be in bad conditions. Look at one that I removed to inspect (another victim of glue getting hardened and causing rust) and a sample reading:

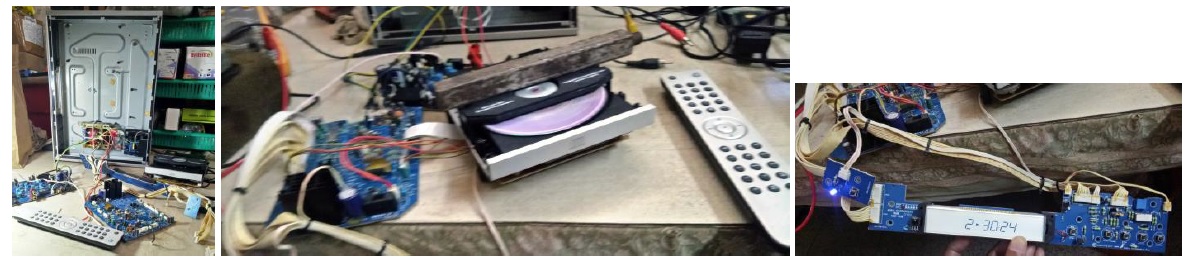
Went ahead with my most interesting hobby of replacing all the electrolytic capacitors, the front panel switches and also a strained strip wire after a dry-solder patch up. Then after cleaning the board and having satisfied with all the required rectification work done, connected the boards and tested and was very glad to see the DVD working very well! For the purpose of this test, I kept the cabinet on its side and gave all connections keeping the boards and CD tray on the table.
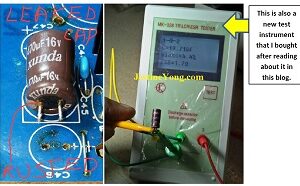
This is also a new test instrument that I bought after reading about it in this blog.
Fit the DVD back on its case and again subjected it to testing with various CDs playing it fully. I found that the player was showing very clear display and the output was also very healthy and pleasing. Then fit it back and kept it ready for pick up by customer, who is staying almost around 100 Kms away from my place.

Mission accomplished and great satisfaction got added to its collection.
Here is a picture of the defective components:

PS: I had also opened and cleaned the remote control, as some of the buttons were not working. Unfortunately I forgot to click snaps!

This article was prepared for you by Parasuraman Subramanian from India. He is 72 years old and has more than 30 years’ experience in handling antique equipment like Valve Radio, Amps, Reel Tape Recorders and currently studying latest tech-classes conducted by Kerala State Electronics Technicians’ Association. He has done graduation in BBA degree, private diploma in Radio Engineering and retired as MD of a USA company. Presently working as Consultant to Hospital and other institutions.
Please give a support by clicking on the social buttons below. Your feedback on the post is welcome. Please leave it in the comments.
P.S-If you enjoyed reading this, click here to subscribe to my blog (free subscription). That way, you’ll never miss a post. You can also forward this website link to your friends and colleagues-thanks!
You may check on his previous article on Just Replacement Of Hall Sensor Belt Solved Running Problems In BIC Cassette Deck T-1
 (50)Dislikes
 (0)
(0)
18 Comments
Leave a Reply


Andrew F. Ali
February 18, 2023 at 9:51 am
Well done!!! Excellent work!!!
Parasuraman S
February 18, 2023 at 11:56 pm
Many thanks!
Albert van Bemmelen
February 18, 2023 at 2:40 pm
Like always a very detailed and successful carried out repair. This method of fixing broken of legs with thin wire I once did on a large high voltage resistor of a HV probe and fixed the result with some super glue to strengthen the connection. It fixed a very expensive HV probe that otherwise would have been thrown away. After you showed the T12 solder station in your previous article, I also bought a Quikco T12-942 Oled mini solder station with a set of 5 different solder iron elements. Plus a 24V/5A adapter. Which is needed to solder a very small pinsized 64 pins PIC32MZ2048EFH064-250I/PT 32-bit microcontroller on a controllerboard for making a large 1500 Watt reflow oven. (from PE magazine UK April&May 2022). But because it may be a lot easier to just have a smaller cheaper Infrared IC heater reflow oven ready, I also bought a T-962 800 Watt reflow oven. This way I am able to reflow smaller boards up to 180 x 235 mm in just about 8 minutes. With PC controlled selectable heat wave curves. But also very large boards after my 1500 Watt reflow oven from PE magazine is ready. Something that is a complete new experience for me.
Albert van Bemmelen
February 18, 2023 at 3:08 pm
PS: The exact needed 1500 Watt oven for making the mentioned big reflow oven was a heavily old used toaster oven I found completely free placed outside at the garbage and it was still working very well. With both top and bottom heater elements working fine and a simple mechanical timer on its front. And that makes it a perfect reflow oven without the need to have to change anything on the toaster oven which will be completely controlled by PE's externally placed controller box with graphical heat wave LCD display.
Parasuraman S
February 18, 2023 at 6:53 pm
There you go again by leaps and bounds! Great!
Albert van Bemmelen
February 18, 2023 at 9:09 pm
PS2: I ordered my new T-962 reflow oven, also called Infrared IC heater, last week from Elektor who claim to have upgraded the original oven to a more enhanced version which was a little bit more expensive compared to the standard version. On Github more firmware improvements are available for this oven but it would invalidate your warranty if you have done those upgrades yourself. The manufacturer also sells other models like the T-962A that has a bigger reflow area.
Parasuraman S
February 18, 2023 at 11:56 pm
Very useful information! Thanks, dear!
Parasuraman S
February 18, 2023 at 6:51 pm
Vow! You are jumping up in technology even beating a rocket! Great to hear and thrilled at your craze! Many thanks for your comments!
Waleed Rishmawi
February 18, 2023 at 3:40 pm
good job my friend and I know for sure you enjoyed replacing all these capacitors..lOL. keep up the good work and have a blessed day
Parasuraman S
February 18, 2023 at 6:54 pm
Yes, dear! I am unable to control my itch on that! Ha Ha! But we all have enjoyment of our own choice and tastes! Many thanks for your comments!
Henrique J. G. Ulbrich
February 19, 2023 at 3:35 am
Very good work, Parasuraman. I realize you continue to be the "king of capacitors replacement". Greetings.
Parasuraman S
February 19, 2023 at 2:36 pm
Ha! Ha! Many thanks for your comments and encouragement!
Bonkie
February 20, 2023 at 7:27 pm
learning all the time.
Electronics is my hobby and i am glad to watch the professionals on this channel.
Parasuraman S
February 21, 2023 at 8:23 am
It is technicians and hobbyists like you who make this blog active and colourful! Many thanks for your comments!
GIFT ELIJAH
February 21, 2023 at 12:57 pm
Well done, excellent repairs work done, I hope you have not changed the birth month of that equipment from October to any other month. Lol
Parasuraman S
February 22, 2023 at 5:59 pm
Ha! Ha! Many thanks for your hilarious comments and encouragement!
Yogesh Panchal
February 27, 2023 at 9:08 pm
Good Job! Sir,
congratulations! for your new soldering station,Good tools always make our job more enjoyably & easy.
Parasuraman S
March 1, 2023 at 12:25 am
Many thanks for your comments! Appropriate tools are always very essential in our kind of work!