
Samsung P5110 Tablet Touch Screen Replacement
Not all repairs that we encounter are head-scratching brain teasers that test our skills to the highest levels. Sometimes they are just routine, but still require our undivided attention, so that mistakes are not made. Here is a case in point – a Samsung tablet digitizer replacement, but with a twist. Keep reading to find out what that is…..
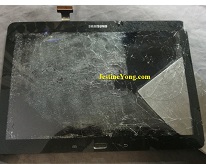
A customer brought in a tablet that at first had been dropped and then sat on! Talk about tablet abuse!
The first thing to do before changing a digitizer (touch screen) is to ensure the tablet is still in working order. Sure enough, apart from the damaged digitizer, the tablet worked fine.

Step 2: Gently unclip the plastic housing from the actual tablet. There are a range of removal tools that sometimes come with the digitizer replacement screen or by using your imagination, other thin blade tools can also be used.
Step 3: With the back cover out of the road, you can now focus on removal of the digitizer. But before doing this, it is safe practice to remove the battery connection to ensure that no accidental short circuit occurs.
Step 4: Next is the removal of the digitizer flex ribbon. This can be done by gently pulling back on the locking tab and removing the ribbon out of the terminal connection.
Step 5: Now the fun begins! Carefully using a heat gun, quickly and consistently heat the digitizer evenly all around the black edging. This is where the double sided tape holds the digitizer to the aluminium housing. Don’t overheat it – you can always add more heat if needed.
Step 6: Using thin blade tools, gently separate the double sided tape from the tablet housing. Do not push in any further than the black surround as damage to the LCD screen could occur.
Step 7: Once the digitizer is separated from the tablet, remove any double sided tape from the housing. You don’t need to remove all the sticky goo from the tablet; it will adhere to the new tape just fine. Carefully clean the LCD screen of any fingerprints or dust. I use the cleaner that came with my video camera and microfiber cloth to clean and buff the screen. Just be aware that any marks that you don’t clean off will show up when you hand the tablet back to the customer. So spend the extra time to be sure. Move the tablet around in different light to find any hard to see marks.
Step 8: This is where the twist comes in! Before fitting the new digitizer to the housing – remove the protective plastic sheet! What did I just say? REMOVE THE PROTECTIVE PLASTIC SHEET! Why am I making a big deal about that? I recently started to remove a digitizer from another Samsung tablet, but found that it didn’t want to come off. The only way I could remove it was using a paint scraper to lift it away from the LCD. Finally it came away from the housing.
Someone had not removed the protective plastic sheet from the inside when the digitizer had been replaced before and as the tablet heated up through use, the plastic melted onto the LCD! Epic Fail! I tried to remove the plastic using my fingers, but it was no use – the LCD was damaged. So now I have to explain to the customer what someone else had done previously. Not good news………..
So, back to the original screen replacement….
Step 9: After removing the protective plastic sheet from the inside of the digitizer, remove the plastic sheet from the double sided tape. Carefully lay it down onto the housing, using your fingers to line up the corners evenly. Turn the tablet over and gently push on the edges, making sure you keep away from the circuit boards and cables.
Step 10: Reconnect the digitizer flex ribbon and the battery cable. Just be aware that the battery connectors on these Samsung tablets pull up vertically, not away from the connector. Clip the plastic cover back onto the housing. They will ‘click’ into place, so just keep moving around the tablet with an even pressure. The customer can decide if they want the outer protective plastic cover removed or left – the tablet can be operated with this left on.
Step 11: Start it up and test all your controls and features before you hand it back to the customer.
Step 12: Write up your invoice and get paid!
If you are interested in a video of this repair, please follow the link below:
This article was prepared for you by Mark Rabone from Australia.
Please give a support by clicking on the social buttons below. Your feedback on the post is welcome. Please leave it in the comments.
P.S- Do you know of any your friends who would benefit from this content that you are reading now? If so, forward this website to your friends or you can invite your friends to subscribe to my newsletter for free in this Link.
Note: You can check out his previous repair article below:
https://jestineyong.com/samsung-lcd-tv-la40a650a1f-ghosting-repair/
 (110)Dislikes
 (0)
(0)
18 Comments
Leave a Reply
Cancel reply


PARASURAMAN
December 30, 2016 at 10:26 pm
Excellent! Great minute job! Handled befitting a professional! Very informative too!
Mark
December 31, 2016 at 5:48 am
Thanks Parasuraman,
That means a lot coming from a skilled professional like yourself!
Albert van Bemmelen
December 31, 2016 at 1:24 am
Nice work Mark! I had similar case recently with my little niece's 10 inch Tablet. The replacement touchscreen plate was just about 10 US dollar/euro. It was like your repair a terrible work just to remove the old broken glass touchscreen on top of the LCD. Removing the old touchscreen without beaking it into more tiny and dangerous pieces is completely impossible! And I protected my eyes with special safety glasses to prevent any glass splintering problems.
Luckily the new Touchscreen came included with an already added new top layer also. So the old broken glass Touchscreen complete with its because of the heat shrinken damaged top layer and adhesives can be thrown away without any problem (in the special glass recycling container).
Sadly after the new plate was attached on top of the LCD, a small crack was visible in the left corner. The Tablet worked except the area in the corner behind the little crack. That's Murphy's law I guess. You know that it can happen so it happens. Although the repair was no complete success, The Tablet could be used again.
Mark
December 31, 2016 at 5:34 pm
Hey Albert,
It's the luck of the draw! I have 2 Samsung tablets that need batteries. So the digitiser, LCD and all circuitry needs to be removed before getting to the battery. It will be a tall order to try and get the digitiser off without damage, but it's worth a shot!
Mihai
December 31, 2016 at 2:17 am
Thank you Mark for this good article ! I have to change digitizer for a tablet too. Keep the good work and Happy New Year !
Mark
December 31, 2016 at 5:36 pm
Hey Mihai,
Best advice I can give is to take your time, especially when heating the double-sided tape. You don't want to overheat the circuitry, so slow and steady and you will have a successful repair.
Good Luck!
moshe
December 31, 2016 at 4:52 am
thanks Mark....the best post i've seen on replacing these digitizers.
Mark
December 31, 2016 at 5:37 pm
Thanks Moshe!
M. Imraz Ali
December 31, 2016 at 8:04 am
Great Repair Mark
Very Informative
Yogesh Panchal
December 31, 2016 at 2:08 pm
Good Repair! Mark thanks for sharing.
reza
December 31, 2016 at 2:25 pm
Hi Mark
It was useful experience
Robert Calk
December 31, 2016 at 4:14 pm
Nice job, Mark. Thanks for the tips and sharing the repair with us. Happy New Year!
suranga Electronics
December 31, 2016 at 6:19 pm
Hello, Mr- Mark.
The best and Safety on Touch Screen Replacement.
Thanks you.
Bulent NUR
December 31, 2016 at 6:47 pm
Great informativly job, mission acomplished.
Tyrone
December 31, 2016 at 8:51 pm
Good repair article Mark thanks for sharing,Happy New Year God bless.
Ulises Aguilar Pazzani
January 4, 2017 at 12:09 pm
Great job done very professional with a lot of Passion keepit up thks for sharing
Marulitua Hutabarat
January 5, 2017 at 7:29 pm
Nice job Mark.
Thank you to share.
Happy New Year from Indonesia.
Chris
January 22, 2017 at 10:14 pm
Hi Mr. Mark, this is a nice work but only you know how hard it is to change that digitizer on a tool like that tablet was.
I repaired gsm phones over 15 years and I stopped to do that after the touch screens come out. I had a very low quality parts source in my country and I had to change that digitizers several times before one was correctly worked etc.
Your article is very helpful and nice organized and explained.
My best regards.