
Servicing Ikon Megaray Torch

This Ikon MegaRay LED Torch was brought to me with the complaint that it is dead. I learnt through ‘preliminary interrogation’ (LOL) of the owner that one day after charging, when he used the torch, the light diminished and finally went off. I dismantled the torch:
Checked the PCB and found that one 6 pin IC (U2) is burst. Connected a 3.7V supply to the battery terminals of the PCB and found that the Torch and its switch were working. Connected the Adaptor to the socket and noticed that both the Red and Green LEDs were lighting up.
I thought it could be due to high voltage or lightning. The number, if I am not wrong, could be 5765. But I could not get a datasheet of it from the web. I removed the IC and noticed that the PCB was also burnt underneath! I cleaned the surface as much as I could. Then connected the 5V adaptor and checked where the PS is for this IC. The 5 V appeared on pin 1 (?) marked by me just to identify. The next pin on top was the pull down for green LED (Charged indicator, perhaps). The next pin on top was connected to R3, which is grounded. The next pin exactly opposite, at the bottom was the pull down for Red LED (Charging indicator, perhaps). The middle pin on the bottom was the ground. The last pin on the right at the bottom was going to the on/off switch of the torch. Evidently, the charging voltage is passed through this IC and controlled.
Since a replacement IC was not available, as per consent of the owner, I bypassed the IC by providing a FR104 (that was a salvaged diode, so I just used it) Charging diode, and one 1k resistor to RED LED ground:
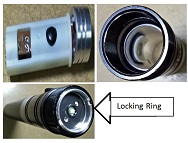
Connected the DC supply from the AC Adaptor. The Red LED lit up and voltage was present at the terminals for battery charging. I noticed then that the centre pin of the DC socket was loose! So, that could be reason for failure of the IC! Fixed it with solder (Last picture at the top).
Reassembled the torch:
Checked the torch and it worked fine. (I had charged the battery separately using my desktop PS). I connected the DC Charger and found the LED lit.
I have cautioned the customer not to over-charge, as now there is no controller. Also told him not to leave the torch for charging overnight. I liked the Torch, as it was very powerful and there was a focus adjustment at the front. Overall a good piece. But no idea where it is made!
Here is the fully zoomed picture of damaged IC:
This article was prepared for you by Parasuraman Subramanian from India. He is 68 years old and has more than 30 years’ experience in handling antique equipment like Valve Radio, Amps, Reel Tape Recorders and currently studying latest tech-classes conducted by Kerala State Electronics Technicians’ Association. He has done graduation in BBA degree, private diploma in Radio Engineering and retired as MD of a USA company. Presently working as Consultant to Hospital and other institutions.
Please give a support by clicking on the social buttons below. Your feedback on the post is welcome. Please leave it in the comments.
P.S-If you enjoyed reading this, click here to subscribe to my blog (free subscription). That way, you’ll never miss a post. You can also forward this website link to your friends and colleagues-thanks!
You may check on his previous repair article below:
https://jestineyong.com/servicing-collapsible-solar-lantern/
 (62)Dislikes
 (1)
(1)
11 Comments
Leave a Reply
Cancel reply


Robert Calk
July 22, 2017 at 8:52 pm
Thanks, Parasuraman.
It may be a power distribution switch like this: http://www.s-manuals.com/pdf/datasheet/g/5/g547e-g547h%2C_g547m_r1.5_gmt.pdf
Albert van Bemmelen
July 23, 2017 at 4:54 am
I forgot about that good link, thanks Robert. In this case Parasuraman also could use this 1 cell Li-ion charger chip la9010 with smd marking S2. Although it may not be pincompatible because it also only uses 5 pins. (but in the same size SOT housing). But I know that it is used to charge the 3.7V li-ions!
Albert van Bemmelen
July 24, 2017 at 3:34 am
Apparently there exist different types of LA9010 ICs. I saw the wrong ICs with that same name and number (in DIP16 housing) on eBay:
http://www.ebay.nl/itm/LA9010-Integriert-Schaltungsgehause-DIP16-Machen-SANYO-/162421700581?hash=item25d11677e5:g:PhoAAOSwHxVW7seg
But don't get confused because I meant these Li-ion charger chips on :
http://www.s-manuals.com/pdf/datasheet/l/a/la9010_r01_inno.pdf
They have the same chip name but nothing in common.
Albert van Bemmelen
July 22, 2017 at 11:57 pm
Thank you Parasuraman. I understand that it was a 3.7V li-ion cell that is now charged without protection controller. It seems hard for the owner knowing how not to overcharge the Li-ion cell now. And if it gets overcharged it may be too late? (I take it that you did measure the ingoing charging current and the cell voltage?). The explanation of the 56x5 chip you gave is very hard to comprehend without a clear drawing of the circuit.
Of course I will keep a look out for the 6 pin smd chip that was burnt. Often the real component number is written just below the top number. The top number could as well just be a manufacturer's date.
Parasuraman
July 23, 2017 at 11:03 pm
1) Charging current is well within the limits as the adaptor is safely rated. Moreover there are current limiting resistors. 2) I checked the time taken by the battery for full charge from a dim light situation and told the user not to charge more than that. 3) There was no way I can fix another IC in that board as it was charred! That is why I didn't bother about looking for any alternative!
Albert van Bemmelen
July 24, 2017 at 2:25 pm
Understood. But just in case you need a 6 legged charger chip... just found a very interesting link to all sorts of li-ion/charger chips including a 6 legged smd type LTC1734 on:
http://semtronics.net/shop/index.php?rt=product/category&path=133_140
and the link to that chip on:
http://semtronics.net/shop/index.php?rt=product/product&path=133_140&product_id=1014
Vytas
July 10, 2018 at 8:39 pm
I have same issue with similar gadget. My IC's have first three digits 57C*, the last one is lost. Now i know that initially smd was market 57C5.
I found data sheet with it , but it was programmable temperature sensor, which is wrong. Any ideas what to replace in to?
Vytas
July 10, 2018 at 8:42 pm
This IC's is 57C5
Suranga Electronics
July 24, 2017 at 4:07 pm
Mr. Parasuraman,
wow.. very good repair.
Thankas for this.
Yogesh Panchal
July 24, 2017 at 4:28 pm
Good job Sir,
Humberto
July 25, 2017 at 12:00 pm
Good aticle Sir, you are a Master.