
Servicing IMPEX Induction Cooker Model IX-R20
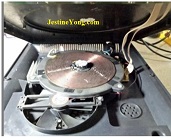

This induction cooker was brought to me with the complaint that it was dead, and it was lying in the attic for quite some time. The customer wanted this serviced, if possible, to keep it as a standby. As usual, my service job begins with thorough cleaning. Have a look at the condition of the inside:
In my previous articles, I have made ‘tall’ claims about cleaning work I do, but have seldom provided proof for how effectively it is being done. Hence I am adding the following images, to show how the IC, which looked like a haven for cockroaches, transformed into:
Hope the above images would give you an idea about how much can we do in bringing a device back to its original condition! Last picture is a close shot of a portion of the board, in which you will notice a jumer wire has lifted up (Referred to later in the article). As you all might agree, working on a clean set gives a lot of relief for the mind to work! It is no wonder that there is a proverb; ‘Cleanliness is next to Godliness’! OK, let us get to the service part of this set.
While cleaning, I observed that many parts, including jumper wires of the board are corroded and rusted, images of some of which are shown below:
From the last picture, you will get an idea how one leg of the transistor was already in broken condition!
Whenever any used Induction Cooker comes in for service, it is a good practice to replace all the Large Black High Voltage Capacitors like in this case 2uF/250V, 5uF/250V and .33uF/1200V. Sometimes these capacitors would have bulged or cracked, which we can see only on removal. The values would have also got changed. After replacing these and other corroded parts and jumper wires (there were many other resistors and disc capacitors in this condition), I checked the ESR of all electrolytic capacitors and found them to be well within the range. But looking at the condition of the board, I suspected that the bottom of these capacitors might already be corroded. Therefore, I removed the 10uF/450V capacitor and my guess was right:
So, I replaced this and all the other electrolytic capacitors as well. Then did the dry solder patch work all over the bottom of the main board as well as the control board. I normally keep an SMPS 12V Fan connecting it to my benchtop power supply, while doing repeated soldering to keep away the smoke and I use a thimble to push the components and keep it firm in place while applying the solder from the other side, especially when soldering jumper wires or new components:
I had indicated in the third paragraph that one of the pictures above will be referred by me later. While doing drying solder, we have to be watchful for any leads withdrawing from its hole! The jumper wire got released back when I touched the soldering iron at the bottom! If we are not paying attention to this, we will end up in a mess and may not be able to trouble shoot when the device does not work! Moreover loose contacts created thus, can give much more problems! I pay attention to or even listen to or feel if any of the leads especially that of jumper wires, withdraw. If so, I immediately clear up the solder and pull up and bend the lead, before soldering it again. Cleaned the boards using IPA and dried it thoroughly. Removed the IGBT with its heat zinc, and left only the Bridge Rectifier. Checked it and found it to be ok. Connected the boards without IGBT and the induction coil, and powered on through a Series Bulb. There was the assuring beep sound and the power on LED lit up. But the touch switches did not respond to power on/off. In the normal condition, it should get on when you touch it and show an error code; because IGBT section is not working (I kept a thick glass piece on top of the touch switch and touched only on top of that).
Nothing at all I tried direct touch as well and repeated many times using different fingers as well as combined, but no response at all! The control board had the uController and switching IC fit in it. The switching IC was found scraped and therefore the number could not be traced! As I do not have much experience in handling Induction Cookers, I consulted my friends through the Whatsappp Technical Group and in came many experts’ suggestions! According to them, the spring on which a small cap is fixed, which is placed under the Cooker Top, should be totally rust free. Rust can change the frequency and while touching, the change in the frequency may not be within the limits fixed for the uController to respond. So, I cleaned all the springs once again thoroughly using IPA and metal brush and made it totally rust free. Then tried, but with the same result!
Then followed the suggestions one by one. Replaced all the 103/104 disk caps on the control board – No improvement – replaced all the IN4148 – Same – replaced all the resistors on the board – Now something was happening and the touch was responded after making a few attempts. A few other keys were also responding! Checked the frequency in my 20MHz CRT Oscilloscope by connecting the probe between the spring and ground, and found the frequency to be out of its range, but it showed some modulated frequency the timing of which was different on each spring. Having achieved this much, I replaced all the jumper wires on this board! So, this board had all new components on it except the uController, LEDs, display and switching IC. I removed the switching IC (Multiplexer), fixed a socket and put a 4053 IC (as suggested by friends) and tried. No response. I tried with 4052 It responded like before. So, I was sure that the original IC was ok and put it back. Cleaned the board once again thoroughly and allowed it to become dry. Tallied the list prepared by me before hand with that of the components on the control board:
One point that I wanted to share with you is the fact that the board is a good design, as all the component values and numbers are printed on the board. So, it is easy for us to remove all the components at a stretch. That does not mean that we can blindly believe this. We have to keep checking what is printed on the PCB and what we have removed is same! Since the values of resistors, capacitors and diodes around each touch switch, are identical, as these are connected to different pins of switching IC, it is easier. Finally the board looked almost new:
Since the frequency of the touch switch is critical for proper operation, we need to fix it under the Cooker Top, where a coating is there to increase conductivity and when the springs will be compressed to a size fixed for generating the required frequency. (I had pressed the spring down while checking for response earlier). This means, the touch switch type of Induction Cookers are very sensitively balanced on frequencies set! So, fixed the control board in its place, fixed the IGBT, connected the Induction Coil in its place, and connected the main board to the control board.
Powered it on through the Series Bulb. It responded to touch from the top without any problem, and showed error for not keeping any vessel on top. So, kept a stainless steel vessel with water on it and tried:
In the second picture above, you can see water boiling and steaming! So, disconnected, waited for the top of the Cooker to cool off and then fixed screws at the rear. Finally, the following picture will show you all the components and jumper wires replaced by me on this induction cooker. A war won after a tough and painstaking fight!
I gave the Cooker to my wife, who used it for the whole day and found it to be working perfectly alright! She gave me the QC Pass!
A job completed to my fullest satisfaction.
This article was prepared for you by Parasuraman Subramanian from India. He is 68 years old and has more than 30 years’ experience in handling antique equipment like Valve Radio, Amps, Reel Tape Recorders and currently studying latest tech-classes conducted by Kerala State Electronics Technicians’ Association. He has done graduation in BBA degree, private diploma in Radio Engineering and retired as MD of a USA company. Presently working as Consultant to Hospital and other institutions.
Please give a support by clicking on the social buttons below. Your feedback on the post is welcome. Please leave it in the comments.
P.S-If you enjoyed reading this, click here to subscribe to my blog (free subscription). That way, you’ll never miss a post. You can also forward this website link to your friends and colleagues-thanks!
You may check on his previous repair article below:
https://jestineyong.com/servicing-ikon-megaray-torch/
 (87)Dislikes
 (0)
(0)
14 Comments
Leave a Reply
Cancel reply


Albert van Bemmelen
July 29, 2017 at 6:36 pm
What can I say other than a priceless repair and cleaning Parasuraman! I think you again really excelled by replacing just every capacitor you see LOL.
I once repaired a kitchen hood suction apparatus of which the flexprint buttons weren't working after my friend's Wife had cleaned it with just a little bit too much water.
It turned out that the flexprint kind of sortcircuited inside because of the moisture between the flex layer buttons why they were not functioning anymore. And therefore I had to remove and replace them by real buttons.
I wonder how you besides the cleaning with ipa part, were able to make it totally rust free? Because I almost never were able to clean rusty battery contacts. Thanks.
Parasuraman S
July 29, 2017 at 11:19 pm
Many thanks! After cleaning with IPA, I use a metal brush to clean the part thoroughly, by zigzag movement, ensuring that the brush makes contact all-around. Unlike the battery acid leaking and eating the metal, this kind of rust can be cleaned. I sometimes even use No.100 (zero) emery paper pieces, holding it between two fingers and giving it a polish! Battery contact rust cannot be cleaned thoroughly, as the acid would have removed the surface coating. Even if we clean it, the rust will form again. We cannot apply varnish in such places, as it has to make contact!
Gary Gemmell
July 29, 2017 at 11:45 pm
That is a massive repair something most shops in the UK just would not do.
Well done another item saved from landfill!
Randy Warren
July 30, 2017 at 12:29 am
That was a war indeed, I hope you were paid well for all that work! Nicely done!
Parasuraman S
July 30, 2017 at 11:22 am
Many thanks! I do not pay much attention on returns in money! I just recovered the cost of components plus a nominal charge towards the cost of service. The satisfaction that I get and how these things keep me mentally active, are the only driving factors for me. It is better to keep ourselves actively happy internally like this rather than paying up heavy bills to Hospitals! That way, it is a gain and not a loss.
suranga Electronics
July 30, 2017 at 1:02 pm
Wow... Great job Mr-Parasuraman.
Very Good Service.
Robert Calk
July 31, 2017 at 9:25 am
Great work, Parasuraman. Thanks for the article.
Yogesh Panchal
July 31, 2017 at 5:52 pm
Sir,
Thanks for providing us "mentally active" article.these type of articles always encourage to learn something from others experience and it teaches something, no matter succeed or fail to repair the equipment.
Mahmoud
August 1, 2017 at 6:41 pm
well done Mr. Parasuraman
Nice work
Arun Kumar G R
August 2, 2017 at 2:42 pm
Hats off to you Sir,
The pleasure that one gets once the unit is back in action is incomparable,
Money can never compensate satisfaction and the Whole day long happiness,
that we get out of putting back a useful thing.
Parasuraman S
August 3, 2017 at 9:23 pm
Yah! You have hit the nail on the head!
Lee
August 10, 2017 at 1:25 pm
Parasuraman S You are one determined individual to go such lengths to repair stuff. I like your determination in getting to the bottom a problem.
I can understand the pleasure and satisfaction in repairing things as i get satisfaction also from repairing stuff.
It give us retired folk a sense of achievement as well.
Parasuraman
August 11, 2017 at 10:36 pm
Yes, well said!
Ulises Aguilar Pazzani
August 26, 2017 at 12:02 pm
Mr Subramanian greate job Sir