
Sony Laptop With Distortion Display Repaired

Customer walked into my workshop with his Laptop and the complaint was distortion display at the left side of the screen. After producing token to the customer for the laptop repair, I have started my diagnosis.
Laptop make is Sony model No. is SVT131A11W.
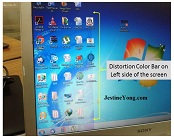
Turning the Laptop On I found the display as shown in the below photo:
Probable cause of this type of fault symptom are:
1. LCD Panel.
2. LVDS cable and related parts.
3. Very less probability is Logic Board.
So now it is time for troubleshooting. First I have to dismantle the screen panel:
On visual inspection of the panel screen area, it seem ok without any physical damage.
Checked LVDS cable connector on panel was also seem ok. (Though I have doubt about the cable because this screen has been replaced by some other service provider about six month back, that I come to know by the date mentioned on backside of the panel and cable connector also looks like modified.)
I have removed the cable form the panel and cleaned with IPA and refit the cable and connector. After this process I have connected the power to laptop. On powering up I found the problem was still the same. I have wiggled the cable a little bit to confirm the loose connection but no effect on the screen.
So now it is time to open the base part of the laptop and check the connector on motherboard.
Removed the LVDS connector and this also cleaned by IPA
After cleaning the connector we refitted it. Now again I have powered the laptop and see the result.
Display distortion bar was gone. While fitting of this cable I feel that the connector bonding with the LVDS socket on the motherboard is a bit loose and it can be easily come out when we remove the tape from the connector which is used for holding the connectors firmly to each other.
So I have decided to use instant glue on the edge of fitting of both the connector.
So I have applied the glue very carefully with the help of the needle pin so that the glue can hold the connectors from the outside.
After this process I reassembled the laptop and powered it On again-see the result below:
And put under the burn-in test for two days and it is now ready for handover to the customer.
This article was prepared for you by Yogesh Panchal who works as a Computer Hardware Engineer in Mumbai India.
Please give a support by clicking on the social buttons below. Your feedback on the post is welcome. Please leave it in the comments.
P.S- Do you know of any your friends who would benefit from this content that you are reading now? If so, forward this website to your friends or you can invite your friends to subscribe to my newsletter for free in this Link.
Note: You can check his previous repair articles in the link below:
https://jestineyong.com/external-hdd-drive-intermittent-working-fixed/
 (108)Dislikes
 (0)
(0)
12 Comments
Leave a Reply


Albert van Bemmelen
October 5, 2016 at 5:49 pm
Good job Yogesh. I've never seen this complaint before. These types of repair are always good to know and recognise! Thanks for the article.
Ross Wedding
October 5, 2016 at 7:33 pm
Excellent Result Yogesh, laptops can be very tricky to work on.
YH Wong
October 5, 2016 at 11:31 pm
Good tips there. Tiny minor problem but seems like a big problem there.
Parasuraman
October 5, 2016 at 11:44 pm
Good job! Praiseworthy!
Bulent NUR
October 6, 2016 at 12:23 am
Good job, practical solution.
Robert Calk
October 6, 2016 at 12:50 am
Good job, Yogesh.
suranga Electronics
October 6, 2016 at 2:51 pm
Well done Mr- yogesh,
it's a Common Fault too Some LCD & LED tVS'
Humberto
October 7, 2016 at 12:39 am
Hi Yogesh, you have done a great repair. Good pictures and a clear explanation.
Andre Gopee
October 7, 2016 at 9:26 pm
Nice Job Yogesh. Thanks for sharing.
Ulises Aguilar Pazzani
October 12, 2016 at 10:23 am
Job Yogesh, grate job and very visual for the repair
Akure, Olayinka Shadrach
October 13, 2016 at 7:22 pm
Good troubleshooting aproach.
Mathew Charles Karonga
November 7, 2016 at 11:33 pm
Thank for the article