
Two Resistors Found Open In 5V 3A AC-DC Power Adapter

Model and Make: Nagano 5V 3A AC Adapter Model SQ15W5P-11
Problem reported: Dead
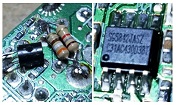
Observation: A lot of dry solder. Fuse was intact. TL431 SMD in the secondary side was burst.
Trouble shooting and rectification done: Checked the SMPS transformer with Blue Ring Tester and found all LEDs lit up indicating that there was no short in primary or secondary. Used Blue ESR Meter to check electrolytic capacitors and did not find any caps abnormal. (To know how useful a Blue Ring tester and Blue ESR Meter are and to buy, kindly see links http://www.electronicrepairguide.com/blueringtesterresult.html http://www.electronicrepairguide.com/esrmeter.html ) Did cold test of all components on the primary and secondary. Found two SMD resistors were open in the secondary section. Replaced it with normal resistors. Also replaced TL431 fixing it from the top. Looked for any more defective components in primary and secondary. Did not find any. Did a thorough dry solder patch up.
Result: Adapter worked fine adding satisfaction to my collection.
Here are some pictures:
Note: Sorry, forgot to click the component side of the PCB.
This article was prepared for you by Parasuraman Subramanian from India. He is 70 years old and has more than 30 years’ experience in handling antique equipment like Valve Radio, Amps, Reel Tape Recorders and currently studying latest tech-classes conducted by Kerala State Electronics Technicians’ Association. He has done graduation in BBA degree, private diploma in Radio Engineering and retired as MD of a USA company. Presently working as Consultant to Hospital and other institutions.
Please give a support by clicking on the social buttons below. Your feedback on the post is welcome. Please leave it in the comments.
P.S-If you enjoyed reading this, click here to subscribe to my blog (free subscription). That way, you’ll never miss a post. You can also forward this website link to your friends and colleagues-thanks!
You may check on his previous repair article below:
https://jestineyong.com/restoring-and-refurbishing-antique-ahuja-ase32b-tube-power-amp/
 (72)Dislikes
 (0)
(0)
14 Comments
Leave a Reply
Cancel reply


Albert van Bemmelen
June 2, 2020 at 1:11 pm
While your absolute successful repair articles continue in a more concise manner it may have affected the taking a picture from the component side too. But since in this case you added the 3 components on top of the solder side anyway it didn't really matter! Since you mentioned the Blue ESR and Ring testers but not how you tested the TL431, I guess that you do not have a tester for the TL431 and just found it defect while measuring using your DMM or analogue meter.
Parasuraman S
June 2, 2020 at 2:19 pm
The TL431 was found 'BURST' as mentioned by me and there was no need to measure it! Many thanks for your expert comments!
Tayo
June 2, 2020 at 7:04 pm
Thank you Parasuraman but i too wondered how you tested the TL431 (or how you would have tested it). Your article mentions that the diodes were "open" but not that it "burst". There is certainly a difference between the two. Perhaps the difference was lost in translation. I very much enjoy your work.
Parasuraman S
June 3, 2020 at 11:38 am
Observation: A lot of dry solder. Fuse was intact. TL431 SMD in the secondary side was burst.
This is what was written.
Tayo
June 4, 2020 at 6:21 am
Thank you for pointing this out again. I missed the observation part bcos it was obscured by one of the advertisements which unfortunately decided to place itself right in the middle of your article. I will be more conscious of of them next time or simply get a robust ad-ablocker.
Parasuraman S
June 4, 2020 at 10:42 am
It's OK. Many thanks!
Henrique J. G. Ulbrich
June 2, 2020 at 10:39 pm
Another concise and complete repair report. In a nutshell you´ve explain all the necessary. Many thanks for sharing. Your satisfaction bag must be joyous.
Parasuraman S
June 3, 2020 at 11:40 am
Ha!Ha! Many thanks for your encouragement!
Waleed Rishmawi
June 4, 2020 at 5:25 pm
a job well done my friend. keep up the good works and have a blessed day
Parasuraman S
June 4, 2020 at 8:36 pm
Many thanks my dear friend! Your encouragement always helps!
Saqib Sami
June 6, 2020 at 3:08 am
Good repair Sir. How to check output current of these adapters ? For example we have 5v 2A charger how to check it is true 5v 2A ?
Parasuraman S
June 12, 2020 at 3:04 pm
We have to give a load operating at 5V, that pulls around 2A and see whether the voltage drops. If it drops, the current rating is not 2A. Since current is always dependent on the draw of the load, it is not possible the current capability of a source like this directly.
Humberto
June 11, 2020 at 6:47 am
Well-done.
Parasuraman S
June 12, 2020 at 3:04 pm
Many thanks, dear friend!