
Replacing a Fragile Video Connector on a Laptop Motherboard
The Laptop was a Dell Inspiron 1750, a very nice 17″ laptop with an intermittent video problem. My first thought was to change the video cable, which had no effect. I noticed, however, that slight movement of the cable near the motherboard connector caused the picture to appear, as would slight pressure on the connector. I searched carefully but could not find a dry joint After much thought, I decided to try replacing the video connector. My feeling was that if I was wrong, the fault was almost certainly a video chip BGA fault, and I do not believe it possible to achieve a permanent repair of this without proper equipment. It may be noted that there was always a steady picture from the VGA socket. Heating the video chip did not cause the picture to appear on the main screen by the way.
I have carried out the difficult task of replacing surface-mounted video connectors before on other laptops, but never the IPEX-CONN40-2R-GP 20.F1093.040 used in this series of Dell laptops, which is particularly fragile. I have also replaced connectors with through-board pins with the same basic approach. The basic problem is temperature; the plastic used in connector constructions melts at a lower temperature than solder, and if the plastic even gets slightly soft, the connector can distort and become unusable.
An Atten 848D hot air rework station was used for this task. Many will say you can do it with a soldering iron, but I found, after many attempts in the past, that I simply do not have the manual skills to succeed. With a hot air gun and care, I can do it. It is important at this point to say: do not attempt anything like this on a valuable motherboard until you are satisfied you have mastered the techniques to do it with soldering iron or hot air gun. Practice on some cheap scrap motherboards – they all have plenty of connectors!
The first job is to get the old faulty (?) connector off the otherwise working motherboard. In principle, for this motherboard, we don’t care how much damage we cause to the connector, providing we do not damage the motherboard (in particular the tiny connecting traces), or the other components on the board. In order to protect the board we apply heat-resistant adhesive tape to the board in the vicinity of the connector, on both sides as shown in the two photos below:

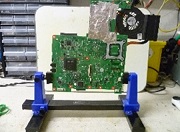
This has the additional duty of preventing other components from falling off the board should their solder reach melting point. The board is mounted vertically as shown below, so that as soon as the connector solder melts it will drop off the board. Do not be tempted to prod it to help it come off – you are almost certain to lift or break the traces or pads if you do.
Apply the maximum heat from your hot air gun directly on the connector, particularly at the ends and along the back where it is solidly soldered to earth pads, as shown in the photo. The next photo shows the removed connector after it had dropped off the board – completely wrecked, but the board traces are fine!.
The next job is to find a cheap scrap motherboard with the correct connector. In my case it was a Dell 1545. In principle, it doesn’t matter what damage we cause to this motherboard and its other components, providing we get the connector off it without damage. We must therefore heat the connector from the other side of the motherboard. In order to concentrate the heat in the right place, where the solidly soldered earth pads are, mark their positions on the back of the board by measuring from the board edges. With this board, there is an unused iTPM socket on the other side facilitating this, so we can clearly see where to direct the heat.
It is also important that the connector drops straight off without any bending forces, so we mount the board upside down so the connector will drop straight down when the solder melts. In addition, we fit the video cable connector to the board connector socket. This helps as a heat sink for the plastic, provides support for the connector structure and adds a little weight to encourage a direct drop off when the solder melting temperature is reached. The photos show the board supported upside down clear of the table, ready to be heated, and the connector, still attached to the video cable, after it had dropped off.
After the connector has fully cooled, the video cable can be removed and the socket inspected.
If all looks OK, replace the video cable in the connector and check continuity. Again, if OK, you can now remove the video cable and solder the replacement connector to the original motherboard. For this, I do resort to a small soldering iron. Clean the pads on the board and place the connector in the correct position. Use a generous piece of adhesive tape to hold it in place then use a magnifying glass to check all the connectors are in the correct position on their pads and traces. Tack the pads at each end with a little solder, then recheck the traces. If all is still in position, remove the fixing tape and solder the pads along the back of the connector. Re-check the traces. Then solder the end pads properly, and finally solder the traces – fiddly job this! Be careful not to leave high blobs of solder on the pads or the cable connector will not be able to fit fully home.
Now refit the video cable to see that it fits properly and recheck continuity. All OK? Now remove the protective tape if not already done (might need some adhesive remover) and clean up any residual flux etc. Job done. Well, did it solve my problem? Well, I’m afraid it didn’t! So, I am still scratching my head. Never, mind, it was a challenge and gives me confidence that such jobs are feasible, even with such fragile connectors. Any feedback from more experienced technicians out there would be much appreciated.
This article was prepared for you by Gerry Millward from Bristol, England. He is 74 years old and retired 11 years ago as a Electronic Systems design engineer in the Defense Industry. He now operates a one-man Computer Technician business, mainly to keep himself constructively occupied. His main interest is motherboard level repair but is regularly and infuriatingly diverted to fix Windows problems.
Please give a support by clicking on the social buttons below. Your feedback on the post is welcome. Please leave it in the comments. If you have electronic repair articles to share with us, please contact us HERE.
P.S- If you enjoyed reading this, click here to subscribe to my blog (free subscription). That way, you’ll never miss a post. You can also forward this website link to your friends and colleagues-thanks!
 (135)Dislikes
 (1)
(1)
17 Comments
Leave a Reply
Cancel reply


Albert van Bemmelen
September 8, 2016 at 2:52 pm
Good job Gerry! When a normal Soldering iron or DeSoldering Gun can't be used I too resort to using a Hot Air SolderStation instead. But because you can adjust both the Hot Air as well as the Airflow it is always tricky to set the right and safe temperature. In case I need to 'repair' bga problems I therefore also use my Infrared contactless Temperature Gun. This way keeping it below a max of about 200 degrees Celsius. (Apple Laptops already melt solder at low temperatures of about 170 degrees Celsius). And I start off with a lower Max temperature first. Since a too high Hotfix temperature can't be undone.
Yogesh Panchal
September 8, 2016 at 3:13 pm
Good Job! sir,
Thanks for sharing your experiance.
skwong
September 8, 2016 at 3:38 pm
Well done Gerry. This type of repair job is for a highly skill, experience and patience repairer in order to repair successfully. You are right any attempt to lift up the part manually will damage the copper track as it is so fragile.
Bulent NUR
September 8, 2016 at 5:03 pm
Very skill job, thanks for sharing.
Jaime Obed
September 8, 2016 at 6:48 pm
Interesting article! I loved it.
Robert Calk
September 8, 2016 at 6:57 pm
Nice job, Gerry. Kapton tape works well with not much adhesive to worry about.
Andre Gopee
September 8, 2016 at 8:47 pm
Good job Gerry... When I am doing this type of job I find that using a lot of Liquid Flux and the right Hot air tip nozzle get the Job done. Just remember that applying heat to the board can stress the components and hence this is why a pre-heater comes in handy, but if you do not have a pre-heater you can use the hot air station to heat the board from a distance for about 1 to 2 minuits so that when you apply the heat to the component in question it does not take long to melt. Hope this helps. Congrats on a job well done.
Gerald Millward
September 10, 2016 at 6:33 pm
Tnanks for that Andre - what a good idea to invest in a little pre-heating!
Gustavo Contreras
September 8, 2016 at 9:22 pm
Great Job Sr!!
Thanks for share 😉
Humberto
September 8, 2016 at 9:50 pm
Good repair Mr. Gerry, you had a good idea using the heat-resistant adhesive tape.
Parasuraman S
September 8, 2016 at 10:56 pm
Highly skilled and professionally firm repair work! Hat's off to you!
mahmoud_tajpour
September 10, 2016 at 3:33 am
Hi dear Gerry I am Iranian and I am 78 years old and retired when I was young and study in school one of my teachers told us the British peoples are strange now with this amazing job you I knew that my teacher was very right.
I wish you further success.
your slncerely Mahmoud
Gerald Millward
September 10, 2016 at 6:35 pm
Thank you Mahmoud - we are strange sometimes but we usually mean well!
Henrique Jorge Guimarães Ulbrich
September 10, 2016 at 5:35 am
Great, Gerry. Welcome. Congratulations for the magnificent work. A lot of patience in doing it.
Mark Tembo
September 16, 2016 at 4:40 pm
Thanks for the article! I would like to buy this Hot Air Solder Station, a cheaper one. where can I find it as we do not have it our country?
moshe
September 21, 2016 at 10:43 am
A really interesting article on a difficult task.
Thanks for sharing it!
Ulises Aguilar Pazzani
October 12, 2016 at 11:24 am
very nice repair thks for sharing