
Membrane Keypad Retrofit In A Combo Telephone/Radio/Clock Soundesign Model 7541

I have this set for a long time. The telephone function was used in the beginning and then abandoned. The radio was also used at that same time and also abandoned. The set was only used in the clock function since then.
There are seven switches in the top part, used for all the adjustments. As only the clock function is being used, just four of them are used, in two situations: when the time needs adjustments and when there is a Power failure. The employed switches in this case are: FWD FAST/SLOW, REVERSE SLOW and TIME SET.

The plastic buttons actuate on membrane contacts inside which, with continuous use year after year, began to present contact problems. The picture below shows the conductive surface (black circular area) that is actuated from the plastic buttons and the tracks in the printed board in which the conductive area makes contact.

Some time ago I opened the set and did a general cleaning: cleaned all the set, as well as the tracks in the circuit board that make the membrane contacts. The black rounded area received a carbon application using a pencil. Such measures recovered the functioning but with time the problem returned, worse than before. Until a point in which it was not possible to do any adjustments.
Of course the idea to throw it away was not considered due to my ecological consciousness. Moreover, the display with large digits is interesting, allowing seeing the time at a distance. The obvious solution was to abandon the membrane contacts and use traditional pushbutton switches. I have several of them in my junk box. I had a screening and set aside four switches suitable for the case.
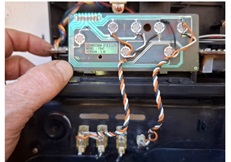
The plastic actuators were detached from the top part (inside) of the cover, with the remaining holes intended to lodge the pushbutton switches. The pictures below shows the top part with the holes and the printed board with the tracks before used to establish membrane contact (sorry, the picture is out of focus, but enough to understand).

The idea was simple: use wires to connect the new added pushbutton switches to the respective points in the printed board. At this point a problem aroused: there was no space for the pushbuttons between the position of the old removed plastic buttons and the printed board. I had to loosen the printed board and set it aside, making room for the pushbuttons installation. This was facilitated by the existing flexible flat cable (in white color in the picture below).

The pushbuttons were then fastened to the holes and the wiring was done between these pushbuttons and the respective points in the printed board. Wires long enough were used to reach the displaced printed board and to allow handling, for example, in a future maintenance.

The layout of the pushbutton switches, as built, is shown in the next picture. Observe that the switch at right is located in the ALM SET position, although it performs the TIME SET function (not used anymore). There is a reason for this: mechanical difficulties to fasten the switch in the right place, as it is an elongated hole. Considering that the set is not aimed at no one else, it is for my exclusive use, there is no problem.

A test confirmed the correct operation. The set was then reassembled and is now in my bedroom again, working as a new one.
All done with zero cost: the pushbuttons and wires came from my junk. And with another important point: it was not thrown away.
This article was prepared for you by Henrique Jorge Guimarães Ulbrich from Curitiba, Brazil. Retired telecommunication and electronics technician. Loves electronics, telecommunications, cars, wines and grand children.
Please give a support by clicking on the social buttons below. Your feedback on the post is welcome. Please leave it in the comments.
P.S- If you enjoyed reading this, click here to subscribe to my blog (free subscription). That way, you’ll never miss a post. You can also forward this website link to your friends and colleagues-thanks!
Note: You can read his previous article on A Rare Defect In A Microwave Oven
 (31)Dislikes
 (0)
(0)
12 Comments
Leave a Reply


Waleed Rishmawi
July 5, 2025 at 12:37 pm
Good job on the repair and the modifications of the buttons. Looks good. Thanks for sharing.
Henrique Jorge G. Ulbrich
July 6, 2025 at 2:26 am
Thanks, Waleed. Have a nice day.
Albert van Bemmelen
July 5, 2025 at 3:06 pm
Nice article that explains why we love our electronics hobby Henrique!
My old but still working as new Audio Sonic clock radio had a annoying 50 Hz noise in the amplifier caused by the internally too close by placed 220V AC transformer. And because I use the radio to wake up at a low audio output level it always made the 50 Hz signal to loud interfering. The only thing that solved this was to place that small transformer in an empty power adapter housing and connect the secundary AC wires with a long flexible cable to the clock. That fixed it! I also still use 2 clocks next to each other because in the past I worked in shifts and had to deal with different wake-up times. Now both wake me up at the same time just in case one of the clocks fail or for some reason the radio didn't work.
Henrique Jorge G. Ulbrich
July 6, 2025 at 2:23 am
Thanks, Albert. Perhaps your clock radio is a good one, but has an original problem, that escaped from the designer. Or even the quality control was no so good as it would be.
Yogesh Panchal
July 5, 2025 at 6:22 pm
Good Job! Sir
If our needs or purpose are fulfilled by repairing it, then why should we throw it away or bury it in the ground? It is better to repair it and use it as long as it is repairable.
Henrique Jorge G. Ulbrich
July 6, 2025 at 2:24 am
I aree, Yogesh. Thanks for the comments.
Henrique Jorge G. Ulbrich
July 6, 2025 at 2:27 am
Correcting: I agree, Yogesh. Excuse-me for it.
Parasuraman S
July 5, 2025 at 7:39 pm
Excellent fix and kudos to you for taking so much trouble to save the device from dump! It was a very unique trick used by you to fix carbon contact problems, something I have learnt now to emulate as and when found necessary! Many thanks!
Henrique Jorge G. Ulbrich
July 6, 2025 at 2:25 am
Thanks, Parasuraman.
Mark J
July 6, 2025 at 2:27 am
Henrique well done on the repair.
Lee
July 8, 2025 at 7:36 am
I did a similar thing 20 years ago for a clock radio.
Humberto
July 10, 2025 at 8:11 pm
An interesting repair, very well explained with details all the time.