
Easy Ways To Troubleshoot and Repair Power Supplies
Hi!
The focus in this article is on a HLT48-12-4000 power supply. This power supply is a PSU from a CCTV NVR system from some nearby company. This type of unit is very common on CCTV NVR systems. Repairing this type of PSU’s is not a big deal, but maybe my debugging technique will help the reader in more efficient way to make the diagnostics…
The unit was defect, won’t start up when it was plugged in to the wall AC outlet.

I checked carefully the PCB for some burnt parts and tracks but don’t found any.
Here is the PCB:
I have my method how to debug such of electronics failure what is very quick for me:
– checking for burnt parts and traces
– checking for short circuits on ic’s, transistors and then other parts
– checking for abnormal readings/values on cap’s, diodes, resistors, I/O pins etc.
Most of case one of the first two checking method will figure out or point me in a direction where actually the problem lie. In this situation, the problem was identified on the PWM controller.
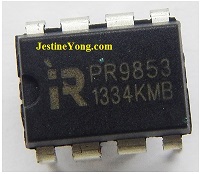
The PWM controller is the PR9853 low cost PWM controller which is used in many PSU applications this and similar types and battery chargers etc. When I checked for shortening of the power supply pins ( pin2 and pin8) of the ic I got a reading around 30 Ohm, that was very strange to me and I decide to take out the IC.
After removing the ic I also checked for short between pin2 and pin8. The result was the same 30 Ohm and clearly a toasted PWM controller. Here is the PR9853 PWM controller:
Info from the datasheet of the PR9853:
I also checked for bad components like the bridge rectifier, the diode which is on the schematic and the power FET transistor also. Everything was in perfect condition. So I decide to order just the PWM controller from the internet.
After two weeks it arrived and I changed the ic. Through an isolation transformer and a bulb in series I powered on the PSU and BINGO! The PSU was working! For testing I connected two car bulbs 12v/21w for several hours. The PSU was going hot but didn’t failed and was in a good condition.
Job done!
I hope you enjoy this tutorial and will save lot of repair time.
This article was prepared for you by Christian Robert Adzic from Novi Knezevac-Serbia.
Please give a support by clicking on the social buttons below. Your feedback on the post is welcome. Please leave it in the comments.
P.S- If you enjoyed reading this, click here to subscribe to my blog (free subscription). That way, you’ll never miss a post. You can also forward this website link to your friends and colleagues-thanks!
Note: You can check his previous post in the below link:
https://jestineyong.com/peugeot-206-incorrect-gauges-repair/
 (117)Dislikes
 (0)
(0)
15 Comments
Leave a Reply
Cancel reply


BAMIDELE DAVID
July 26, 2018 at 2:13 am
How can I troubleshoot a faulty stabilizer
Gary Gemmell
July 26, 2018 at 6:45 am
Thanks Christian I always enjoy reading your articles.
Dan
July 26, 2018 at 9:47 am
I am glad you published your experience, I always look forward for these tips. Thanks.
Justice
July 26, 2018 at 3:23 pm
Hi Christian ,thank you for the wonderfull article which is educative, and looking forward for more.
Albert van Bemmelen
July 26, 2018 at 4:07 pm
Good job Christian and thanks for the datasheet. It often also happens that the primary switching powermosfet needs replacement together with the PWM controller PR9853 and the primary fuse. It was a good thing they were still intact.
Robert Calk Jr.
July 26, 2018 at 5:00 pm
Thanks Chris. Good job.
Tito
July 26, 2018 at 9:55 pm
Good job Chris and very smart
Parasuraman
July 27, 2018 at 8:20 am
That was a wonderful tip to do a cold test on this type of IC. Many thanks for your support!
Beau Michna
July 27, 2018 at 12:59 pm
Very informative, thank you.
HAKAN
July 29, 2018 at 1:40 am
Why did you use bulb in series with the power supply line input?is it for the power supply to draw less current?If you connect that powersuply directly to AC line, what would happen?
Christian Robert Adzic
July 31, 2018 at 5:09 am
Hi!
Thank you for supporting my article.
To answer short as possible to your question, pls read this link:
https://antiqueradio.org/dimbulb.htm
I hope you will get the point why to use the bulb in series test kit...
My best regards.
marco tapia
July 29, 2018 at 7:59 am
Thank you Christian for this technique that you use and the process of elimination which showed the defective part,I love this article very informative and outstanding outcome, well done.
Ganthan
July 30, 2018 at 11:41 am
Really good and informative. Thanks for sharing.
Peter
August 3, 2018 at 10:06 pm
Good job done, question, what's the normal reading between these 2 pins of the pwm controller. Is it common we got an higher value than 30 ohms and how can one check it or find somewhere the right value of other pwm controllers.
Christian Robert Adzic
August 4, 2018 at 2:02 am
Hi Peter!
Between GND and VDD pins should be no readings in continuity testing.
That two pins are the ic power pin.
Imagine what would happen if you put a resistor of 30ohm between
GND and +5v or GND and +12v?
Can you figure out?
My best regards.