
Modified Circuit To Fit 3V RGB LEDS In This Chinese Make Bedroom Phantom Light

This Chinese Light was brought by a new customer with a request whether it could be restored. According to him, this worked on battery or AC adaptor and when switched on, it was giving bizarre color lights and could be changed by pressing two optional buttons at the bottom. Another switch (C) is for switching on the motor, upon which the top portion rotated spreading various colors and shapes on the bedroom roof. This was bought by him for use during festivals and celebrations, but became defective because of negligence. I accepted the job as I was curious to know the functions of such a lamp. I removed the bottom plate by removing its screws. I saw that the battery compartment was spoiled due to leaked cells and the springs and contacts were beyond restoration and replacement was not available.
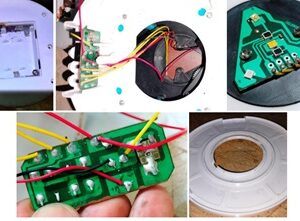
The top portion can just be slid out. The switches below were wired to a triangle shaped PCB which housed four SMD LEDs probably of Red, Green, Blue and Yellow. There were two tiny SMD ICs that controlled the LEDs. The middle portion housed the motor and gear system to rotate the top portion. Let us have a look:

When I tested the LEDs, all the four were dead. I applied power through the adaptor and checked whether anything was working. The motor was working but with noise of friction. The ICs were getting hot and nothing worked. As there was no number on the ICs and more importantly no model number or brand name for the light, the only option was to modify the circuit to accommodate the commonly available 3V RGB LEDs, which emits different colours and functions randomly, pausing and speeding and mixing different modes like a christmas light.
I removed the ICs and LEDs along with one SMD cap and scraped it clean. Then removed the wires except for one + and one (-) that came to the triangle PCB. Then used a 330 Ohms resistor from the ground and grounded the three LEDs to that. Then used the positive wire for a parallel connection of the three LEDs. Then applied power and watched the three LEDs shifting from red to blue to green to yellow and blinking and dancing randomly. Since I noticed that the lighting of the LEDs were affected when the motor was switched on, I added one 330uF/25V upon which, it was bright and steady. Let us see a few pictures:

Then cleaned and lubricated the gear wheels of the motor and the loading round plastic base using silicone grease.
Then fixed the dome and powered it up and watched it working superbly providing amusement to me like a boy. I switched off the room light to see its effect. Mission accomplished with delightful satisfaction which got added to the collection bag. A picture of the removed (better to say scraped off!) components is also given side by side.


This article was prepared for you by Parasuraman Subramanian from India. He is 74 years old and has more than 30 years’ experience in handling antique equipment like Valve Radio, Amps, Reel Tape Recorders and currently studying latest tech-classes conducted by Kerala State Electronics Technicians’ Association. He has done graduation in BBA degree, private diploma in Radio Engineering and retired as MD of a USA company. Presently working as Consultant to Hospital and other institutions.
Please give a support by clicking on the social buttons below. Your feedback on the post is welcome. Please leave it in the comments.
P.S-If you enjoyed reading this, click here to subscribe to my blog (free subscription). That way, you’ll never miss a post. You can also forward this website link to your friends and colleagues-thanks!
You may check on his previous article on Reported Dead But Found Panel Broken In Samsung LED TV Model UA43AUE60AKLXL
 (34)Dislikes
 (0)
(0)
14 Comments
Leave a Reply


Waleed Rishmawi
June 22, 2025 at 6:31 pm
Nice surgery with great repair outcome. Love the colors on it. Have a blessed day
Parasuraman S
June 22, 2025 at 9:27 pm
Many thanks, dear friend! I too liked the colours!
Gowri Shanker Sharma
June 22, 2025 at 7:07 pm
Sir.
As early I requested about 12vdc charger for lithium batteries
We need charging voltage 14.5 and charging current 3 to 5 ampere.Please kindly send proper circuit.
Thanks
Hariom
Parasuraman S
June 22, 2025 at 9:30 pm
Sorry, dear! I could not connect what you are asking for! If you are looking for some circuit diagram, kindly do a google search! Thanks and all the best!
Albert van Bemmelen
June 22, 2025 at 8:07 pm
I guess that at the moment replacement springs and contacts are still not available in your country, but as you probably know they can be bought from different sellers online. Also as boxsets with 10 different types of battery contacts and springs for less than 3 euro/dollar.
Parasuraman S
June 22, 2025 at 9:33 pm
Unfortunately, the shapes and combination of these springs and contacts vary from device to device, depending on the design. Storing all such types will not work out because of the investment required! Many thanks, dear Albert for your expert comments!
Mark J
June 23, 2025 at 12:03 am
Great repair work ionce again. Thanks for sharing.
Parasuraman S
June 23, 2025 at 3:09 pm
Many thanks, dear Mark!
Yogesh Panchal
June 23, 2025 at 12:55 am
Good Modification! Sir
Parasuraman S
June 23, 2025 at 3:10 pm
Thanks, Yogesh Bai!
Humberto
June 23, 2025 at 1:06 pm
Good innovation and another device saved from dump ⭐
Parasuraman S
June 24, 2025 at 10:02 am
Hi, Humberto! Not heard from you for a while! Many thanks for your comments!
corriette
June 30, 2025 at 12:43 am
always amazing results to hear of. great technician. thanks for sharing.
Jim
July 16, 2025 at 8:43 am
Thats great you were able to salvage it and it is a pretty cool light!