
A Bizzare Way Of Opening Garden LED Flood Light Model ECOLINK

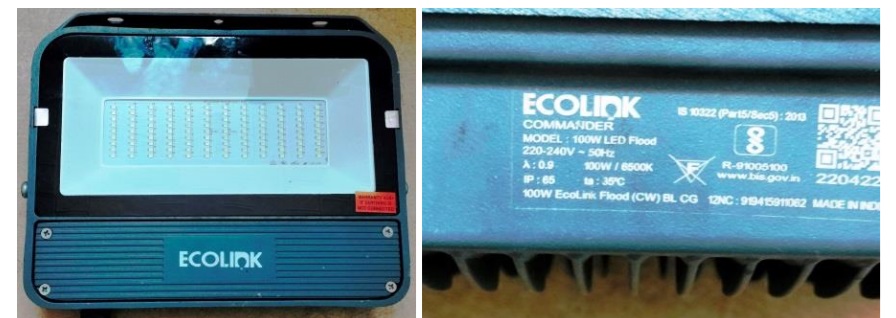
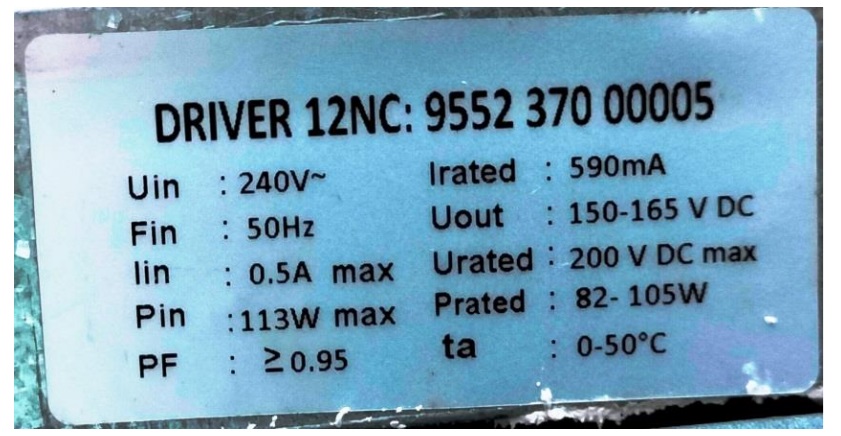
This belonged to the hospital where I work and was brought to me in dead condition hoping to get it rectified. I openedthe four screws, which housed the LED driver module and checked and found the output was ok.
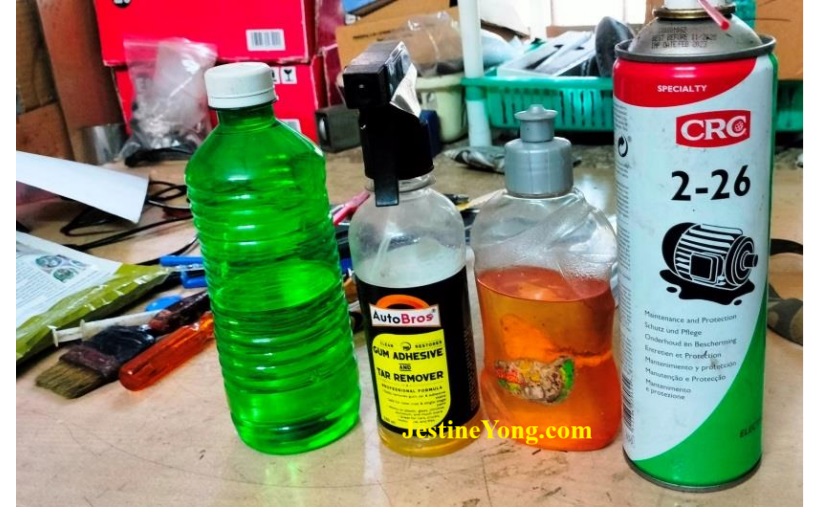
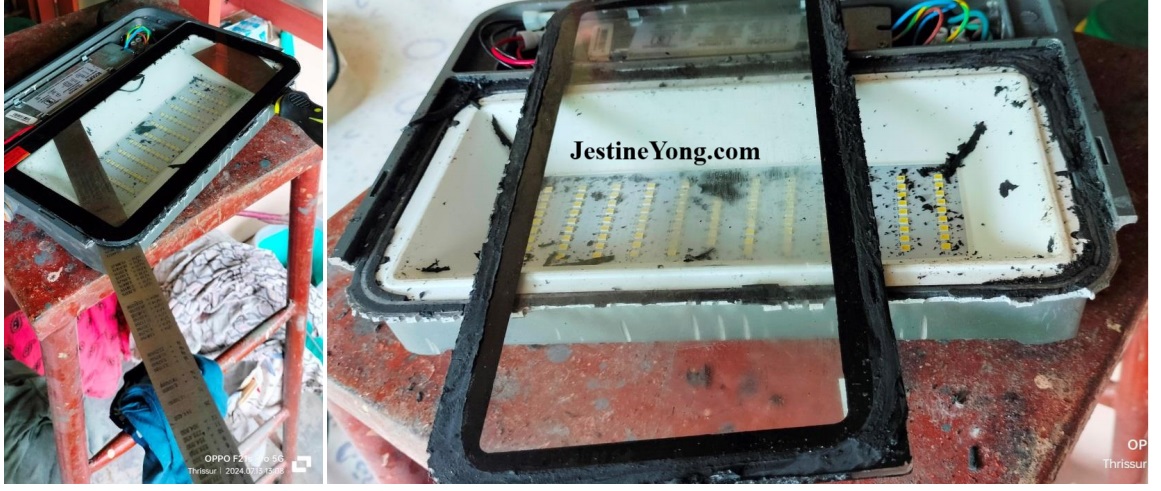
The challenge thrown to me was opening the section where the LED board is fit. It was under a glass. The glass was fixed inside a frame and sealed with black tar like rubber substance, which was very, very hard to even cut with a sharp blade. First I used various glue removers like Thinner, Petrol, Gum-Adhesive-Tar Remover & even CRC C-26, making incisions on the sides and injecting these liquids using a syringe and allowing it to soak in. This took me around three days, trying one after another.
What I could achieve was removing the adhesive stuff on two sides of the glass, where there was a little gap. All attempts to lift the glass did not succeed as it was firmly fixed on the frame and I could not apply force lest the glass should break . This type of sealing is being done to avoid water seepage and damage. You can see the various tools (in the background) along with the bottles of liquids that I used one after the other:
After spending almost a sleepless night, thinking about what kind of liquid that would melt the completely dried hard rubber glue, I decided to do the ultimate the-only-other-go method of cutting the outer side of the frame that housedthe glass, so that I can insert a sharp blade and cut the rubber under the glass with the aid of petrol/thinner. I used my hacksaw blade and made a groove up to the glass on one side and gave a small gap and made another a little far from it.
Then used my beak shaped player and plucked the cast iron piece ensuring that the glass is not touched in any way.
Then I used my angle cutter/grinder for doing the groove cutting on that portion from one end to the other. Let us have a look at pictures so that you are with me in my narration of this interesting bizarre work:
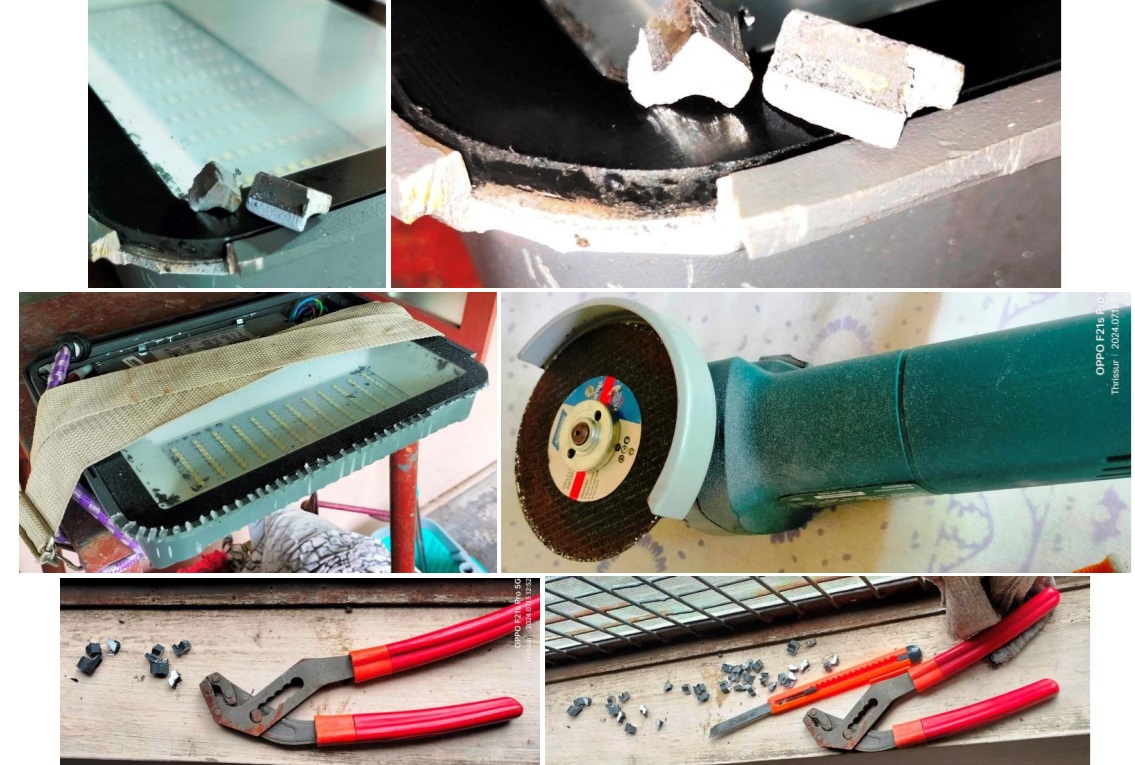
Since the metal was not hard, I could finish this work without having to exert myself too much. Utmost care was taken not to break the glass. I put on my two-wheeler helmet and closed the face with its hood and wore my thick rain coat and rubber gloves as safety measures. I might have looked like an astronaut with these gears! (LOL) After clearing the area from one side to the other side by plucking away the frame piece by piece, I used the sharp knife and incised the rubber under the glass progressively and made a hole enough for me to insert it well and hammered it to one end using my small hammer. Then took it out and reinserted it in reverse at the point where I started and cut the other side too similarly. Then I sharpened one end of my 12 inch metal scale like a thistle of a blade and inserted it and hammered it cutting the rubber on the sides up to the end. I used the washing and drying area at the rear of my house as a temporary workshop for doing this work, as it was raining cats and dogs outside. I used a tall stool, which was at the correct height for me to do the job. One of the pictures above would show you how I tied the light with bungee straps to hold it in proper place. I was doing all these works deriving amusement like a little boy and I felt the thrill of conquering or winning a war against a stubbornly fit glass cover. I forgot to mention that I poured petrol each time I made a little progress in cutting the rubber so that it would make the bonding softer. The glass came off only after every bit of bonding was cut and separated. The glass hung on even on a tiny strand of the hard rubber! But with continuous and unrelenting pushing forward, the glass came off finally, though inflicting a few bruises on my fingers in the process!
Following pictures would once again help you all to be with me so as not to miss the thrill:
I removed the reflector, which too had suffered a few cracks here and there. The LED board was fixed with screws and had the heat sink compound spread fully at the rear side. Let us have a look at the board and the driver module together after it was cleaned thoroughly:
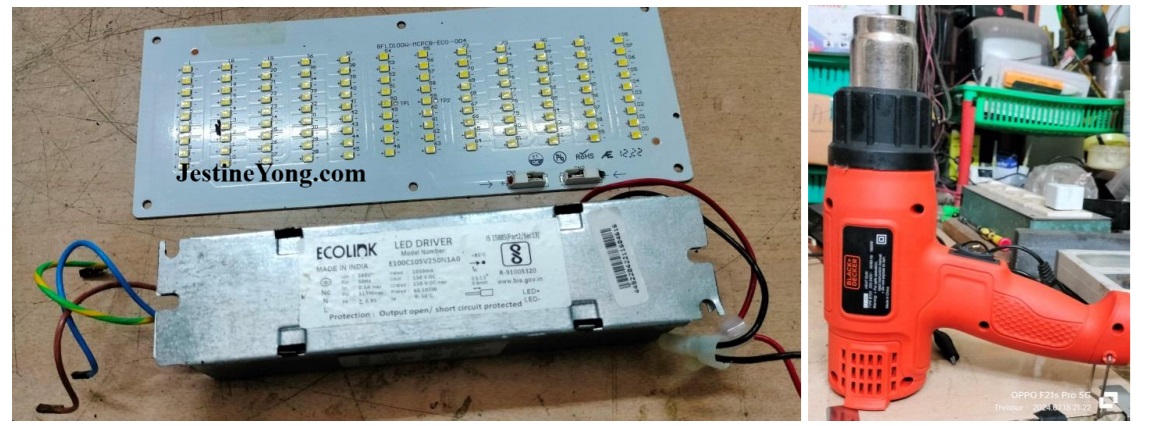
Since the new boards are coming with SMD inverter circuits on the board itself, there was no need for this driver to be fit back. I applied flux liberally on the LED board and blew all the SMD LEDs out using my 1800W BLACK+DECKER HEAT GUN . A couple of LEDs fell on my feet and gave me protest burns, which looked like retaliation, and I enjoyed the pricks! (LOL) I bought two 50W boards and fixed it using double sided LED backlight fixing tape. Then applied Fevibond on the sides in order to ensure that the boards do not peel off due to heat. Then provided extension wires to the mains cord housed in the separate chamber at the bottom, and took it through the hole at the bottom and soldered the wires to the new Boards. I paralleled the Line and Neutral wires so that both the boards get 230V AC directly. I provided a thermal sleeve on the wires in order to obviate the chances of melting and shorting due to the heat produced by the LEDs.
Then fixed the reflector, after cleaning to the extent possible, as the plastic had dried and it was prone to break like chips! I cut the reflector on the left and right sides in order to provide clearing for a line of LEDs that overshot and went under the reflector. I could not do a clean job of it, as the plastic came off even by a gentle touch. The gap created made that portion of the reflector look like rat bitten! Then fixed the glass on top of one coat of Fevibond and applied two coats of water proof sealants on all the sides, waiting for the first coat to be dried. Now let us have a look at the result along with a couple of pictures more, to conclude this very interesting work, which provided me a lot of thrill and excitement.
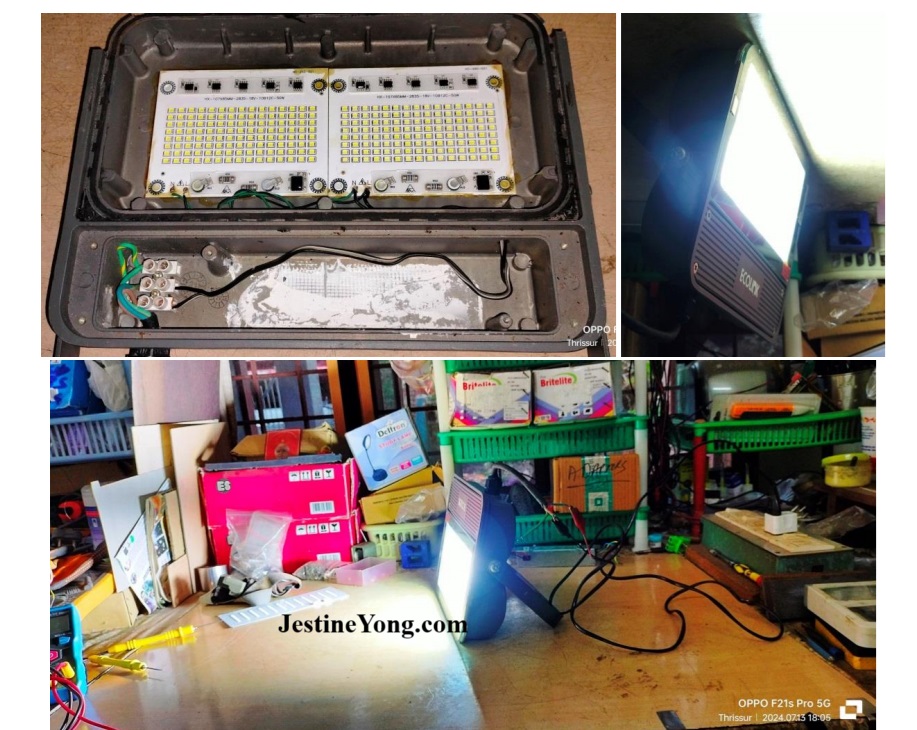
Mission accomplished with greater satisfaction getting collected to the avaricious bag!

This article was prepared for you by Parasuraman Subramanian from India. He is 74 years old and has more than 30 years’ experience in handling antique equipment like Valve Radio, Amps, Reel Tape Recorders and currently studying latest tech-classes conducted by Kerala State Electronics Technicians’ Association. He has done graduation in BBA degree, private diploma in Radio Engineering and retired as MD of a USA company. Presently working as Consultant to Hospital and other institutions.
Please give a support by clicking on the social buttons below. Your feedback on the post is welcome. Please leave it in the comments.
P.S-If you enjoyed reading this, click here to subscribe to my blog (free subscription). That way, you’ll never miss a post. You can also forward this website link to your friends and colleagues-thanks!
You may check on his previous article on Backlight LED Domes Found Lying Loose In SONY LED TV Model KLV32EX330
 (42)Dislikes
 (0)
(0)
19 Comments
Leave a Reply


Hans Andersson
April 6, 2025 at 4:20 pm
What about break fluid as a solvent?
"Patience, persistence and perspiration make an
unbeatable combination for success."
--- Napoleon Hill
Parasuraman S
April 6, 2025 at 6:15 pm
I have not yet tried. Shall try it next time. Thanks for your comments and a wonderful quote!
Mark
April 6, 2025 at 4:38 pm
That took a bit of thinking to get it apart!
Parasuraman S
April 6, 2025 at 6:15 pm
Thanks, dear Mark!
Albert van Bemmelen
April 6, 2025 at 5:35 pm
This again was another profound led display repair with even more troublesome disassembly problems successfully done. Although I doubt if it was as rewarding in the end after such a hard manual labor.
Question: did you also try Acetone to dissolve the glue from the glass? Because it is a excellent solvent that even liquifies plastic from old bad cd and dvd discs to a liquid solution that then can be used as a lacquer layer to make wood and other materials completely waterproof. And I use Acetone to make hardened old silverglue liquid and as new again.
Parasuraman S
April 6, 2025 at 6:17 pm
The reward is always the goodwill of my hospital, which I value very much! Thanks for your suggestion of usig Acetone. Shall try it next time. Many thanks, dear Albert for your expert comments and suggestions!
Yogesh Panchal
April 6, 2025 at 6:34 pm
Good Job!Sir
Parasuraman S
April 6, 2025 at 8:11 pm
Thanks!
Henrique Jorge G. Ulbrich
April 6, 2025 at 11:54 pm
I´ve serviced some reflectors, but never faced this type of trouble (difficulty to remove the front glass). All of them used an easily removed silicone gasket. Would the manufacturer tried to make a programmed obsolescence product?
Parasuraman S
April 7, 2025 at 3:35 pm
The manufacturer's idea was to use and throw. But we defeated it by brutal tactics! (LOL) Thanks for your comments!
Mark J
April 7, 2025 at 12:23 am
Parasuraman did you try acetone or nail polish remover? That works for me most of the time when I need to open something that is glued. Good job on the repair. Thank you for sharing you knowledge and experience.
Parasuraman S
April 7, 2025 at 3:36 pm
I did not. Even Albert has suggested the same. Shall try next time. I have observed that it melts plastic, but no idea whether it would melt rubber of this type. Thanks for your input
Mark J
April 8, 2025 at 4:13 am
You are welcome. Just returning the favor. I always welcome your input. I have learned a lot from your articles. Thank you again for sharing and commenting.
Hollis LuQuette
April 7, 2025 at 1:25 am
You had one tough project right there , but you came out the winner . I was going to suggest Acetone like Albert did , I use it a lot , it makes the hard stuff soft. I also use 99 percent alcohol on quite a few items in VCR's and Cassette tape players.
Parasuraman S
April 7, 2025 at 3:37 pm
Thanks for your inputs and comments! Shall try next time.
muykit
April 7, 2025 at 2:16 pm
Safety first. Lets take care with solvents, adhesives and detergents. Some may be corrosive, flamable or toxic to inhale. I have times without number seen such substances accidentally spilll on my workbench. 'Mr A stronaut', you left your hands and feet bare hence making yourself vulnerable to the minor bruises. I too once in a while suffer the pain inflicted by hot and tiny dropping solder balls, and also a hot soldering gun. Your pursuit to succeed remained unhindered by a strong determination. A high degree of endurance and maintaining a forcused mindset made you to ultimately carry the day. There is no better way of showng the abudance of love for your work. The lamp will now shine where darkness abounds because someone passionate made a mental, physical and financial sacrifice. Thanks for further sacrificing to prepare a 'lamp of knowledge' in the form of a lengthy article. The 'lamp of knowledge' provides light in the 'dark technology pathways' for impatient readers and learners, the likes of muykit.
Parasuraman S
April 7, 2025 at 3:39 pm
Very spiritually enlightening comments! Many thanks for your concern too and sharing experiences and suggestions!
Waleed Rishmawi
April 7, 2025 at 3:52 pm
that is a lot of work to replace the LEd board but it was worth it since it belonged to the hospital..i like what you said that I work in a HOSPITAL and this DEAD device came to me for repair.LOL. have a blessed day and thanksf for sharing.
Parasuraman S
April 7, 2025 at 8:04 pm
Many thanks for your continued supportive comments, dear friend! I was just wondering how come you never came up and here you are!