
Chauvet 4 Bar Flex Repair
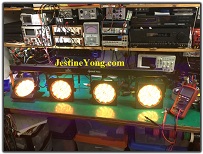
A friend of mine asked me to have a look at one of his Led show lights. It died during a show. It is a 4 light bar made by Chauvet, and can be controlled by DMX, or used as a standalone unit.

It wasn’t powering up at all. Checked the fuse in the IEC socket.
To my surprise the glass was cracked. I’m not sure if this happened from heat, or if he tried to replace the fuse and damaged it in the process.
I decided not to replace the fuse right away, but jumper it with some croc clips, and power the unit via my variac with some series light bulbs. This way if anything was shorted inside, the bulbs would glow and I wouldn’t waste a perfectly good fuse. The bulbs act as a current limiter.
Again the unit wasn’t powering up. Time to open the unit up.
On the inside it has two pcb’s. One is the SMPS, and the other is the main controller board with the microprocessor. The SMPS board was getting 230V in, but wasn’t giving me a 12V output.
Out comes the board.
It had a pcb mount fuse that read open circuit. I decided to check some of the other components too.
Checked ESR of all capacitors with my trusty Blue ESR Meter. All gave low readings, BUT the main filter capacitor (100uF, 400V) read close to 0 ohms. Normally I would assume this to be low ESR reading and a “good” capacitor. To be sure, I decided to use my DMM to check resistance across the capacitor. Again 0 ohms. This indicates a short circuit either in the capacitor itself or the bridge rectifier or perhaps maybe even the switching Mosfet.
Removed the capacitor, and sure as hell, it was shorted.
Bridge rectifier and Mosfet tested fine.
Check out Jestine’s book on testing electronic components for more info.
I replaced the capacitor with a new one rated at 105 degrees Celsius. I also replaced the fuse with a miniature through-hole type. This one is 3,15A Time lag fuse.
I then secured these with a dab of RTV silicone, and cleaned the bottom with IPA to remove all flux residues.
I then powered it all up again via the light bulbs, and measured 12V on output.
Put the SMPS back in its place and replaced the mains fuse in the IEC socket, and switched it on. All was working well.
So remember to check a very low ESR reading with a DMM as this might actually be a short circuit!
As they say “the show must go on”.
This article was prepared for you by Riaan Diedericks. He runs his own electronics repair shop in Pretoria, South Africa. He specializes in Pro Audio repairs.
Please give a support by clicking on the social buttons below. Your feedback on the post is welcome. Please leave it in the comments.
P.S- If you enjoyed reading this, click here to subscribe to my blog (free subscription). That way, you’ll never miss a post. You can also forward this website link to your friends and colleagues-thanks!
You can also check his previous repair article below:
 (110)Dislikes
 (0)
(0)
12 Comments
Leave a Reply


Parasuraman
November 1, 2016 at 3:16 pm
Very good! Capacitor shorting is a common problem!
Albert van Bemmelen
November 1, 2016 at 3:24 pm
It almost always are the Electrolyte Capacitors that deteriorate, dry out, or blow up and end the life of many SMPS Boards and take the primary Fuse with them to kingdom come.
Thank you for your article Riaan.
Anthony
November 1, 2016 at 5:17 pm
Good repair Riaan !
Well done.
Regards
Ernst Marais
November 1, 2016 at 9:36 pm
Hi Riaan,
That Brymen867 is just the best DMM ever. Great repair, thanks for your input
Yogesh Panchal
November 1, 2016 at 10:23 pm
well done!Riaan.
Humberto
November 1, 2016 at 10:34 pm
Riaan good photos and explanations too. You have saved another device from the dump.
Mark
November 2, 2016 at 5:47 am
Thanks Riaan,
Good diagnostic process! I did notice as I read through the article that the main capacitor had a slight bulge to it, but no obvious signs.
But well done on the extra step of checking with the multimeter to check for a short. We do tend to rely on our fancy test equipment to give us guaranteed results, but even the basic meters are vital in correct diagnosis.
Cheers
Mark
Robert Calk
November 2, 2016 at 8:19 am
Thanks for sharing the repair with us, Riaan. I also noticed your Brymen DMM. I have a 869s, and I love it.
Gerald
November 2, 2016 at 12:32 pm
Very nicely written article Riaan. Reminds us that one measurement only doesn't always tell all the true.
Thank you for sharing.
Cheers,
GM
Phumlani Manyathela
November 4, 2016 at 1:42 pm
Riaan thanks my brother.
Ulises Aguilar Pazzani
November 20, 2016 at 6:45 am
another good repair r Riaan
Red
May 22, 2020 at 10:51 am
Thank you. It’s 2020 and your repair post is still helping fix a problem.