
Karaoke Bluetooth Microphone Repaired
In our housing complex there are group of music lovers, keeping get together music concert every weekend & public holidays in our premise, they ordered 7 to 8 these types of microphone. One of our colleague came to me with his device, stating device is not charging.

On visual inspection I found USB charging socket is missing.

This is an easy repair just take the Protruding USB charging connector resolder it & done.
So I opened the unit for further work. For opening the unit just remove four screws from all four corner underneath of the sticker and pull down the handle unit.


As the control panel was pulled up for inspection the USB socket fell down. And it is not an easy job as I mentioned on starting.

PCB is badly damaged because of pressure while connecting the charger. found Ripped solder pad on the socket pins.


This is difficult task without proper tools like microscope & thin needle soldering iron (I do not have microscope) & difficult to work under the magnifier glass.
First I took the ripped USB socket & cleaned the pins.

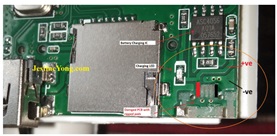
I noticed this socket is not properly designed by the manufacturer to hold it firmly on the PCB by proper Locking lids & body of the socket also soldered on the PCB as you can see PCB Trace is very thin to hold & tackle the pressure while connecting the charging cable.

After tracing the +ve & -ve points I scratched the trace & applied the solder, now before placing the USB socket I applied super glue on PCB as well on base of the socket & fixed it. (Take care while applying glue or be ready with new Charging socket if glue enter in the socket).

Socket –ve pin is directly soldered on the pad but +ve side required to use jumper wire.
After soldering / cleaning & inspecting under the magnifier glass, I connected all the removed wires & powered the unit & found Battery Charging Indicator is turned ON.

After reassembling everything I turned On the Unit & Paired it via Bluetooth to my Phone & played some songs it works fine now & unit is ready to pick up.


This article was prepared for you by Yogesh Panchal who works as a Computer Hardware Engineer in Mumbai India.
P.S- Do you know of any your friends who would benefit from this content that you are reading now? If so, forward this website to your friends or you can invite your friends to subscribe to my newsletter for free in this Link.
Note: You can check his previous repair articles on 3 Pins On-On-Off Self-Lock Tactile Switch
 (17)Dislikes
 (0)
(0)
6 Comments
Leave a Reply


Parasuraman S
June 7, 2025 at 9:59 am
Excellent professional fix and a very intricate job well done! Thanks for sharing, especially how to open it. I do not recommend the use of superglue for fixing the socket, though there is no other go, as it has a tendency to corrode over a period of time due to chemical reactions.
Yogesh Panchal
June 7, 2025 at 3:40 pm
Thank you! Sir
Charging socket fixing direction is designed wrongly,socket body legs are very short & due to this it does not get the holding grip from other side and also socket legs does not reach other side through the hole.because of this bad design actual pressure comes on thin copper Traces & it gets tear-off on little pressure .
Mark J
June 8, 2025 at 7:39 am
Yogesh great job. That was no easy fix but you made it look easy.
Yogesh Panchal
June 8, 2025 at 3:09 pm
Thanks! Mark J
Albert van Bemmelen
June 14, 2025 at 4:30 pm
Good repair. The fact that only the + and gnd powerpins were needed here and not also the data pins made fixing the charger port no doubt a lot easier!
Yogesh Panchal
June 16, 2025 at 12:50 am
Right! Albert