
Microwave Oven Back To Life
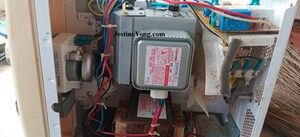
This microwave oven was brought by a new comer in the neighbourhood with complaints of working but not heating. So I did put it to test by powering it, bulb lit inside oven, tray and fan worked, but magnetron was not heating,

Troubleshooting : With this result,it exempts the a/c 220V input cord and its circuit, thermal switch that is usually place on magnetron to cut off if magnetron is over heating, then while oven was working, open its door to check if it will self off, of course it did off and close door again and started working, this indicates door switch is good.
Then I checked all high voltage components: fuse, diode, capacitor and transformer, all tested good.


Check on magnetron’s filaments and magnet 🧲 ring if there’s any crack….no cracks.Then I assumed if all high voltage components are o.k, probably magnetron is o.k too, and if it’s ok, yet it’s not getting heated, perhaps its not getting power. So I decided to check the transformer of it’s getting 220V input voltage, so I removed the + and – 220V input pins from transformer,connect meter probes to the loose 220V ac wires and switch ON oven, surprisingly,meter was reading 25V instead of 220V (pls when we carry out this particular test,we must exercise caution and ensure the two wires do not touch transformer input pins).
This result indicates there is problem from second part of 220V input circuit board.I then use analog meter to first check the two wires for their continuity if it’s oK…..ok right. The next step is to check the 220V circuit board, I tested all components on this board, all tested good, except two ceramic resistors.

This two resistors were open and one does not even have its value printed on it. So desoldered them out and replaced.

After put a glass of water inside oven and power on…..o la la! magnetron started heating and water was warm within 2 minutes.
This’s the finished repair work.

This article was prepared for you by Imoudu Onwumah from Nigeria. He is 62 years old and has just 3 years experience in electronics repairs. I started career in hotel industry as a chef, but then I was doing repairs only in electrical repairs as a hobbyist. In 2018, I decided to learn about electronics which through Jestine’s electronics e-books and holding my hand, am an electronics techie today.
P.S- If you enjoyed reading this, click here to subscribe to my blog (free subscription). That way, you’ll never miss a post. You can also forward this website link to your friends and colleagues-thanks!
Note: You can read his previous article on Repair Of Dead Wireless Microphone
 (46)Dislikes
 (0)
(0)
16 Comments
Leave a Reply


Parasuraman S
August 30, 2025 at 4:18 pm
You have not mentioned the value of the resistors that you used. It is a good professional fix and I am glad that you are progressing by leaps and bounds! Many thanks for the share of a step-by-step guidance!
ANTHONY PATERSON
August 30, 2025 at 5:24 pm
You can see the cracked body of one of the wire-wounds resistors. High power components are more stressed than others and prime candidates for failure. The chassis earthing looked somewhat rusted - I might have rubbed down to reveal good metal and re-attached the earth-lugs.
Thank you for sharing your repair.
ANTHONY PATERSON
August 31, 2025 at 3:52 am
Furthermore, the value of the resistor could be closely approximated by measuring from the end-cap to the break on either side, then add together to get the ohmic value.
Waleed Rishmawi
August 30, 2025 at 4:27 pm
good job on the repair. one way to check if the magnetron is ok is by doing an ohm check between the filement and the body of the magnetron and it should be an open reading..if there is reading the magnetron is faulty; repair either by replacing the whole magnetron or just replace the filement capacitors inside. have a blessed day
Albert van Bemmelen
August 30, 2025 at 4:58 pm
If the broken resistors had no value marking on them and couldn't be measured I guess you had found the matching service manual or its circuit to be able to replace them with the correct values. Else it probably must have been a trial and error replacement test. Or looking for matching clues in similar microwave oven service manuals?
Yogesh Panchal
August 30, 2025 at 6:22 pm
Goof Fix!Imoudu
LEwis Spedding
August 30, 2025 at 7:37 pm
well done with this interesting repair
Mark J
August 31, 2025 at 4:11 am
Imoudu well done on the repair. Thank you for sharing.
Imoudu O
August 31, 2025 at 4:43 am
To: Parasuraman.S and Albert.B
Thanks for your comments and observations.l was lucky to have a scrab of same board,on which I got to know values of the two resistors,(20W/.15R and 10W/3.3K) however 10W/3.3k resistors on the scrab was also open,so I used 20W/.15R from scrab for replacement and replaced 10W/3.3K with 5W/3.3k b/cos I can't get its original wattage value from sales store.
AdamS
September 1, 2025 at 6:59 pm
Good repair Imoudu, but you must replace that 5W 3.3K resistor you used with the correct 10W as soon as you can. If the 5W gets too hot, it will potentially cause a fire.
Only ever go up in power rating - never down!
Imoudu O
August 31, 2025 at 4:46 am
To all: I appreciate all your comments,have a nice day all
Muykit
August 31, 2025 at 7:01 am
A worth noting article, senior technician, Imoudu. Though with lack of a reminder for goodness sake, for the need for one to be overcautious of the emitted harmful rays that should never leave the oven interior, while testing the door switch as the door is opened. I think 220 VAC is what should have been the voltage readng during the temporary transformer disconnection test. A lower voltage reading when transformer is reconnected definitely calls for investigation. And also my understanding is that the two resistors that you directed my attention to, may well be serving the vital purpose of safeguarding the magnetron in instances of overcurrent flow, I hope the replacement resistors will play the designed role with an equally stunning efficiency. I'm a student-participant in this article observation, thats all the more reason why I stand corrected as per my expressed own personal views. Many thanks brother.
Imoudu O
September 1, 2025 at 2:33 am
Muykit,
I can't really say what function those resistors play,however the 220V board is decided into two circuits: input and output,the resistors are on output side,logically when both two resistors got open and output voltage drops to 25Vac at transformer input pins(+ & -),one would assume the faulty resistors have to do with the transformer logicall,hope you understand what I am driving at.
However I am yet to investigate this assertion.Thanks
Nazir
September 1, 2025 at 1:48 pm
Great perseveration for this type of fault ,good job Imoudou
corriette
September 3, 2025 at 8:15 pm
good job. patience is key in solving any appliance.
Tito Kanshulu
September 4, 2025 at 11:08 pm
Excellent repair Sir Imoudu, however, in your article you didn't explain how you contained the high voltage stored in the high voltage capacitor during the taste. All in all, keep the fire burning