
No Display Problem Solved By Side COF Bonding In HAIER LED TV Model LE32B9000

This TV belonged to an old lady living alone and was brought by my school classmate stating that the display went off suddenly and the TV had undergone a repair for some problem long back. I opened and subjected it to a preliminary cleaning using my mini vacuum cleaner, as it was brought very late in the evening and I could not take it out for an all round cleaning with blower in open space. Following is an inside picture for those who might be interested to know:

I took advice from my techie friends and searched for the datasheet of the panel V420HJ2-P01 in
https://www.panelook.com/V420HJ2-P01+Rev.C5_Innolux_42_CELL_overview_39298.html
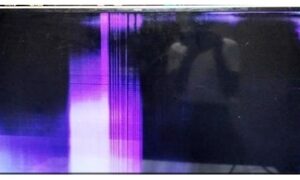
This Panel had three side COFS. The no display problem with the lines that you see in the pictures provided at the beginning indicated shorting of side COFs.
So, removed the bottom and side frames to look at the side COFs and take its number for further troubleshooting. The previous technician had already done bypasses on the COFs. Let us see:
Since a work was already done on the side COFs, I did not want to do anything further on this and suggested to my friend for side COF replacement, for which I had to take the TV to a bonding place located around 30KMs away from my home. He asked me to go ahead and so I went ahead carrying the TV to one of my techie friends who did panel bonding and laser work on panel to burn panel shorts.
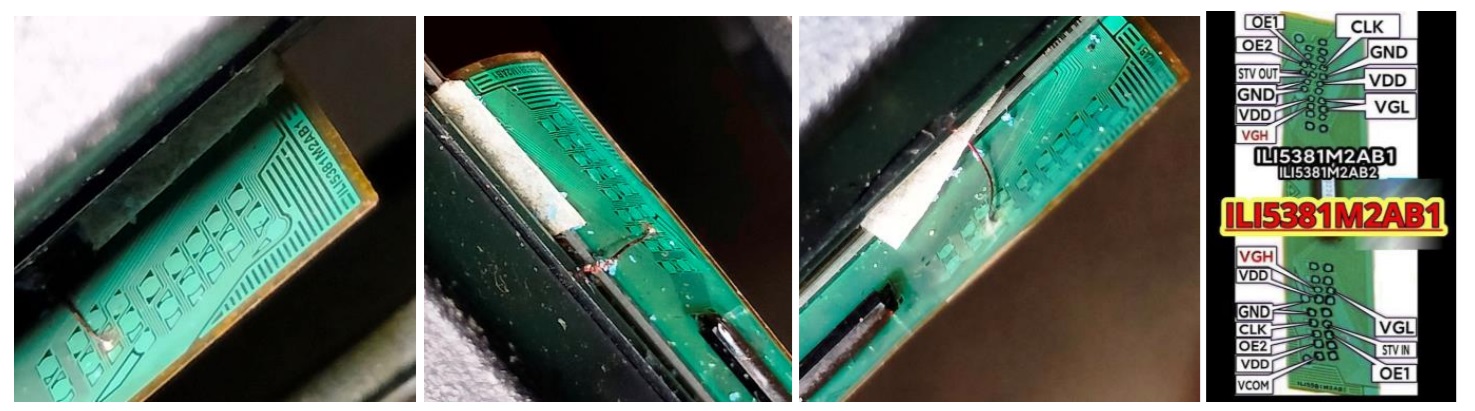
For those who do not know much about the function of side COF, let me just mention that the VGL/VGH voltages and date are taken from the source COFs to the sides and with the help of a chip on film (COF) for which the tracks are on the glass itself, the voltages and signals are fed to the panel from the sides. Sometimes the tracks get burnt or corroded and lose contact which can cause a no display or display with lines or even white display. What a technician does is to provide an external connection from the Source COF to the side COF and that is what you see in the first three pictures above. The last picture is the datasheet of the side COF which has a specific number to locate the VGL/VGH and other pins on the COF without which one cannot do the bypass. The COF data is available in the web by searching using the number that we can see on the side. You may need a microscope or a good zooming camera. These are very intricate and precision works and take a lot of time and causing eye strain. If you zoom the first picture above, you can see the number on the extreme right.
My friend removed the panel and took it in for the side COF bonding. I am providing a few pictures of the process, which can be followed only by those who are familiar with such works.
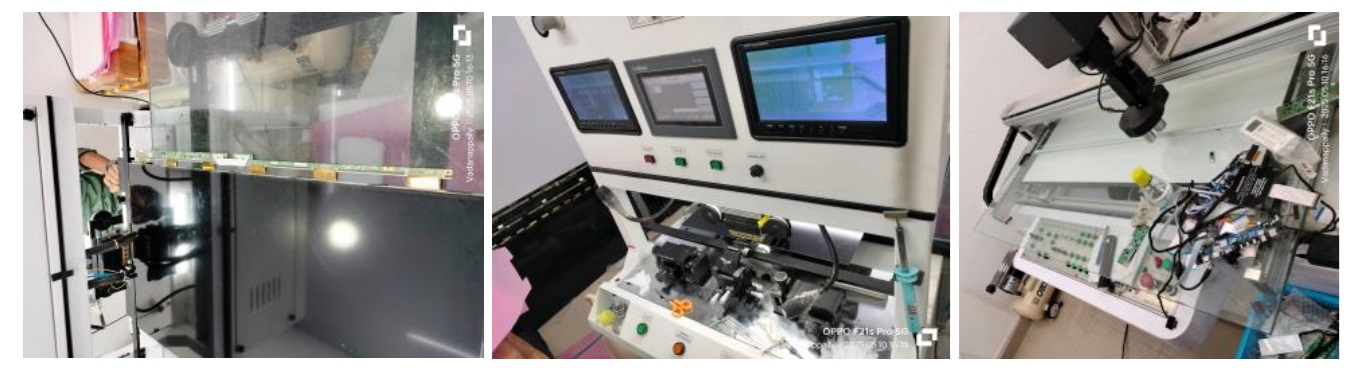
In the first picture above, what you can perhaps see is the panel inserted to the bonding machine after removing the three side COFs, cleaning and applying bonding glue and other agents. The operator has to adjust the tracks on the COF as well as on the panel glass to get it perfectly aligned. The process is similar to our soldering, but uses high temperature with chemical reaction for a conductive bonding. It requires a lot of training and experience as handling the equipment is not that easy. The skill can be developed only by proper training and hands on experience. The machine that you see in the last picture above, is the laser machine installed in the adjacent room. This machine is used to burn shorting between tracks on the panel. Both the bonding and laser machines use very high quality cameras for a clear and distortion free view of the tracks in the panel and COFs. The operator in this case was my friend’s son who was also a qualified artist. Another quality one requires is a lot of patience as cleaning the COF area, perfecting the alignment on both sides of the COF etc. takes a lot of time. Here are a few more pictures:

The first picture above would show you the three new COFs bonded on the sides. The second picture would show you the track that had burned, which was bypassed by the previous technician. The third picture would show you the burnt tracks that caused the failure of display, which is marked with an arrow. The last picture is that of the old COFs removed.
He had to do a manual joining of the burnt tracks which, unfortunately I could not catch in my camera as it was so minute and I have no idea how he managed to do it! The panel was checked and TV was reassembled back by my friend.
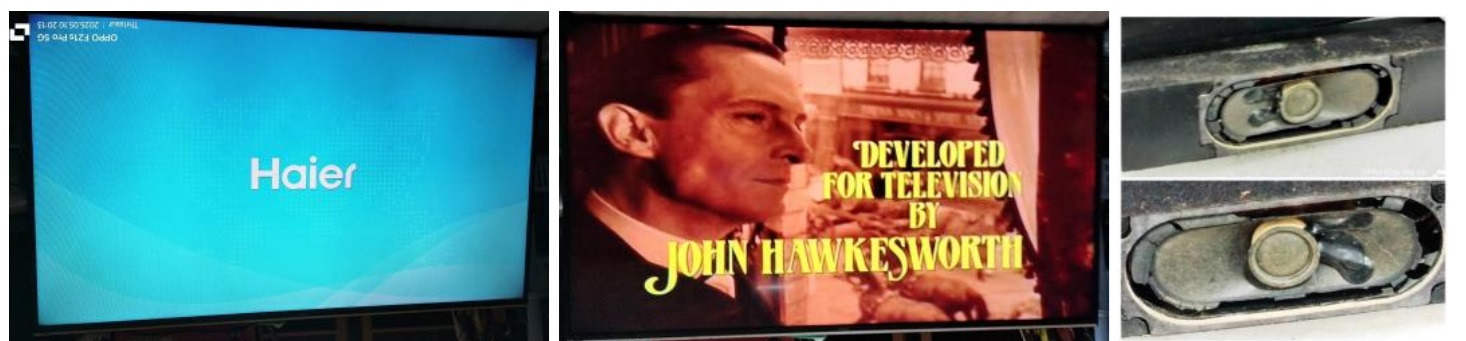
Video signals were fed for sufficient time to make sure that there was no immediate failure. As the speakers were in bad condition, my friend gave me one for fetching an equal from the market and fixed the back cover for safety in transportation. I had gone to the bonding place by 2.30PM and returned home by around 6PM. As it was a Saturday, I rushed to the market place for fetching the replacement speakers in my two-wheeler immediately after my return.
Fixed the speakers and allowed the TV to run for sufficient time before informing my friend to come and pick it up. Mission accomplished with a lot of vigor and enthusiasm causing intense satisfaction getting entry into the collection bag. Perhaps you all will agree that an accomplishment after putting a lot of strenuous efforts not only gives us utmost satisfaction, but also removes the fatigue caused, if any. I got a good night’s sleep too!

This article was prepared for you by Parasuraman Subramanian from India. He is 76 years old and has more than 30 years’ experience in handling antique equipment like Valve Radio, Amps, Reel Tape Recorders and currently studying latest tech-classes conducted by Kerala State Electronics Technicians’ Association. He has done graduation in BBA degree, private diploma in Radio Engineering and retired as MD of a USA company. Presently working as Consultant to Hospital and other institutions.
Please give a support by clicking on the social buttons below. Your feedback on the post is welcome. Please leave it in the comments.
P.S-If you enjoyed reading this, click here to subscribe to my blog (free subscription). That way, you’ll never miss a post. You can also forward this website link to your friends and colleagues-thanks!
You may check on his previous article on 600 Repair Articles Written By Parasuraman covering 641 items!
 (41)Dislikes
 (1)
(1)
10 Comments
Leave a Reply


Albert van Bemmelen
December 28, 2025 at 6:09 pm
Another well performed repair in this 32 inch tv with cof problem issues. However still way too complex and difficult to do for most engineers. And the link to the service document that was showed is only obtainable after payment. Why repairs like these likely never will be my cup of tea.
Parasuraman S
December 28, 2025 at 9:00 pm
Many thanks for your expert comments and opinions, dear Albert!
Mark J
December 29, 2025 at 1:01 am
Parasuraman another great tv repair. Thank you for sharing.
Parasuraman S
December 29, 2025 at 8:28 pm
Many thanks, dear Mark!
Imoudu.O
December 29, 2025 at 3:45 am
This cof bonding isn't it expensive relatively to cost of a new tv? Hope the lady will enjoy satisfaction before tv breaks down again.
Parasuraman S
December 29, 2025 at 8:30 pm
No. Single side COF bonding is not expensive.
Imoudu.O
December 29, 2025 at 3:12 pm
'The second picture would show you the track that had burned.....' are these burned tracks located on the panel or the cofs?
Parasuraman S
December 29, 2025 at 8:31 pm
It is on the glass. That's why I said I have no idea how he joined it!!
Yogesh Panchal
December 30, 2025 at 6:20 pm
Good Efforts! Sir,
This is a time-consuming job, but it's worth it if the compensation in terms of payment is adequate, as it involves a full day's work and transportation.
Also I think there is no warranty for COF bonding in panel repair, is that correct?,Speakers also seems degraded.
Parasuraman S
December 30, 2025 at 9:49 pm
Yes, Yogesh Bai! It is a time-consuming work. But I was paid adequately. My friend either gives a concession or free replacement, if something happens on the replaced COF within a short span of time. Speakers get worn out due to bad quality. Many thanks for your comments!