
Power Supply Modified In Philips Sound Machine Model AZ380/94

This set belongs to one of my neighbors staying opposite to my house. This was brought to me in August, 2018 with the complaint of crackling noise, which was solved by just cleaning the function and band switches. Again it visited me in October, 2021, history of which can be seen from the following link:
https://jestineyong.com/dry-solder-and-defective-capacitors-found-in-philips-az380-94/
This time it was brought in a dead condition (December, 2022.) As suspected the primary of the Transformer had opened.
Since this had a thermal fuse, I gently pealed the transformer to know whether that had got open, but it was not the case:

I took it to my techie friend, who did rewinding of the Transformers. First he refused, as the wires were so thin that it was difficult for him to handle it lest the counts should get missed. But on my insistent requests, he accepted and did the rewinding and varnishing and returned it next day. The output unfortunately was around 10.5V, which when rectified through a bridge rectifier, was around 15VDC. So, my friend refused to accept any charges and asked me to use it on load and see. The set was working on 9V and I definitely could not feed such a high voltage inside.
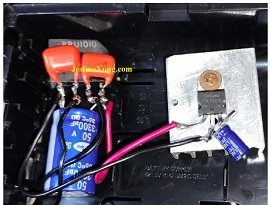
That’s when I decided to provide a 9V regulator as the current drawn by the set was very well within 1A. I used a bridge rectifier, with two 0.01 Caps connected between the in/out of two sets of diodes, one 3300/50VV capacitor for smoothing, 7809 Regulator with a heat zinc and one 220/25V capacitor at the output. The output was around 9V and when I played the set in Radio, USB and CD modes at full volume, it was found working very well. (But I advised the customer to use only minimum volume as a precaution.)

After sharing what I did, I persuaded my friend to accept the charges and he yielded to my pressure.
Mission accomplished very easily causing the satisfaction to jump into the collection bag.

This article was prepared for you by Parasuraman Subramanian from India. He is 72 years old and has more than 30 years’ experience in handling antique equipment like Valve Radio, Amps, Reel Tape Recorders and currently studying latest tech-classes conducted by Kerala State Electronics Technicians’ Association. He has done graduation in BBA degree, private diploma in Radio Engineering and retired as MD of a USA company. Presently working as Consultant to Hospital and other institutions.
Please give a support by clicking on the social buttons below. Your feedback on the post is welcome. Please leave it in the comments.
P.S-If you enjoyed reading this, click here to subscribe to my blog (free subscription). That way, you’ll never miss a post. You can also forward this website link to your friends and colleagues-thanks!
You may check on his previous article on Voltage Surge Shorted Two Mosfets And Blew The Fuse In Samsung LED TV LA32D451G3
 (39)Dislikes
 (0)
(0)
9 Comments
Leave a Reply


Waleed Rishmawi
September 30, 2023 at 1:39 pm
rewiring such a transformer is such an expensive process in my cournty therefore I always try to buy a second hand device and take parts from it if I have to. you managed it though and it was a success. good job my friend and keep up the good work. have a blessed day
Parasuraman S
September 30, 2023 at 10:49 pm
Many thanks for your comments, dear friend!
Albert van Bemmelen
September 30, 2023 at 2:51 pm
Another very well done modification on a set that was already saved before!
I always wonder how they manage to disassemble the core of such a defect transformer because it always seems close to impossible to carry out such a task. It no doubt would make a very interesting article if that person would share that process in detail.
Parasuraman S
September 30, 2023 at 10:53 pm
I have seen him doing it. First he takes out one core pushing it out using suitable tools. Then pulls out one by one. There will be two L shaped or M shaped cores inserted from top and bottom alternatively, the gap of which will be filled by thin sheets. You can see the process here
Many thanks for your comments!
Imoudu.O
October 1, 2023 at 5:54 am
I don't get where the +/- of e-cap was connected on rectifier.What is the purpose of the two 0.01 cap?
l need to understand.
Thanks for sharing.
Parasuraman S
October 1, 2023 at 6:02 pm
+ was connected to the positive rail and - to the negative rail. The two 0.01 caps across the diodes would filter noise generated by the diode when AC is rectified. Hope this clarified your doubts! Many thanks for your comments and clarifications sought!
Sivadasan KK
May 29, 2026 at 12:10 pm
Dear Sir, Iam Sivadasan, 67yrs. retd.Indian Navy(Electrical Branch) from Calicut, Kerala.
Sir I have a vintage Sony audio system model: MHC-GRX10AV (1000PMPO (1998),since Iam not getting the original IC M62442, could you please help me,how to procure it.
Thanking you in anticipation.
Yogesh Panchal
October 5, 2023 at 12:50 am
Good Job! Sir,
i repaired same type of the problem simply installing 9v /1.5amp DC adapter Bypassing Battery connection from inside,Because now a days using this device on big 1.5v X 6 cell is not economical for every day use.
Parasuraman S
October 6, 2023 at 12:32 pm
Many thanks for your comments and sharing your experience!