
Revisit Of Tandberg 3102 Amplifier After Nine Years


This Amp had visited me in August 2013 with a complaint that there was distortion in one channel. I had replaced a few caps in the output section, which were found leaky, upon which it worked fairly well. There was a slight imbalance between the left and right channel, but the customer did not want me to do anything further and I returned it to him. The revisit was in April, 2023 with the complaint that one channel was completely dead.
This time, anyhow the customer was willing to my condition that I would dismantle the whole set and replace all defective components and would return the set only after ensuring proper balance of both the channels. He accepted this demand as I refused to take up the work otherwise. So, I opened the set, subjected it to a thorough cleaning as a lot of dust had collected on all the boards. While checking like this, I noticed that one of the tank capacitors had leaked.

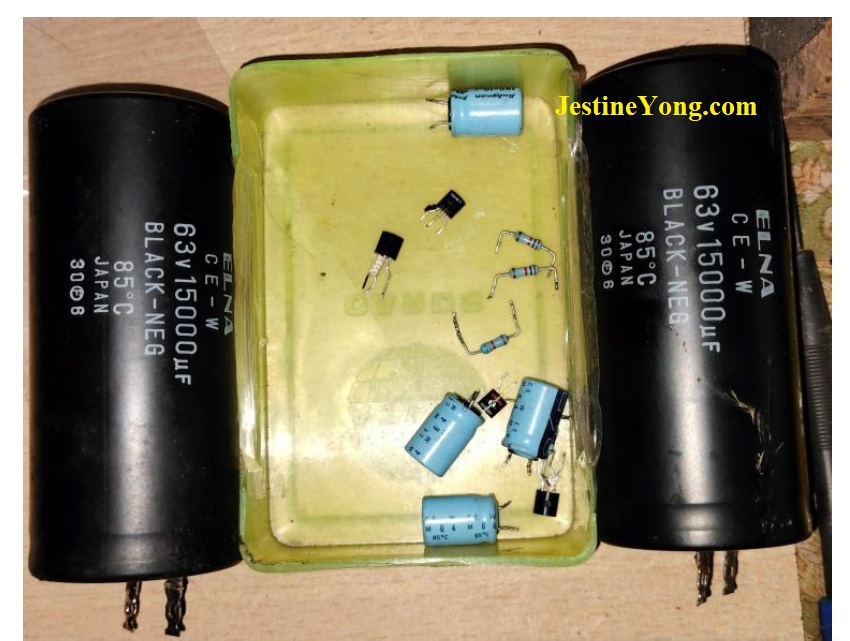
It was a 15000uF/63V capacitor. I removed both and checked and found that the values had dropped drastically. As an exact replacement was not available and I had 10000uF/100V in my stock, I replaced these two. As there was space at the other end for accommodating two 4700/100V caps to be connected in parallel, I drilled holes on the PCB and fixed these two horizontally. The caps fit in the PS snugly without causing any hindrance. I used soldering tabs to fit the extra caps and wired it well for a proper hold.

After doing this essential replacement, I applied power and checked the voltages present. It was around 55 equal in plus and minus. When I connected a speaker and fed audio, one channel was very weak with distortion. So, checked the preamp and amp region for defective components. When I checked the voltages on working channel and compared it with the defective left channel, I noticed that the voltages were not proper in two transistors in the pre-amp region.
One was leaky and other was intermittent. So replaced those two and the other two in the right channel too, to make it match very well. Even then the output was not proper and some sort of clipping was taking place though the left channel output was far better but with distortion.

The output section, which had four Metal Case Mosfets (J55 & K175), was housed inside the heat zinc and there was no way of accessing the top of the board for checking. The board was under the mosfets and bottom was covered too! I desoldered the mosfets and lifted and tilted it slightly to have a view of the board and found a resistor burnt.
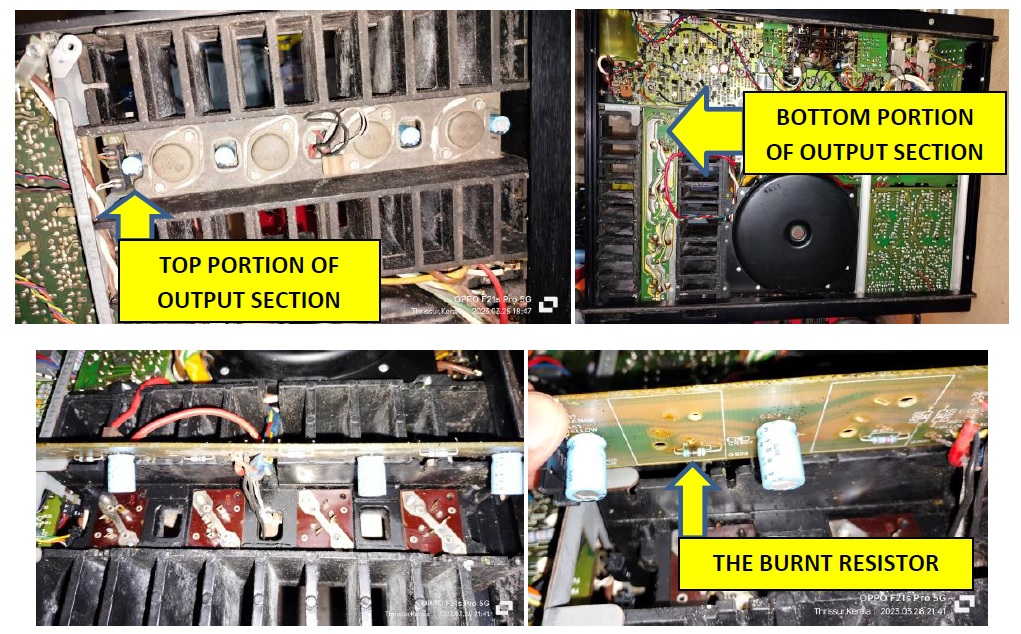
To avoid the need to desolder all the Mosfets to see the condition of these resistors in future, I fixed all the resistors on the other side. Changed all the four electrolytic caps, as these were out of range. Then resoldered the Mosfets and once again applied power and checked the output wave forms, which were too good to see!

I noticed that the volume controls were noisy and as there was no way of applying the lubrication on this sealed pot, I removed it, then removed the tape stuck underneath, and applied the cleaning oil.

After turning the knob left and right several times to make a proper cleaning of the contacts, I affixed the cotton tape like before and fixed it back. The control was found working very well. I also did a retouch of the pre-amp, amp and power supply sections!
I checked the outputs once again and played the Amp for several hours to find that it was working very well, before closing the cover. Mission accomplished and satisfaction got collected as usual.

This article was prepared for you by Parasuraman Subramanian from India. He is 72 years old and has more than 30 years’ experience in handling antique equipment like Valve Radio, Amps, Reel Tape Recorders and currently studying latest tech-classes conducted by Kerala State Electronics Technicians’ Association. He has done graduation in BBA degree, private diploma in Radio Engineering and retired as MD of a USA company. Presently working as Consultant to Hospital and other institutions.
Please give a support by clicking on the social buttons below. Your feedback on the post is welcome. Please leave it in the comments.
P.S-If you enjoyed reading this, click here to subscribe to my blog (free subscription). That way, you’ll never miss a post. You can also forward this website link to your friends and colleagues-thanks!
You may check on his previous article on Transplant Of Parts Done In This Very Complicated NAKAMICHI Cassette Deck C1
 (47)Dislikes
 (0)
(0)
10 Comments
Leave a Reply


SASI NAIR
November 4, 2023 at 10:15 am
Good job
Parasuraman S
November 4, 2023 at 1:52 pm
Many thanks, dear!
Waleed Rishmawi
November 4, 2023 at 4:19 pm
that is a lot of work for surch a device but the resuslt is amazing as you brought it back to its original status sort of speak. good job my friend. have a blessed day
Parasuraman S
November 4, 2023 at 10:37 pm
Many thanks dear, for your continued support!
YOGESH PANCHAL
November 4, 2023 at 4:41 pm
Good Job! Sir
Parasuraman S
November 4, 2023 at 10:37 pm
Many thanks!
Albert van Bemmelen
November 4, 2023 at 5:08 pm
Dismantling the whole set and replacing all defective components is something you never seem to dislike!
No doubt that another successful repair was bookmarked into your booming bag of satisfaction!
I only wonder what the cleaning oil was you used, probably CRC2-26?
Parasuraman S
November 4, 2023 at 10:41 pm
Many thanks, dear! I use Armstrong Switch Cleaning Oil or CRC2-26, depending on the connector and control. Sometimes I use WD-40 also. In this case, I used Armstrong Switch Cleaning Oil, which does not contain kerosene in it, because the pots were covered by tape.
Tito Kanshulu
November 5, 2023 at 4:21 pm
A well articulated article Sir. Thanks for the good job.
Parasuraman S
November 5, 2023 at 5:23 pm
Many thanks, dear!