
Interesting Repair Story Of A Sharp DVD Player Model DV-SL1000W

This DVD Player belonged to my neighbor and he asked me whether I could bring it to working condition as it was lying unused for a very, very long time due to a lot of untoward incidents in his house. I brought it home and opened and cleaned it thoroughly, after dismantling it in whole.
Checked the power supply board and found a lot of dry solders. The ESRs of the caps were also not ok. So, replaced the caps and retouched the board. Then when I connected the boards together and applied power, the DVD was found working.

But there was some problem in the sliding motor section as sound was intermittent and pictures were freezing. I had lubricated the rails and connectors and that was not the problem. Then I removed the tray unit and checked. I saw one small gear wheel had cracked and that is why the sliding movement was getting hampered. I applied a bit of instant glue and tied a wire around hoping that would solve the problem. Let us have a look:

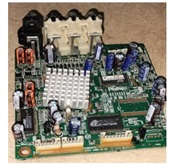
But that did not work and I looked through my discarded DVDs and found one exact replacement and fixed it. But even then the sliding movement was not proper, sound was going off intermittently. I replaced the sliding motor and even then same was the problem. Assuming that power supply could be a problem in the mother board, I replaced all the electrolytic capacitors on that too and soaked the board in detergent water for a few hours, blew the water out using the blower and allowed the board to be under sunlight for whole day. The board looked very neat and clean after that:

Then reconnected and tried. But the problem was still there and then the motor control IC AM5869S was suspected. I removed it and obtained a replacement, which was SA5869S. Datasheet of both the ICs were not available and I had no other go except to fix the IC and see what happens. But this time, the board went dead and no voltage was coming to the uControl IC. So, I knew that either it was a fake IC or not the same. I removed it again, process of which tore a couple of hair like tracks. The next task was to replace the mother board. I had one Philips mother board with control and display unit gifted to me by a techie friend long back. I connected the Tray unit after readjusting the connections to suit the mother board. The connectors were in reverse order and so I plucked the connector base from the board and inverted it and inserted it back to suit it.
Otherwise loading motor, sliding motor and spindle motor and the tray in & out switch connections would not be in proper order and it would malfunction. But there was a problem still, as the software did not support the lens fit in this tray unit and no disk error kept coming. I had a few other lenses, but the problem again was that the sliding bracket gears were different and it did not suit this tray unit:

So, I took out a tray unit of another DVD player and connected it to this mother board once again re-adjusting the connectors and it worked very well. I was happy that the set started working very well. But alas, the tray unit would not fit properly in the cabinet as it was slightly larger! So, I removed another tray unit from a sleek DVD player (working one, which was a spare one for me) and once again readjusted the connectors and tried. It was working perfectly well.
I drilled fresh holes for this tray unit as it was very slim and trim and fixed washers under the tray for aligning the eject window provided in the front panel. The tray opened and closed without any problem. The display unit of this Philips board had USB also in the front. I cut the USB PCB section from it and fixed the control board on the front panel adjusting it such a way that the display was very cleanly and clearly visible and standby LED light was also seen clearly. I had to peel of the front sticker, mask the holes and scrape a few portions to make it suitable for the different display.
The Sharp had only one LED indicator, IR sensor and three buttons. But this had 8 segment display, three buttons, LED indicator, IR sensor. So I fit it properly with just one screw, hole for which was luckily in place.

Since the control buttons could not be operated, I went and fetched a new RC UNIT for the Philips mother board. Then drilled a hole in the dummy RC socket at the rear, removed USB connector after marking its positions and inserted the bare wires through the whole and reconnected the header observing the markings. Then drilled two holes for the USB PCB after ensuring that all edges of the PCB are ground and made neat and clean and fixed it using bolt and nut so that any pressure applied while inserting and taking out USB did not damage the PCB. Let us have a look:

I played many CDs and DVDs and it worked very well. Then used USB and tried and that was also working very well.

After satisfactorily trying, fit it back for delivery to the customer. The whole work took many hours and days as interchanging the Eye unit, removing the trays and readjusting the connections etc. were time consuming.
But I was able to bring the player to perfect working condition though I had to change the inside out to achieve it.

Mission successfully accomplished gaining a lot of experience in handling DVD problems which pumped up my confidence and pose, because of which a highly inflated satisfaction got collected! Though I clicked the snap of the defective components removed, I have no idea where it went as there were around 100 pictures taken at various stages out of which I picked only a few for this article.

This article was prepared for you by Parasuraman Subramanian from India. He is 74 years old and has more than 30 years’ experience in handling antique equipment like Valve Radio, Amps, Reel Tape Recorders and currently studying latest tech-classes conducted by Kerala State Electronics Technicians’ Association. He has done graduation in BBA degree, private diploma in Radio Engineering and retired as MD of a USA company. Presently working as Consultant to Hospital and other institutions.
Please give a support by clicking on the social buttons below. Your feedback on the post is welcome. Please leave it in the comments.
P.S-If you enjoyed reading this, click here to subscribe to my blog (free subscription). That way, you’ll never miss a post. You can also forward this website link to your friends and colleagues-thanks!
You may check on his previous article on Futile Attempt To Revive Onix LED TV Model Crystal 40
 (29)Dislikes
 (0)
(0)
16 Comments
Leave a Reply


Waleed Rishmawi
August 23, 2025 at 6:05 pm
that is a alot of hassel for a DVD player and I am glad it worked just fine. I would not take any repair if sitting in the storage room for year because it would not be worth the fix. DVD players in my country has vanished and hardly getting any dvd for repair. thanks for sharing the repair and the fix. have a blessed day
Parasuraman S
August 23, 2025 at 7:32 pm
Many thanks, dear friend! DVD player users are aplenty in our country!
Albert van Bemmelen
August 23, 2025 at 6:15 pm
I hope it was worth all changes, replacements and the many modifications in the end, because you even had to use a good tray unit from a sleek working DVD player of your own to make everything work! And you also had to buy a new RC UNIT for the Philips mother board to be able to control the player.
I have no idea how costly these dvd players are in your country but I guess that looking back buying a new player would have saved you a lot of trouble!
Parasuraman S
August 23, 2025 at 7:35 pm
There are sentimental attachment to old devices and the customer was one such. I got paid very well covering all my costs and that neighbour of mine, who bought the land from me for building that house many years back, is very decent and understanding. There are thirteen houses in the portions of my land sold over a period of time!
Mark
August 23, 2025 at 6:42 pm
Hey Parasuraman,
Well done! That was a lot of work!
Parasuraman S
August 23, 2025 at 9:06 pm
Many thanks, dear Mark!
Yogesh Panchal
August 23, 2025 at 11:31 pm
Good Job!Sir,
you can easily repair the gear using Baking soda & super glue.
Mark J
August 24, 2025 at 8:02 am
Parasuraman did you really take 100 pictures for this article? Great job on the repair. Once again thank you for sharing.
Parasuraman S
August 24, 2025 at 8:43 pm
I recheked it after reading your comment and found 82 pictures saved in 'FRO' folder (for records only) and 15 in the article, making it 97 in total. Many thanks, dear Mark!
Mark J
August 24, 2025 at 8:04 am
Does baking soda and work good for a lot of applications? I was think about trying it soometime.
Parasuraman S
August 24, 2025 at 8:45 pm
Yes, it comes in a separate small bottle along with super glue.
Parasuraman S
August 24, 2025 at 8:33 am
Oh! Ok, shall try that next time! Many thanks, dear Yogesh Bai!
Muykit
August 24, 2025 at 6:10 am
I always cant help but admire the amazing concept about DVD technology. I recently by sheer luck bumped into a DVD player and to my great surprise my still-waiting discs after 15 years, sounded crystal clear and conveyed pictures as clear as clear can possibly be, all these evoking fond memories. So when shortly later I deeply engaged myself to repair a DVD for my own use, I gave up on realizing that the micro controller was overheating and so their was not a remote possibity of repair. First, looking for this ic will be an exercise in futility. Secondly, replacing the IC will not be a rosy affair, given its closely packed pins that remind me of millipede legs. As if that was not enough, just the thought of obtaining a replacement IC hit me even harder, making the repair chance grow even slimmer. So once the player was switched on, the only movie left for me was to watch as the tray moved in, out, in, out....unfaillingly. The burning urge in me was gone in much the same way DVD players came and went.
Parasuraman S
August 24, 2025 at 8:38 am
You are too good in your novel way of writing your comments! It is always a very interesting short story to read! Many thanks for the time and efforts taken to post such elaborate comments with your own inputs and suggestions!
Mark J
August 24, 2025 at 8:02 am
Parasuraman did you really take 100 pictures for this article? Great job on the repair. Once again thank you for sharing.
Parasuraman S
August 24, 2025 at 8:29 pm
Yes, indeed! I keep taking pictures on every stage and every step so that I can remember what I did and also as a future reference. Most of these pictures are also shared with the customers. Many thanks for your comments, dear Mark!