
AFK-BM2 Baking Machine Repair
This repair is about the AFK-BM2 Baking machine that no longer baked and was brought in by my nephew. And was from his wife’s parents who hoped we would be able to fix the problem.

The difficulty with these repairs is the problem not being able to find any decent service manual. And finding matching replacement parts often won’t be easy either.
Strangely only the rubber motor drive belt could be found when was searched for matching parts.
But the belt and the motor were fine. Just the not working heater element was the problem here. My brother took it upon him to do the most time consuming part of this repair and disassembled the baking machine, and then I took some of my test gear with me to examine this machine further.
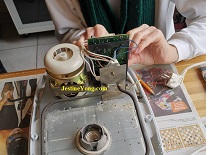
Previous 2 photos showed the front and the backside of this baking machine after the top cover, dough hooks, and the metal baking insert shell were removed. The motor belt under de bottom plate drives the center rotor mount. And above it the square heater element mounted on a vertical placed metal plate is visible plus the also on it mounted temperature sensor with the 2 blue wires including the 2 temp fuses with the 2 x 2 white high temperature resistant wire tubes (2 for TF1, and 2 for TF2).
Above photo shows most of the connectors and parts and their function. Including Temp fuse TF1, TF2, Relay Rel1, and the Heater element connector. The disconnected heater element measured a resistance of about 88 Ohm which represents a power dissipation of (230VAC^2)/88 Ohm = about 601 Watt. And this matches also with the given power consumption on the label of this machine.
To make sure the heater element also worked we connected the heater coil first with a safety light bulb in serie to the 230VAC power line, and after that without one directly onto the 230VAC mains. And it worked splendidly so was not the cause of the not working heater.
I then tested all diodes, transistors, 7805 5V regulator, BT137 and other parts with my Peak Atlas DCA75 Pro, my DMM and other digital meter and all checked out just fine! Also the transformer with marking label AC-XB0001B 220-240VAC 55mA worked splendidly giving a secondary VAC of 12.3V (both white wires to the diodes). And this also fed the 7805 regulator that was fine too measuring an output voltage of 5V DC.
The pcb was marked with text XBM838/938-P02 2004-01-05 KB-3151 130 degrees Celsius.
The blue 2 wire temp sensor measured a resistance of 117.4 kOhm. Temp fuses TF1 and TF2 were placed in series. And first it seemed that TF1 was an open connection (defect), and only TF2 was okay. But after the TF temp fuses were repositioned under the clamp on the vertical metal plate on which also the temp sensor resistor was mounted, both were fine but still the heater element failed to function.
The heater element was switched with a relay marked on the pcb as Rel1 with text: Zanty ZTUC-D12HS 28VDC 15A 125VAC 10A/250VAC 15A/28VDC. Measuring the relay coil resistance gave an open connection so the coil was broken and the relay needed a new replacement. Below the solder side with removed bad Rel1 relay.
Next photo shows the component side with the removed Rel1 relay. D9 is the Rel1 coil diode that protects driver transistor Q8 against high induction voltages.
Also the black big 460V motor capacitor next to the transformer checked out fine! And of course we already knew that the motor was fine too.
Conclusion: after we replaced relay Rel1 with a new 12V coil with 250VAC/ 10A switch (see photo below) the baking machine worked again like a new one. Although we at first were uncertain what relay voltage we needed, because the original relay marking text revealed no coil voltage, we measured about 14.5V DC over the coil diode D9 without any relay attached. Which confirmed we just needed a 12V DC replacement relay.
Above photo on the right shows the baking machine looking in from the top with the cover open.
Previous photo showed another clear view on the solder side of the pcb and the black vertical plastic frame it was connected to with 3 screws. On this pcb the 9 pin top row connector connects to the removed cover with the switches that was fine and housed the processor/controller board.
Afterwards we only needed a new matching relay , solder, the right equipment and a lot of time to examine and check all parts and their function.
In washing machines and dryers the used relays often only have 4 pins. Where pin 5 is left unconnected or just missing like with the original now replaced bad Rel1 relay was the case. But these relays are in function the same because pin 5 often is not needed being the switch pin which only connects when the relay coil is unactivated (off state).
And normally most of the cases only the make contact switch pin is needed when the relay coil is activated anyhow. Which only requires 4 pins being 2 pins for the relay coil and 2 pins for the make switch contact.
This article now will certainly be a great help for those in need for the right information to also fix their AFK-BM2 baking machine. Information that couldn’t be found on ElektroTanya or any other site where normally many different service manuals and schematics are kept.
Happy Baking!
Albert van Bemmelen, Weert, The Netherlands.
Please give a support by clicking on the social buttons below. Your feedback on the post is welcome. Please leave it in the comments.
P.S- If you enjoyed reading this, click here to subscribe to my blog (free subscription). That way, you’ll never miss a post. You can also forward this website link to your friends and colleagues-thanks!
Note: You can read his previous article on Examining And Testing Of FDC To USB Adapter
 (68)Dislikes
 (0)
(0)
19 Comments
Leave a Reply


Waleed Rishmawi
October 28, 2021 at 5:24 pm
I was working on the same exact baking machine which belonged to my mother in law. sad to say, I could not get it to work due to the fact that the heating elements were dead and I could not find replacement. thanks for sharing and have a blessed day
Albert van Bemmelen
October 28, 2021 at 9:10 pm
Yes sadly a new replacement heater element won't be available. Which is a real shame if everything else still works.
Elisha
October 28, 2021 at 5:44 pm
Very informative
Yogesh Panchal
October 28, 2021 at 5:59 pm
ALbert,
Good repair! what is the logic behind two fuse in series??
Albert van Bemmelen
October 28, 2021 at 9:17 pm
I guess it must be for extra safety. If one temperature fuse fails at a too high temperature the second one still stops the increasing current from becoming dangerously high. And probably they noticed in tests that one temperature fuse was unsafe?
Still there was only one temperature measuring element mounted on the top of the mounting plate. But that sensor probably never failed.
Dante de leeuw
October 28, 2021 at 9:45 pm
Again a good repair description Albert!
You wrote about the working voltage of the coil, but I think that
was in the description of the relay already : ZTUC-D12HS , so 12 Volt.
Albert van Bemmelen
October 29, 2021 at 12:04 am
Yes it probably was Dante. Although it didn't explicitly state Volts and neither coil Voltage. Other relays normally often do. Measuring the coil voltage gave certainty although it was still questionable why the relay coil got damaged in the first place. Measuring over the coil diode D9 assured us we selected the right relay.
Lynn Blakely
October 28, 2021 at 10:52 pm
Good repair, Albert: One observation, we noticed there are two wires at the circuit board picture, showing TF-1, and TF-2, so there is a possibility that the two sensors are not in series. They may be used to trigger temperature limits, such as are used in clothes dryers. With out a schematic the uses of each are left to figure out your self.
Albert van Bemmelen
October 29, 2021 at 12:44 am
Yes maybe I made that assumption presumptuous? I just didn't investigate it further because they both were about zero and without both connecting the heating element never worked. They both also were placed next to each other on the same plate on which the heating element was placed. And I didn't make a schematic because the Baking machine already worked after replacing the relay. But I guess it still must be possible to draw the schematic from the pcb layout to make sure?
Parasuraman S
October 29, 2021 at 5:03 pm
Very informative article with lot of inputs! Many thanks for sharing!
Imoudu Onwumah
October 29, 2021 at 6:45 pm
Hi Albert
This is an informative repair article,I learnt some knowledge from it. Usually I test relay with external power adapter,once I know the coil voltage which is usually inscribe on the case.Have a nice day.
Albert van Bemmelen
October 30, 2021 at 12:23 am
Indeed that relay voltage can also be found with an external power adapter Imoudu. Although you probably need at best an adjustable adapter voltage for that. So you can find the relay switch-on level coilvoltage and a minimum voltage level at which the relay still holds its magnetic on switch position but just barely. Immediately below that level the relay switches off and can't be switched on with a voltage that is just a bit higher than the switch-off voltage was. Only until the a lot higher switch-on voltage is reached again. This effect is often known as hysteresis. Like also is the effect that is known in magnetic heads of VCR's. Or just measure the coilvoltage over the always needed coil transistor protectiondiode. The wire of the defect relay coil is now ideal for repairing small defects on small copper tracks of smartphones and other defect devices. So will still come to good use again. Have a splended day too!
Juan Gil
October 9, 2022 at 10:30 pm
The quality of your report with pictures exceeded expectations. Is a pleasure to find people like you helping others. Alvast bedankt!!
Henk 2 leerdam
January 28, 2023 at 9:12 pm
Prima verslag!
Zojuist de tweede broodbakmachine hier mee gered.
Henk 2 leerdam
===================
Great report!
Just saved the second bread maker with this.
Henk 2 Leerdam
Marc
July 15, 2023 at 12:04 pm
Hi Albert,
I'm new to this blog and just found this detailed report.
Thank you for sharing.
I would like to ask your advice for the following problem on the same machine:
I changed the belt, then plugged the circuit before mounting everything back, pressed the ON button and It started working ok, but instead of pressing the ON/OFF button to end the program, I unplugged the circuit.
Now, I tried plugging again, and without pressing ant button,the motor runs continiously,the heater element is on, but neither the display or buttons work.
What could have happened?
Could hoy please help me finding a solution?
Best regards
Mike Cooper
November 23, 2023 at 11:01 pm
Hi Albert,
Great article! And very relatable...
I'm also new here, and have a dismembered AFK BM2N on my table. My issue is slightly different. After replacing the drive belt, which had fallen apart, which often happens on these machines, i gather. The motor failed to work. Now when my wife reported the issue to me, the motor was trying to turn. However, the old string-based drive belt knotted up and the motor could not turn.
No burning smell, no black on the motor, so I am guessing a fuse has gone somewhere. The heating element still works fine.
I am a real newb when it comes to electronic circuitry I'm afraid, but I'm so invested in this project now, I want to complete it! Do you have tips for me? I have a soldering iron and a multimeter, but am rather bad with both...
Thanks! Best regards, Mike.
Just a visitor
December 13, 2023 at 12:37 am
The PCB is the same as in a baking machines from Unold, model 68415. Same fault, a dead (cheapo) relay. Small transformer labeled SD41-501 but looks like yours, I guess it's the same one just with a different label.
Balmy
October 31, 2024 at 2:54 am
Top job sir. Thanx to you i rescued my bread maker from the dumpster. Thank you for taking the trouble and posting the repair procedure for all of us.Your efforts are much appreciated.
mark
February 16, 2025 at 7:23 pm
HI.My bread maker starts.When it gets to the baking after a while it trips the
earth leakage on the board.