
Beware of Duplicate Yokes of CRT TV
I thought of sharing this peculiar experience that I had, with my technician brethren across the world, because this is a very serious issue, which might baffle an average technician like me. I got one Samsung CTV with the complaint of arcing noise from inside the TV. Since this TV is having the China Kit inside and does not have any relation to the model number given, I am skipping its model number purposefully.
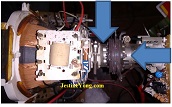
I opened the CTV and cleaned the inside thoroughly as usual. Patched up all dry solders, and cleaned the Anode Cable, Cap and the anode area of the CRT very thoroughly. Connected the board and heard arcing noise coming from the rear, with vertical noise lines on screen, and traced it to the top inner side of the CRT Yoke. The pictures were also very hazy with bizarre colours:

Switched off the CTV immediately, disconnected the CRT board, marked the correct position of the magnets and yoke on the CRT with a sketch. (Please see the arrows in the picture below and the picture of magnet assembly that appears later in the article)
This is very, very important. When you put back the yoke and the magnet assembly, if they are not properly positioned on the CRT neck, the picture will not have colour purity and many such other related issues. The magnet assembly consists of a few magnets, usually six rings for a 21” CRT, with a locking plastic ring at the rear, and the mounting steel bracket. We need to mark a line on top of this assembly very visibly, to bring it back to its position, in the event of disturbing it by mistake. Since this is set in factory using machines, it will otherwise be very difficult to bring it back to its original position (according to Jestine Yong, in one of his articles published). Slowly loosened the holding screws of the magnet assembly and that of the yoke.
Slid the magnet assembly out, without ever disturbing its original locked position of the magnets. Then gently poked plastic portions holding the yoke to the neck, with a plastic flat screw driver. After ensuring that the yoke is free, gently shook it to both sides and slid it out. This is a very, very careful work and needs perfect study of what are the things holding the yoke on to the neck and should be dismantled without applying any pressure, as this portion of the CRT Tube is very brittle and it will crack any moment, many times causing injury, and a loud bang, when air is sucked in. Though the CRT is implosion proof, our heart rate will rocket because of the sudden effects. Moreover, there are poisonous coatings inside the tube! (Please see following link https://en.wikipedia.org/wiki/Cathode_ray_tube#Toxicity) There should never be any sideways movement of the hand. It is also a good practice to mark the Vertical and Horizontal sides of the coils on the yoke and also note down the colour of the wires connected on it. Please see pictures below:
After removing the yoke, I checked the side on which the arcing was noticed. See pictures below, which are self-explanatory:
Because of fungus attack, that area had got arcing and had burnt several windings of the coil. I tried removing the top layer, thinking that only one string might have got broken. But there were several underneath, leaving only one alternative, i.e. to replace the yoke. The number on the yoke was 2192AAA. Gave the yoke to an electronic shop in my town, which is a reliable source for us, technicians. He fetched an equivalent (at-least in number) from the market, made up of aluminium coil, instead of original copper coil. Nowadays, copper coils are becoming rare, because of its prohibitive cost, and most of these are coming from China. I fit the yoke, magnet assembly and switched on the TV. The CRT was showing split colours. I tried reducing the colour to complete 0. Even then the result was same. See the result without video connected and with video connected. (In the video connected picture, you can see that the numbers on the left side top is showing three different colours)
The CRT lost its convergence and purity! Though I loosened the magnet holding plastic ring and adjusted the rings, it remained same. After disconnecting the power supply, once again dismantled the magnet assembly and yoke. On verification of the coils wound on the yoke and that of the original yoke, I saw a lot of variations. The original coil had a single sub-coil on the top, whereas the new one had split coils. There were four connection pins on each side in the new one, whereas there were only four connecting pins on one side and on the other side, two pins were dummy in the original.
Moreover, even the coils wound on sides were different, even though the number matched! So it was obvious that the supplier, originating from China, had either made a mistake or just put this label on non-moving yokes and dumped it to the market. Anyhow, we, technicians are always taking the brunt! Fortunately, the shop owner took the yoke back and gave me a free replacement, after fetching it from the market and ensuring that the winding was ok. I realigned the magnet assembly back to its original markings exactly, and fit the new yoke and the magnet assembly. Switched on the TV and see the result. The pictures are good, but because of its moving nature and horizontal/vertical scanning, either my mobile camera is not able to capture it properly or perhaps the scanning in this TV set is having an interface problem with it, as I have been able to take good picture before. Another chance is that the resolution would have got affected, because this yoke also is of aluminium wire coated with copper colored varnish! Anyhow, nothing under my control!
Finally, the job was completed, and I wiped of the sweat from my forehead, in relief!
This article was prepared for you by Parasuraman Subramanian from India. He is 66 years old and has more than 30 years’ experience in handling antiques equipment Valve Radio, Amps, Reel Tape Recorders and currently studying latest techs classes conduct by Kerala State Electronics Technicians’ Association. He was a BBA graduate, retired as MD of a USA company.
Please give a support by clicking on the social buttons below. Your feedback on the post is welcome. Please leave it in the comments.
P.S-If you enjoyed reading this, click here to subscribe to my blog (free subscription). That way, you’ll never miss a post. You can also forward this website link to your friends and colleagues-thanks!
You may check on his previous repair article below:
https://jestineyong.com/teac-a500-stereo-cassette-deck-repair/
 (111)Dislikes
 (1)
(1)
11 Comments
Leave a Reply


Albert van Bemmelen
September 8, 2016 at 3:12 pm
Dear Parasuraman, you did a difficult task again. After having seen the TV pictures in your article, You are undoubtedly the Sherlock Holmes of difficult repairs!
Yogesh Panchal
September 8, 2016 at 3:22 pm
Right sir it is very difficult to get the original parts, because part suppliers are looking for cheap material.
thanks for the article.
Bulent NUR
September 8, 2016 at 5:05 pm
Good job again, thanks for sharing.
Robert Calk
September 8, 2016 at 7:07 pm
Good job, Parasuraman. Thanks.
corriete
September 8, 2016 at 8:32 pm
Wow
What patience sir.reallycan't understand why there are so many wrong items saying the original number.i had an experienced with a flyback transformer saying the number I needed but was completely different from the original.SAD but true.An STR..... was also wrong.well done sir
Andre Gopee
September 8, 2016 at 9:28 pm
Good Job sir. Thank You for sharing.
Humberto
September 8, 2016 at 10:10 pm
You have done another tedious repair, but at the end: another equipment saved from the dump. Congratulations.
Tito Kanshulu
September 9, 2016 at 5:03 pm
Good job sir. Nowadays the market is full of fake components,even some of these transistors we use.
suranga bandara, Suranga Electronics
September 9, 2016 at 5:51 pm
Mr-Parasuraman, Good Job.
Thank You for sharing!
Gerald Millward
September 10, 2016 at 6:31 pm
Parasuraman - an heroic and skillful piece of work. I am so glad I do not have to repair CRT TVs - they are now unknown in the UK.
Chidi
September 13, 2016 at 5:08 am
Thank you sir for sharing. More grease.