
Computer Motherboard Restored After Its VGA Connector Got Ripped Off
MODEL AND MAKE: This is a locally assembled computer, which does not have any make or model number.
COMPLAINT REPORTED: VGA female connector damaged while removing the monitor.

HISTORY: This computer belonged to the same person who brought UPS and Monitor for service. But while removing the VGA cable, the connector got ripped off accidentally.
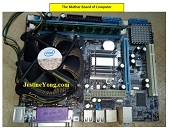
RECTIFICATION DONE: Opened the side cover and remove all connectors from the mother board, after taking several close-up photographs so as to ensure that these were put back in its original position. Rechecked the images in the phone to ensure that these were clear and all were covered. Then pulled out one by one, taking a snap again each time before removing it. Did a general clean up without using the blower. If we use a blower in the computer, the dust will enter into hard disks and drives and might cause problem. Hence it is better to clean up externally using a fine brush. Unscrewed the mother board and brought it to work table to study the extent of damage done. It was very bad. Some pins were found loose lying in the mother board. Some pins were broken. Used my desoldering iron-cum-sucking gun and removed the solder from this multilayer PCB. We need to be extremely careful and should wear antistatic gloves compulsorily while handling computer mother boards. Cleaned the holes thoroughly using IPA and ensured that there were no more obstructions for inserting a new connector. Took snaps and published in my whatsup group asking for a replacement connector, as all shops were closed due to lockdown.
One of the techie friends acknowledged and assured me to send it by speed post, which he did later in the day. Even though I have never met him, I felt thankful to him for his deed of charity by rendering a helping hand when needed! He had sent me a small board which had this connector fixed in it, probably a monitor mother board. I removed the connector carefully ensuring no damage done to the pins. Then cleaned the connector well of dust and dirt. Fixed it in the Computer Mother Board, ensured it was seated properly and then soldered it well, taking a little longer time to remove the iron so as to ensure that the melt solder filled the hole fully because of the multilayer property of the board. Then refit the mother board, replaced all the connectors by counter-checking the images taken, rechecked that everything was in proper place, then connected the monitor and powered on. I was very glad to see the windows starting up screen! After ensuring that everything was alright, connected a key board and mouse, which also worked very well. Checked the graphic properties and found these to be in order. Checked a few graphic images and these were also good. Fixed the side cover and left the computer on for several hours for any possible problems. As it worked flawlessly, I called up the customer to come and pick up all the three, i.e, UPS, Monitor and Computer. He was very happy to have got his computer back in operation, which reflected on me too, the bulged satisfaction of which got gathered in its collection bag! Mission well accomplished!
NOW LET THE PICTURES SPEAK:
This article was prepared for you by Parasuraman Subramanian from India. He is 70 years old and has more than 30 years’ experience in handling antique equipment like Valve Radio, Amps, Reel Tape Recorders and currently studying latest tech-classes conducted by Kerala State Electronics Technicians’ Association. He has done graduation in BBA degree, private diploma in Radio Engineering and retired as MD of a USA company. Presently working as Consultant to Hospital and other institutions.
Please give a support by clicking on the social buttons below. Your feedback on the post is welcome. Please leave it in the comments.
P.S-If you enjoyed reading this, click here to subscribe to my blog (free subscription). That way, you’ll never miss a post. You can also forward this website link to your friends and colleagues-thanks!
You may check on his previous repair article below:
https://jestineyong.com/high-voltage-causes-explosion-in-36-led-light/
 (39)Dislikes
 (0)
(0)
8 Comments
Leave a Reply


Albert van Bemmelen
October 9, 2020 at 11:19 pm
Nice job replacing all 3 x 5 pins of the VGA mainboard connector! A good thing that designers never chose to use the big old rather wobbly 21 pin Scart videoconnector on computer mainboards. They sure would have caused a lot more problems!
Parasuraman S
October 10, 2020 at 6:23 pm
You are right! A 21PIN could have been a lot of problems! Many thanks!
Mark
October 10, 2020 at 10:31 am
A man of patience - well done Parasuraman
Parasuraman S
October 10, 2020 at 6:24 pm
Many thanks!
babums
October 11, 2020 at 1:09 am
Had a knowledge,thanks for sharing.
Parasuraman S
October 11, 2020 at 5:00 pm
Many thanks!
Yogesh Panchal
October 11, 2020 at 10:21 pm
Sir,
Good Job,
Replacing intact Connector "Soldering Pot" is the Easiest way.But if connector is damaged process will get difficult like in your case. you have to pull out each leg by top side with same time melting the solder from back side.
Good patience!
Parasuraman S
October 12, 2020 at 12:39 pm
Many thanks!