
How To Fix A Defect Philips 6990 Shaver With Trimmer
Last week I had bad luck after shaving with my older Philips HQ6990 shaver. Of which I mostly only use the trimmer to trim my never ending growing beard. Because after cleaning it with a brush it got damaged after a few drops of water must have gotten into the case and onto the internal pcb. And that almost immediately blew the 33 Ohm series resistor and some other parts when I started to charge it on the 230V AC cord. Including destroying one of the diodes in the primary diode bridge.
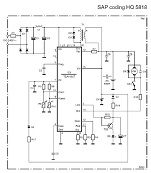
The controller chip inside my HQ6900 series shaver is a 20 pins TEA1402T chip that makes the automatic wide voltage input 240V to 100V AC range conversion to a lower needed voltage and also controls charging the internal NiMH 1.2V cell.
And Philips claims according to the box that 1 hr charging = 10 days of use on which I disagree! And no doubt my shaver would still have worked if the inside pcb was covered with a thin layer of varnish. But I suppose they just try to sell more new expensive shavers this way! The safety from the life mains 230VAC powerline in these shavers is guaranteed by using a very small transformer that prevents any galvanic/electric direct contact with the other ways very deadly powerlines when shaving. Another reason why they should have used varnished water protected boards instead!

On previous photo below TP13 the damage the drops of water did to the copper layer is visible.
Any datasheet of this TEA1402T chip can not be found anywhere which is odd. Only the incompatible TEA1401T is mentioned and all service datasheets on the ElektroTanya website only share 2 pages without enough information to go on.
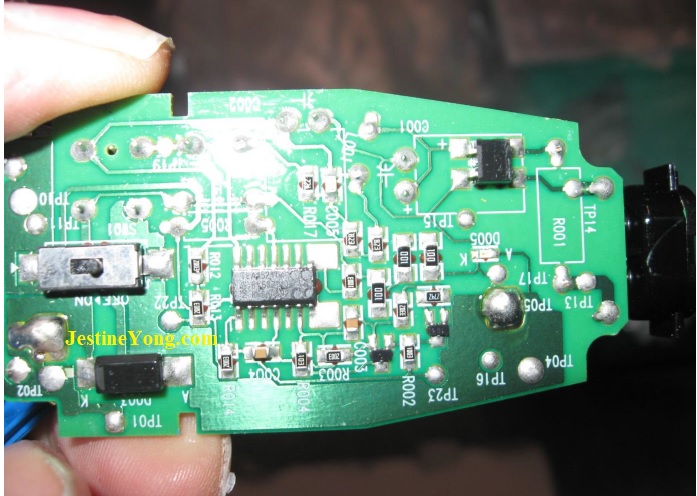
In the meanwhile I managed to fix my defect shaver with another exact fitting board from another Philips 6920 shaver. A same size shaver but without the trimmer. That also uses another smaller TEA 1521T controller chip. And Philips claims this rechargeable shaver also can be used 10 days but now only after 8 hr of charging! Which looks more acceptable with a identical looking NiMH cell as is used in the 6990 shaver. Next photo shows how I started analyzing the circuit by connecting the components by drawing in all connections.

After the exact same sized pcb from the HQ6920 shaver without trimmer was placed over into my HQ6990 shaver, my shaver again worked with supporting the use of my trimmer. Because apparently those Philips shavers that have no trimmer option in the housing still use boards that fully support those. Philips shavers like the HQ6920 without trimmer simply lack that option in the housing/case mechanically wise.
Although no datasheet can be found of this 20 pins TEA1402T controller chip I kept looking for more information and unexpectedly found following identical TEA1402T matching circuit in an older HQ5818 Philips shaver manual
All I now needed to do was fill in the found component values in that exact with the HQ6990 matching shaver circuit. A few components were still hard to read and also some had special thermal functions like R6 and R10 in next circuit. And resistors R3 and R4 had the odd EIA-96 smd code markings which I also will give in the resulting BOM list of components, as correct as possible because some markings were unclear.

Bom list HQ6990:
R1 = 33 ohm (fuseresistor, defect), R2 = 37,7kohm measured (marking unknown), R3 = 77C marking is EIA-96 smd code 61.9kohm 1%, R4 = 32C marking is EIA-96 smd code 21kohm 1%, R5 = 300 or 30D ? marking (possibly also EIA-96 code marking), R6 = unknown (0,5Mohm/diode measured, temp resistor?), R7 + R16 + R17 = 102 or likely EIA-96 10Z marking (all defect), R9 = 244 marking , R10 = 13.3kohm (temp resistor?), R14 = 221 marking, R15 = 104 marking. Diodes D2,D3 and D4 were fine.
C1,C2 = 2.2uF/385V , C7 = 47uF/10V TS2 = marking 3B pnp BC856B transistor, LED D5 small smd green, Coil L1 marking brn-blk-red-silver D1 = diode bridge (replaced by 4 diodes 1N4007, one was previously shorted)
On my now replacement board from the HQ6920 shaver without beard trimmer that uses a TEA 1521T mains controller R1 was with 68 ohm a different fuse resistor. And the led on this HQ6920 board doesn’t flash like it normally did on my HQ6990 board during charging. Next photo shows this
HQ6920 board. It uses almost the same setup as my 6990 board showed. Just the controller circuit is different. Transformer, switch, diode bridge, DC motor and NiMH battery are still the same.
But odd thing with this circuit is again that although there is a small safety transformer used both primary and secondary side with dangerous Vin and the safe Vout are still connected to the same TEA 1402T or TEA 1521T power controller chip. They after all both also use the same ground! A ground that only is separated from direct contact to the mains by 2 single bridge diodes. And also motor, NiMH cell and other parts share that same ground. Most important safety-wise therefore here is that the metal and the wiring of the DC motor is completely isolated from all metal shaving parts.
After fixing my old HQ6990 shaver I end this summary hoping to also fix my old defect original HQ6990 board. And if R1 the 33 ohm fuse resistor did a good job in protecting the shaver circuit, I guess my TEA1402T chip will still be in good shape.
Especially because these small but still very expensive devices are too expensive to just throw away and replace by a likely even costlier shaver. I’ve seen prices starting with 80 euros up to 300 euro or more. At those prices we can buy a new TV or another more useful device! Anyway mainly the resistors on my defect board need replacements, e-caps and all diodes are still fine now. Next last photo shows the NiMH and transformer board side of the in size identical HQ6920 shaver. On that HQ6920 board the resistors R012,R013 are marked 2003 = 200kohm, Resistors marked 100 are 10 Ohm, and resistors with marking 823 are 82kohm.

If you are smart, which you no doubt are after reading this short but detailed article, you carefully open up your shaver. Take a can of varnish or plastic spray and start spraying a good layer over your board to make it better protected against moisture or small drops of water! (Watch out not to spray it in the switch, the motor or the moving parts!). But always keep away from water if you can, especially if you are charging the shaver from the 230V/110V AC powerline because these chargers according to the instruction manual were never designed to be used in wet environments.
Also never forget to first take a good clear photo of all smd components before they are unreadable after they have taken too much current for any unforeseen reason!
Because manufacturers rather sell us new devices instead sharing the information we need to be able to repair them. Like was again the case in this example where none of the component values were mentioned in the Philips service manuals. Next last 2 photos show a close-up of TS2 a BC856B pnp SOT-23 NXP transistor, and of IC1 the voltage converter/charger IC TEA1402T. Both snapshots taken with my firmware fixed G600 LCD Microscope.

Until another interesting repair.
Albert van Bemmelen, Weert, The Netherlands.
Please give a support by clicking on the social buttons below. Your feedback on the post is welcome. Please leave it in the comments.
P.S- If you enjoyed reading this, click here to subscribe to my blog (free subscription). That way, you’ll never miss a post. You can also forward this website link to your friends and colleagues-thanks!
Note: You can read his previous article on Cheap Fix On Completely Dead 24 Inch Salora 24LCF-5000TDW TV-DVD Player
 (47)Dislikes
 (1)
(1)
18 Comments
Leave a Reply


Parasuraman S
December 3, 2022 at 8:28 am
Vow! That was a lot of job done, with successful results! Very detailed article and I have saved this link, as I too use Philips Shavers. Many thanks for sharing.
Albert van Bemmelen
December 4, 2022 at 2:59 pm
No doubt Philips is making a big mistake by not protecting their shaver boards for even small drops of water, added to the fact they neither made the case more waterproof at all! Because I'm sure my old shaver board still would have worked if it just had a thin protection layer or a more closed housing. Also because after my shaver was short circuited no left traces of water showed whatsoever. And if the case was sealed so no water can drip into the shaver this just wouldn't have happened either! Probably it takes reported deaths before manufacturers like Philips start in making better and safer devices like now happened in the recall of its sleep apnea respirators that cost them millions and they already knew years before they took action! With already over 260 reported deaths as result!
Albert van Bemmelen
December 4, 2022 at 4:02 pm
By the way: Good thing is that my replacement HQ 6920 shaver board already was varnished to protect it for moisture, like my 6990 board should have been but wasn't!
Albert van Bemmelen
December 4, 2022 at 4:42 pm
Although no datasheet can be found of the in the shaver used SOP20 pins TEA1402T Power plug for the universal mains chip, it is however easily available on eBay here
Anwar Shiekh
December 3, 2022 at 11:04 am
I have a wet/dry shaver but have learned that it should only ever be used dry.
Anwar Shiekh
December 4, 2022 at 3:34 am
Not sure they are always even worth trying to repair; working on my own is bad enough.
Albert van Bemmelen
December 4, 2022 at 2:31 pm
If manufacturers only would share the right information like on the missing TEA 1402T datasheet, that would make fixing these shavers much easier! And then you no doubt would succeed in fixing your own shaver too Anwar!
Waleed Rishmawi
December 3, 2022 at 3:41 pm
another great detailed repair with amazing results. I get many of these in the shop but sad to say, I was not successful in repairing them. have a blessed day
Albert van Bemmelen
December 4, 2022 at 2:23 pm
I'm sure that if my shaver on its solderside had a thin protection layer my Philips shaver board still would have worked! Because it really must have only been a spat of clean water that destroyed my good old shaver into oblivion! Added to the fact that Philips could have made the case of the Shaver also more waterproof! This is what gives any brand a bad name! And why fixing these small devices is so hard!
Imoudu.O
December 3, 2022 at 9:21 pm
I believe this would have been time consuming sir and has saved you some money. Have a nice day.
Albert van Bemmelen
December 4, 2022 at 2:13 pm
Finding additional information was Imoudu. But I guess that it makes repairs like these all the more interesting.
Yogesh Panchal
December 5, 2022 at 1:21 am
Albert,
Good repair....
Protect the circuit using waterproof coating spray.
Albert van Bemmelen
December 5, 2022 at 1:36 pm
I know Yogesh, but obviously Philips should have! No buyer is normally going to open his brandnew shaver to do this! Even Philips Senseo boards in the bottom of the koffiepad machine are usually waterproof coated! (Hopefully!)
Rains
August 9, 2024 at 4:34 am
I still have a brand new HQ6990 still in the original box, waiting to be used when my current HQ6970 breaks down (if ever). My old broken HQ6842 I keep for spare parts (if ever needed). 🙂
vkv451350
February 16, 2025 at 2:38 pm
There is the artical in Russian magasine "Repair and servive" in 2016 N7 concerning TEA 1402T. The online text at http://remserv.ru/cgi/magazine/issue/214/home/4512 is a short variant. To read the full version your should download pdf of the magazine.
vkv451350
February 16, 2025 at 10:00 pm
The difference between two board version at TEA 1402T and TEA 1521T is that 1521 chip doesn't indicate the end of charge.
murmelmops
February 19, 2025 at 1:46 pm
Yes, thats what i noticed too.
murmelmops
February 19, 2025 at 1:44 pm
Did you manage to repair your shorted board?