
Lacie 1TB Network Space NAS Repair
A friend of mine who is using a lot of NAS Network Servers and several superfast computers at home called me up to ask if I could fix one of his Lacie Network Space NAS with 1TB hdd. It didn’t start if the tumble on-switch was operated and neither was it recognized in his over LAN connected PC Network.

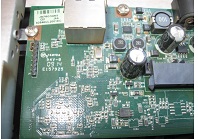
Above photo shows the Lacie Sata internal controller board after the on top mounted 3.5 inch harddisk was removed from the modern stylish black case. And the 6 screws that fastened hdd and its cover plate.
Immediately both bulged 470uF 16V e-caps showed. And after the 4 screws that were holding the board were also removed I was able to remove them and replaced them with one 680uF 16V and one 470uF 16V e-caps I had in stock that had the right height to fit underneath the metal top plate.
The 12V 3A power adapter was okay on above photos on the right, shown with both removed bad e-caps. Below the left top side of this board with the label and pcb marking.
Above photo showed the underside of the controller board with the Lacie NAS-C2 7D21UL 240C0EC 2008.03.11 text marking.
(which probably tells us that this NAS had worked flawlessly about 12 years from 2008 to now in 2020). With both circles marking the position of the bad 470uF 16V e-caps.
After I had replaced both capacitors I phoned my friend who came right away to get his NAS. I waited until he e-mailed me confirming that his NAS was again working. And he send me a following screenshots of the working Lacie in his network.
My friend uses Networkspace\openshare. Or https://www.lacie.com/nl/nl/support/network-storage/network-space. Or Advanced IP Scanner that is useful on many systems.
Previously I also was able to fix another one of his defect NAS servers by copying a good Bios from a working NAS over to his bad corrupted Bios chip. By simply using my RT809H programmer.
To complete this repair here some last photos of this Lacie Network Space 1TB NAS.
At first we not always can be sure if a simple repair like this one is the success we hope for. But afterwards it was another decent and quick done repair. And made another happy friend at almost no costs like often is the case. And is only possible if our electronic shacks keeps enough of those spare parts in stock previously ordered online or salvaged from other devices to keep our costs low. And repairing consumer electronics was never about making money in the first place, but is a terrific means to save money when devices no longer work and need fixing.
Albert van Bemmelen, Weert, The Netherlands.
Please give a support by clicking on the social buttons below. Your feedback on the post is welcome. Please leave it in the comments.
P.S- If you enjoyed reading this, click here to subscribe to my blog (free subscription). That way, you’ll never miss a post. You can also forward this website link to your friends and colleagues-thanks!
Note: You can read his previous repair article in the below link:
https://jestineyong.com/building-new-tools-for-our-man-cave/
 (70)Dislikes
 (0)
(0)
11 Comments
Leave a Reply


Parasuraman S
August 4, 2020 at 8:44 pm
"And repairing consumer electronics was never about making money in the first place, but is a terrific means to save money when devices no longer work and need fixing" That is the punch line I like most! Two jobs done well and your friend also was satisfied. That is a double benefit!
Albert van Bemmelen
August 4, 2020 at 10:18 pm
If someone fits that puchline even more it may be you dear Parasuraman, after all those meticulous repairs with the many bad e-caps and those tv sets that hardly were repairable which you got fixed as if they were never even used before! When I see so many bad e-caps in devices I quickly start thinking if it is worth the time and capacitors.
Albert van Bemmelen
August 4, 2020 at 10:31 pm
By-the-way: Both bad 470uF 16V e-caps were only removable from the Lacie Sata controller board by using my old Ersa MS 6000 solder Iron station at the right temperature and by applying new solder to the cap legs first. And by simultanous pulling out the legs of each capacitor while heating the solder. Otherwise removing those caps was close to impossible because of the very narrow holes that held the cap legs. Using my desolder gun or my hot air station failed to be of any use in this case. And this also meant that inserting the new caps only could be done by pressing the legs through the heated and still solder containing via's. The via holes were so narrow that opening them by removing the solder for easy inserting the replacement e-caps was even impossible with my solder gun or desolder hand pump. And with many computer mainboards this is often the only way how to replace bad e-caps or other through-hole soldered components.
Yogesh Panchal
August 5, 2020 at 2:13 pm
Good Repair! Albert...
You are right removing capacitors from multi layer PCB is critical job and PCB may be damage beyond repair.
Yogesh Panchal
August 5, 2020 at 2:16 pm
Using Good Flux will make the work easy while de-soldering any component from this type of PCB.
Randy
August 5, 2020 at 8:06 am
probably correct, it sure ain't about making money these days in the US, try finding a tech, I mean a good, knowledgeable tech around here. Nope, no money in it, they left and went to a job that could pay the rent...
Humberto
August 5, 2020 at 8:24 am
Anyway, good repair. Your friend, satisfied. Congrats.
Raj
August 5, 2020 at 9:32 pm
Great.. thanks for your tips on removing capacitors on such boards. Cheers
Andrea Del Corso
August 10, 2020 at 5:50 pm
Bel lavoro Albert,come sempre,complimenti!
=========================================
Nice work Albert, as always, congratulations!
krom
October 15, 2022 at 10:44 pm
what is the value of the third capacitor please? in my case it is this one that must be changed.
Wim
September 2, 2023 at 10:19 pm
Dear Albert, what is the value of the third capacitor? in my case it is this one that must be changed.