
Power Supply, Backlight And Scaler Board IC Failure Solved In VU LED TV

As mentioned by me in the article on Sony Bravia TV backlight change, this is the other TV that got repaired finally by my technician friend. Once again, the snap of the TV in dead condition was not taken!
This belonged to my schoolmate, who lives a few houses away from my home, in the same road. He brought it to me with the complaint that the Led light comes on and goes off to standby and no display comes to screen. After opening and cleaning the inside, I saw a bulgy capacitor, 470/16V, in the power supply section of an all-in-one board used in the TV. I replaced the capacitor and looked for any more damages and could not find any.
Though the power supply now functioned and the TV got released from its standby, there was no display. When I checked the voltage that goes to LED backlight, it was zero. I suspected that the LED light might have got shorted inside.
So, used an LED driver tester and found that the LED was getting on with a reading of around 69.4V. The suspicion was on the driver circuit. I got the pin details of this LED Driver IC SN51DP from my techie friends. Later, when I was writing this article, I got one like below too:
Then I checked up the voltages on each pin and found the following:
Since the required voltages were present and no output was detected, I looked for any shorting components around it and could not find any. I tried to fetch a replacement IC. This was not available. So, decided to use an LED driver board, which is commonly available in the market. The advantage of this board is that you can just wire it as mentioned there and just disconnect the driver output from the main board. (As I have already covered about this LED driver board in detail in my previous article Backlight Replaced And LED Driver Bypassed In LG LED TV MODEL 32LF561D-TF | Electronics Repair And Technology News (jestineyong.com) I am not elaborating it here again).
After this, when I switched on there was display, but with several vertical lines across the screen.
When I checked the voltages on the input of level shifter IC S302-11, I got the following voltages: V_com=7.14, VGL= Minus 9.28, VSS=5.93, AVDD=15.4, Panel Voltage=11.79 and VGH=29.90, which were all normal.
So, I consulted my techie friends, who advised me to cut LC1 and LC2 outputs of level shifter IC S302-11, which I did. But when applied the power, only some of the lines had vanished.
On further advice, I also cut ST1. After that when I switched on, no display came and on checking I found all the voltages which I indicated earlier were missing. This showed a short somewhere. In order to check whether it was a problem of the booster IC, P303-11, or failure of the level shifter IC, S302-11, I used a booster board.
When I wired it and applied a 12V externally, I found that the voltages were dropping, indicating that the level shifter IC could have crashed.
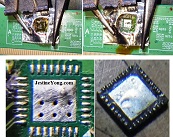
In order to remove this tiny IC, I applied desoldering liquid around and touched fresh solder on all the pins. Then I used a thin metal sheet, which I cut in the middle to cover the surrounding components of the IC, and used clips to keep it tightly in place. Used my hot blower, MAX8550, keeping the temperature at maximum and adjusting the air throw to the required limit. The IC came off easily. Then removed the metal sheet, cleaned the places thoroughly. Applied fresh solder on the IC pins for soldering a new one, which I had ordered.
Unfortunately, instead of sending me S302-11, P302-11 was sent by the supplier. So, I had to return it and take a refund, as he did not have S302-11.
I really hunted for S302-11 with all the available sources around. None of them had. Finally, another technician friend sent me a scaler board, which had S302-19 and asked me to try if the pins match. I checked and found that the markings of VGL, VGH, power supply, ground, and data pins were all exactly same.
Though I tried my level best to solder this IC, which had its legs underneath, I could not. The problem was placing the IC on a slanting scaler board. If at least one leg got soldered, I could have it in place and soldered the rest. But that was not possible. I had even bought a Microscope to enable soldering. But I could not manage, probably due to lack of experience in this remote operation. After several futile attempts, I decided to take my friend’s help, for which I carried this TV also along with five others, which all got collected, as mentioned in my article on Sony Bravia backlight change. My friend first cleaned the seating portion of the IC thoroughly. Then soldered the S302-19 after several attempts. After studying the videos of previous problems of lines on the screen, he applied VGL/VGH voltages on the LC1/LC2, after joining the ST1. But the horizontal lines did not vanish. So, he shorted the two and used a 3.9K resistor and applied voltage from AVDD.
Then when the TV was switched on, it worked perfectly well. These tricks are very well explained in LED repair books being published, about which Jestine Yong regularly provides links in his newsletter.
The above picture is when it was continuously tested for hours at his place. The following picture is when I tested it next day in my home.
After trying it for several hours, it was delivered to the customer, adding a great satisfaction to its collection bag.
Well, I have to say, in conclusion, that handling such multiple failures is a thrill for hobbyists like me, especially when one is as old as 72! (LOL).
This article was prepared for you by Parasuraman Subramanian from India. He is 72 years old and has more than 30 years’ experience in handling antique equipment like Valve Radio, Amps, Reel Tape Recorders and currently studying latest tech-classes conducted by Kerala State Electronics Technicians’ Association. He has done graduation in BBA degree, private diploma in Radio Engineering and retired as MD of a USA company. Presently working as Consultant to Hospital and other institutions.
Please give a support by clicking on the social buttons below. Your feedback on the post is welcome. Please leave it in the comments.
P.S-If you enjoyed reading this, click here to subscribe to my blog (free subscription). That way, you’ll never miss a post. You can also forward this website link to your friends and colleagues-thanks!
You may check on his previous repair article below:
https://jestineyong.com/just-patching-up-dry-solder-revived-a-dead-zebronics-computer-pc-smps/
 (71)Dislikes
 (0)
(0)
25 Comments
Leave a Reply


Albert van Bemmelen
April 1, 2021 at 5:39 pm
Although this repair reads as a good story it is one I won't try to repeat also because I do not understand most of it. Mainly on how it is at all possible to remove those vertical lines on the LCD screen by just shorting some tracks or IC pins and still manage to do that without giving in on picture quality or apparently even on the TVs lifespan? If TVs have really become so bad these days I rather would buy a new one instead of troubling myself with so much questionable engineering tricks.
Parasuraman S
April 1, 2021 at 6:50 pm
Well, I fully agree with you. But these are quite common here. It does affect resolution. But will go unnoticed! Many thanks for your comments!
Mark
April 1, 2021 at 6:22 pm
Well done Parasuraman,
That was quite a challenging repair - congratulations!
Parasuraman S
April 1, 2021 at 6:51 pm
Many thanks!
Suranga Bandara
April 1, 2021 at 11:16 pm
Good Repair ..
Well done Parasuraman,
Parasuraman S
April 2, 2021 at 11:41 pm
Many thanks!
Humberto
April 1, 2021 at 11:32 pm
You have repaired this LED TV perfectly. Congratulations.
Parasuraman S
April 2, 2021 at 11:42 pm
Many thanks!
Tayo
April 2, 2021 at 3:52 am
Amazing detective work... but I am even more impressed that you are not afraid to seek the advice and aid of friends whenever you are stumped.
I look forward to reading more of your great adventures!
Parasuraman Subramanian
April 2, 2021 at 11:45 pm
More important is the readiness of a techie to help another! I am lucky to be associated with such techies who welcome any need and respond positively! That's unity!
Many thanks!
Yogesh Panchal
April 2, 2021 at 3:02 pm
Sir,
Good Effort! to solve the problem and reviving the Unit.
Taking help of techie friends when we are not having knowledge about the equipment is always better for the equipment.""That is what Doctors do"" This way we also upgrade our knowledge and may get some tricks & tips to handle the equipment in different way.(Definitely by sharing profit for efforts)
Parasuraman Subramanian
April 2, 2021 at 11:46 pm
Yes! Well said!
Waleed Rishmawi
April 2, 2021 at 4:27 pm
complicated repair but the outcome as expected..keep up the good work. have a blessed day
Parasuraman Subramanian
April 2, 2021 at 11:46 pm
Many thanks!
Henry
April 7, 2021 at 8:59 pm
Nice experence sir,is really good to know that such fault can be removed with this tips. Thank you for posting
Parasuraman S
April 11, 2021 at 1:44 pm
Many thanks for your comments!
Imoudu Onwumah
April 2, 2021 at 9:25 pm
What a stressful repair!! I know u don't give up easily,some us would have returned the tv.l remember when I just started electronics repair two years ago,I received a tv that doesn't power on(Sharp LCD made in Japan)after repair with the aid of Jestine smps ebook,it powered on with good quality picture,but with vertical lines on 1/3 of d screen,so l retured it like that.Now with this article,with d aid of Kent ebook, I will try my hand on such tv problem in future.l say big thanks to you.
Parasuraman Subramanian
April 2, 2021 at 11:48 pm
Yes, our motto should be to revive the set by hook or crook! Many thanks!
Imoudu Onwumah
April 2, 2021 at 9:53 pm
I decided to read this article again,I noticed a very vital lessen to us technician,l quote ur statement from ur article "this is the other tv that got repaired finally by my technician friend" ,when I read this, I sighed, u did not claim d final victory to ur self but to ur friend, what a honesty and fair play u always claim to do.it's a plus for me.
Parasuraman Subramanian
April 2, 2021 at 11:51 pm
Yes, honesty improves our self confidence in multiples! Our mind will remain clean and we can fill it up with plenty of positive things! Many thanks!
Sylvester
April 12, 2021 at 7:28 pm
As diligent as ever. Most of us will have given up by the time vertical lines persist on the screen. Good lesson to newbies like me.
Parasuraman S
April 12, 2021 at 11:25 pm
Many thanks for your comments!
Upali
May 15, 2021 at 7:43 pm
Great work. Well done.
Could you please let me know what is the component (BB801) which is between the inductor and diode in the topmost line of schematic of SN51DP shown above.
Thank you.
Jefter Moonga
June 3, 2021 at 4:42 am
How are you my mentor? Am trying to reduce the backlight current of a let tv. Motherboard Tp.V56.pb801. The led trice ic is sn51dp. I couldn't identity the iset pin and also the resistor whose value to increase to reduce current. Your help is always appreciated.
Fondjio
April 18, 2022 at 8:03 pm
Bonjour à vous, bien que votre article date, je me sens d'obligation de vous poser mon probleme lié au même afficheur et mêmes composantes. Je dois dire que vous avez été un peu veinard de tomber sur cet ic s302- 19, moi je n'en trouve pas ni celui ci ni le s302 - 11, j'ai pu comprendre que malgrés le s302-19, les ligne n'ont pas disparues, et vous avez été obligé de cours circuiter et utiliser une resistance sur avdd pour regler le probleme, est ce donc à dire que je peux m'en passer de s302? Et directement proceder au pontage avec la resistance?
=====================================
Hello, although your article is dated, I feel obliged to ask you about my problem related to the same display and the same components. I must say that you were a little lucky to come across this ic s302-19, I can't find any, neither this one nor the s302-11, I was able to understand that despite the s302-19, the lines n didn't disappear, and you had to circuit and use a resistor on avdd to solve the problem, does this mean that I can do without s302? And directly proceed to bridging with resistance?