
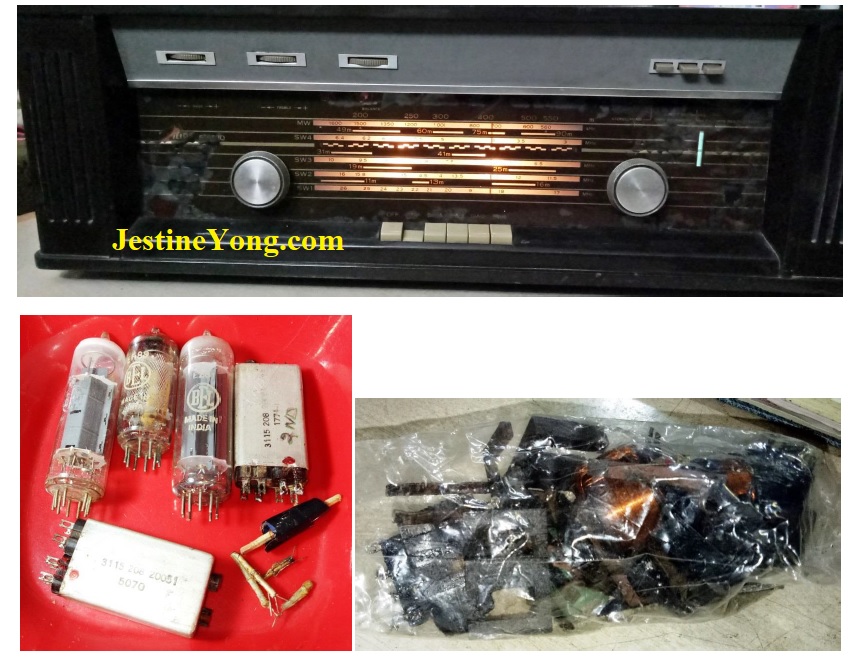
Restoration Of An Antique Philips Valve (TUBE) Radio 15RB708/00


This valve (tube) radio (Stereo) was brought to me by a customer staying a few KMs away from my home. It was one of the shops which dealt with antique items that gave my name and phone to the customer, though I have no idea how the shop got it, as I was unaware of its existence and who run it; that too very far off from my home town. This is yet another proof of mouth-to-mouth publicity and how it travels far and wide. Of-course, I thanked the owner of the shop and established a friendship over the phone and decided that I might have to go and see his collections in the near future.
The set was opened and a thorough cleaning was done. I applied WD40 liberally on all the controls and switches and valve bases, which is the first thing to do when we restore such antique sets. The controls and switches have to be turned/pressed repeatedly to enable auto-cleaning. The valves have to be inserted and taken out gently after applying the spray. This has to be done several times until the inside of the bases and valve pins look clean. I found on power on that the set was getting on, with dial lamps lit, but there was no sound output. The EZ81 rectifier valve was found getting heated up and no DC output voltages were detected on its 3rd pin, though AC inputs were present in pins 1 and 7 but dropping. The cathode getting shorted to the plates or filament is a common fault we find in tube rectifiers. The main transformer has two windings, one for high voltage (240-0-240) with minimum amperage and another for 0-6.3V with higher amperage for the filaments and bulbs. So, the transformer was ok. The following diagram that shows the rectifier and sound output sections might be of help to those who are interested in this type of repair: (Please use Ctrl key and scroll to zoom)

The sound output uses two ECC83 valves as preamps and two EL84 valves as output. I replaced the rectifier valve and also the filter caps and found the DC coming very well. As I noticed that one of the EL84 valves had collection of white powder at the top, which was a clear indication of defect, I had already replaced it earlier. But there was no sound output even at full volume when I touched the third pin of volume control with a screw driver. The speakers showed continuity and gave sound when checked with analogue multimeter (X1 range). If we keep one probe on one pin and tap on the other pin of the speaker, it will give out ‘kar kar’ sound and generally this is good enough for a preliminary short or open check.
I looked for any burnt resistors or other components at the bases of the output valves and did not find any. Then I removed both the EL84 valves and did a ring testing of the output transformers, which showed short. Though I suspected the possibility of primary shorts or open of the output transformers, I did not expect both transformers getting shorted! When I touched the output transformers, it was very hot within a few seconds that I kept it on for testing. As the transformers were mounted on the cabinet between the chassis and left speaker, I had to disconnect the speakers and take out the chassis and unscrew the output transformers in order to have a closer look. Well, the output transformers were in very bad shapes, showing clear indications of shorts within. Have a look at these yourself:

The third picture shows the caps and resistors connected on the output, details of which can be seen in the diagram. As I knew one expert who did rewinding of these transformers or make new ones and was a real professional, I sent these two to him. Since he said that rewinding of these on its original core was difficult, he made two new transformers after opening and studying one. I received the TXs back, after which I literally plucked the caps and resistors from the original and fit these on the new ones. I replaced only one cap as the other was in good condition:

After fitting the transformers and chassis back and restoring the speaker connections, when I checked, the output was good. I gave a USB sound input and found the outputs were really good. Then turned my attention to the Radio section. As no RF output was coming, I checked the IF transformers for any open winding which is quite common. I replaced the EBF89 valve as it was found dead short and getting very hot. I then found that the primary of one of the IFTs was open. (IFT stands for intermediate frequency transformer). As I have done rewinding of such IFTs before, I removed it, opened the case and took measurements of the length of coil on the former and its placement and rewound the coil by hand. I also replaced the cap as a routine. The ferrite core for tuning was found stuck on both the coils. I gently removed the wax and managed to take these out. But unfortunately, the thin plastic holders were found in bad shape, upon which I used very thin sleeves to hold the screws on which the ferrite cores are bonded. Many of you who are not accustomed to tube radio repairs might not be able to follow these explanations and I am sorry that I am unable to explain it in an easier way. Perhaps following pictures would be of some use:

From the above pictures, you can notice that the very thin ferrite core is bonded to the screw on top covered by a sleeve. The red sleeve what you see is what I have put as the original sleeves were in bad shape. The ferrite core is moved up and down inside the coil by adjusting the screws, which has slots within the core of the coil. This screw has to be adjusted up or down for proper tuning of IFT frequency. Well, it is a very complicated and intricate work that has to be handled very, very carefully. The final fitting looked like this before I put it in its case:

Well, the whole work was very disappointing as the screw was slipping from the tracks within the coil former and I was never able to adjust any of the two IFTs. I even tried inserting thin threads, but it did not work. Finally, after several rounds of requests, one of my techie friends told me that he had a similar Radio, from which he was ready to remove and send these two IFTs. But cautioned me not to try adjusting the alignment screws from its original conditions. I got the exact replacement of the IFTs upon which I sent what I had with me to him. When the replacement IFTs were fit, the RF came through and I was able to tune to local stations (MW) as well as a few SW stations.
If I could tune the IFTs properly, the gain would have been better, but I never ventured to do so, as once again it might end up in a fiasco! Moreover, customer was also happy about the result as he wanted only that. I fit the back cover and allowed the Radio to work for hours together on three consecutive days, before I allowed the customer to come and pick it up. The photo given below might show the IFTs that I removed from the Radio, but these were not given to the customer but sent to the techie friend for fitting it back on the Radio he had, which according to him was kept only as an antique collection and he never used it . Of-course, I paid him a decent cost, even though he was not willing to take any from me. Anyhow, mission accomplished and great satisfaction got added to its collection!

This article was prepared for you by Parasuraman Subramanian from India. He is 72 years old and has more than 30 years’ experience in handling antique equipment like Valve Radio, Amps, Reel Tape Recorders and currently studying latest tech-classes conducted by Kerala State Electronics Technicians’ Association. He has done graduation in BBA degree, private diploma in Radio Engineering and retired as MD of a USA company. Presently working as Consultant to Hospital and other institutions.
Please give a support by clicking on the social buttons below. Your feedback on the post is welcome. Please leave it in the comments.
P.S-If you enjoyed reading this, click here to subscribe to my blog (free subscription). That way, you’ll never miss a post. You can also forward this website link to your friends and colleagues-thanks!
You may check on his previous article on Sudden Power Surge Blew SMPS In Two HAIER LED TVS MODEL LE22B600
 (55)Dislikes
 (0)
(0)
20 Comments
Leave a Reply


Menahem Yachad
January 20, 2023 at 1:59 pm
Parasuraman,
You did a great job.
I know exactly what you were explaining about the IFT - I have done the same work many times myself.
I have melted new plastic formers around the screw, in order to repair the Transformers. It is a very tricky job, and does not succeed every time.
Well done!
Meanhem
Parasuraman S
January 20, 2023 at 10:40 pm
Glad to see one who understands it well! Many thanks for your comments and encouragement!
Albert van Bemmelen
January 20, 2023 at 2:03 pm
Indeed it is very antique equipment that was in your care! Although these tubes are very old they are known to be the only amplifier triodes/heptodes circuits that still would be able to survive an EMP burst. Although they say that WD40 can be used for many purposes, they also say it is known to deteriorate plastic in time why I am careful to use it. Even some of my common contact cleaning cans that had leaked unexpectedly 'painted' the wooden planks of my closet with some unremovable blue layer afterwards. Why I often put some of these cans into a plastic closed bag to prevent any leakage damage.
Parasuraman S
January 20, 2023 at 10:41 pm
Many thanks for your comments and cautions! Your expert comments are always appreciated!
AdamS
January 20, 2023 at 6:14 pm
I hope you mean WD40 switch cleaner, not the general WD40 lubricant!
Parasuraman S
January 20, 2023 at 10:42 pm
Yes WD40 cleaner. I understood from comments on previous articles that WD40 is not a lubricant. Many thanks for your comments!
Yogesh Panchal
January 20, 2023 at 8:08 pm
Sir,
Good Job!
Learned about Valves 30 Year back.Also done some fault finding in old Range of Black & White TVs i.e. EC,Crown,Weston,Nelco,Salora......Thanks for reviving old memories.
Parasuraman S
January 20, 2023 at 10:43 pm
Many thanks for your nostalgic comments!
Ajay Kumar Pondicherry
January 21, 2023 at 12:24 am
Excellent job Sir!!. Wonder how you are able to source the replacement valves!! Great looking radio too. Thanks for sharing Sir.
Parasuraman S
January 21, 2023 at 11:15 am
I have over 200 valves in my collection. Many thanks for your comments!
Sachin Sonar
September 13, 2024 at 3:57 pm
I have Philips Prestige Valve Radio in Working condition with FM installed to Use it but Magic EYE EM84 is not shows movement in MW Band.Kindly guide.
Manoharan
June 23, 2025 at 4:02 pm
Replace valve.
Mario
January 21, 2023 at 3:32 am
Que de patience et compétence.
==========================
What patience and skill.
Parasuraman S
January 21, 2023 at 11:15 am
Many thanks for your comments and encouragement!
Henrique J. G. Ulbrich
January 21, 2023 at 10:06 pm
Your article came me back to my old times, when I used to deal with valve radios. Thanks for the good memories.
Parasuraman S
January 22, 2023 at 12:01 pm
Many thanks for your comments and encouragement!
Waleed Rishmawi
January 27, 2023 at 8:43 pm
an outstanding job my friend. I have not done this kind of job before. I am glad you were able to find the parts for replacemernt. thanks for sharing and have a blessed day.
Parasuraman S
January 28, 2023 at 4:49 pm
Many thanks for your comments and encouragement, dear friend!
Sam
November 23, 2023 at 7:31 pm
I have the same radio. Volume control damaged. Iremoved the original volume control andreplaced with another one. Again Ez81 valve damaged amd replaced now working fine
M G BYNDOOR
July 23, 2026 at 8:42 pm
I have gone through your article and fit very interesting and useful. Your vast experience and knowledge is amazing and very helpful to many.
I have one 15 RB708 Philips radio not in a working and in a very bad condition. I would Lito repair it myself. I am looking for a detailed service manual. If anyone can spare, I will be grateful and I will for it. Can you help me? Where can I source few spare parts?
Regards