
The Never Ending Thrill Of Repairing Radios
I am sure you all will agree with me when I say that the thrill of repairing radios is something unmatched. Especially, when these are unique and leading brands, it brings nostalgia too. Here, I am going to describe two such cases, which I really enjoyed well.
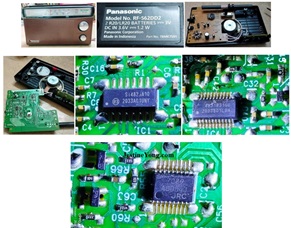
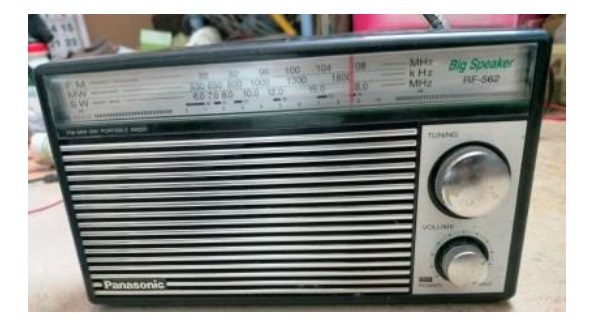
CASE (1) – National Panasonic RF562 : This was brought by my colleague’s husband stating that the radio was used by his dad and it stopped working. Let us have a look at the Radio and its inside before coming to the reasons for becoming dead and the rectification done:

As you can see from the above pictures, the Radio used one AM/FM Tuning IC, another for AM/FM RF and another for the audio output. The complaint was that it was dead even after replacing the battery. I cleaned the battery contacts and tried, but still did not work. So, I checked the on/off switch built-in the volume control. It was working ok. Then I checked whether the voltage was reaching at the board.
It was not. So, checked the DC input pin, which is supposed to pass through the battery supply when a jack is not inserted. But it was not showing continuity. So, I applied CRC-20 and inserted a jack in-out a few times, upon which the radio started working. I also applied CRC-20 on the volume and tuning controls as well as the band switch. The radio worked very well on all the three bands and I was thrilled to listen to stations in all the three bands.
Case (2) – Spanio Woody:
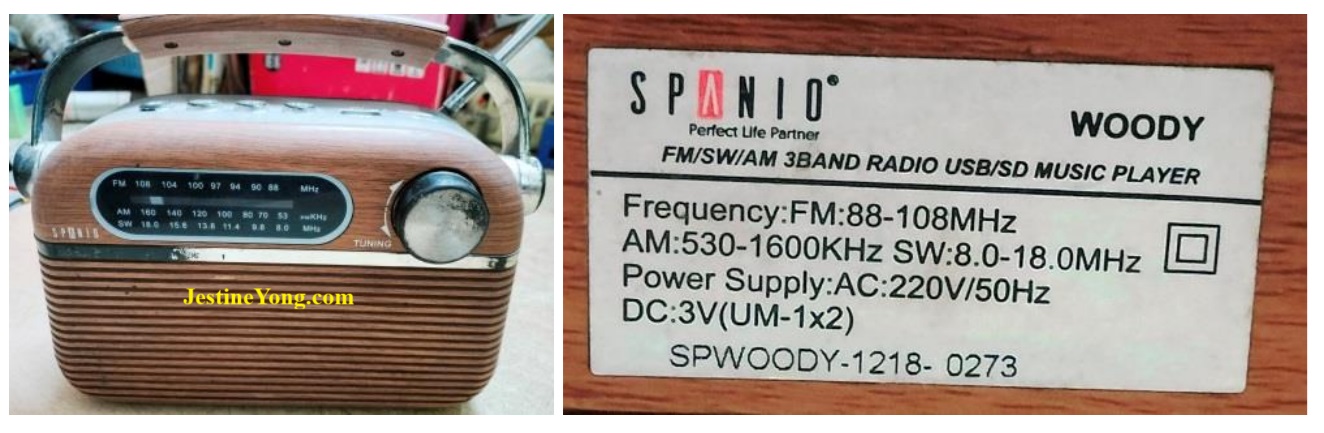
This set belonged to an employee working in the Grocery-Bakery-Vegetable shop opposite to my house. He told me that the radio was not working and it was left unused for a long time. I opened the set and found that the Mains transformer was burnt. Since secondary voltage was not known, I got a new one done with 3V and 5V windings. The battery was dead and after replacing it and cleaning and lubricating all switches and controls, the radio, USB and Bluetooth worked very well in the set.
I fixed the new transformer and first tried 3V AC input. But that was not sufficient, as the board had an 1117-5V IC regulator in it. So connected the 5V input, upon which a DC of about 7.5V could be obtained. The charging circuit was also working fine as can be seen from the following pictures:
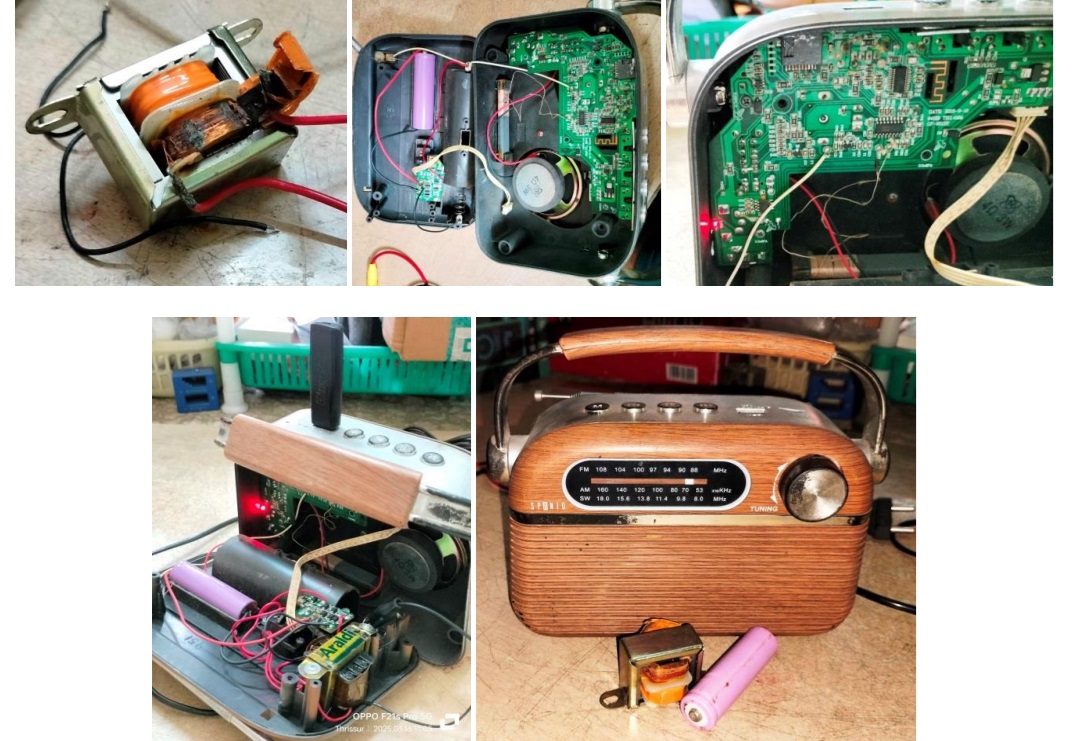
The last but one picture would show you the new transformer fit in place. I tested it for several hours on all bands and functions and the unit was working very well qualifying for rejoining its owner.
Double Missions accomplished filled with enthusiasm and vigor and the satisfactions got collected as usual.

This article was prepared for you by Parasuraman Subramanian from India. He is 74 years old and has more than 30 years’ experience in handling antique equipment like Valve Radio, Amps, Reel Tape Recorders and currently studying latest tech-classes conducted by Kerala State Electronics Technicians’ Association. He has done graduation in BBA degree, private diploma in Radio Engineering and retired as MD of a USA company. Presently working as Consultant to Hospital and other institutions.
Please give a support by clicking on the social buttons below. Your feedback on the post is welcome. Please leave it in the comments.
P.S-If you enjoyed reading this, click here to subscribe to my blog (free subscription). That way, you’ll never miss a post. You can also forward this website link to your friends and colleagues-thanks!
You may check on his previous article on Tuning Diode (VARACTOR DIODE) Found Short In PANASONIC RQ543ADS TWO-IN-ONE
 (35)Dislikes
 (0)
(0)
18 Comments
Leave a Reply


Albert van Bemmelen
December 6, 2025 at 5:01 pm
Good to see that rewinding a defect transformer is not always an option!
Parasuraman S
December 6, 2025 at 8:23 pm
Yes, very true! Many thanks, dear Albert!
ANTHONY PATERSON
December 6, 2025 at 9:29 pm
Albert,
It was a new transformer NOT a rewind of the original. Hence the final picture showing the defunct items - transformer and re-chargable battery
Parasuraman S
December 7, 2025 at 9:08 pm
Yes, you are right!
Yogesh Panchal
December 6, 2025 at 10:36 pm
Good job!Sir,
First time seen Radio without IFT..
Parasuraman S
December 7, 2025 at 9:10 pm
Many thanks, Yogesh Bai!
Mark J
December 7, 2025 at 5:23 am
Parasuraman I agree with you when you said "The thrill of repairing radios is something unmatched". Your are better at than I am. Your articles are very helpful.
Parasuraman S
December 7, 2025 at 9:11 pm
Many thanks for your comments and encouragement, dear Mark!
Philip
December 7, 2025 at 5:06 pm
You see Engineer Parasuraman, way back in my twenties, small radoes are what made me to earn the technician recognition, though honestly it was using hit or miss method whenever a hard radio repair made me feel like my head was going round and round. I love radio repair. They always happen to have faulty switches, power contaminated contacts, failed input power capacitor, or, low output power transformers. I prefer connecting an ideal electricity powered module with 5V output as an external power source for radioes. I do it as I find transformers to be less promising. But warn radio owners to be on the watchout for unforgiving lightening. Also using side D dry cell batteries that dont last beyond 3 days is nowhere near being economical. I'm stuck with an Aitkenson AT-7370R whose 'station IC' has not any identification information printed on it. The IC has a short circuit. The IC looks every inch like the all too familiar ...936... but its connections differ greatly. The radio owner has long gone silent !
Parasuraman S
December 7, 2025 at 9:13 pm
Many thanks for sharing your experience with Radios! Very nostalgic! Curious to know what that IC is!
Philip
December 7, 2025 at 6:57 pm
Before one opens a faulty radio to repair it, the sense of smell may come in handy. The smell of some burnt components is a reassuring indicator of a burnt component. In all certainty, the sniffing arouses suspicion about the smell that always lingers around in your faulty radio. I've never known why it always flatly refuses to go away. I'm sorry dear reader if the idea of sniffying makes you sniffy. Again, fallen off or loose components in a radio that can be heard moveing up and down the radio when you shake it, can be quite a tell tale sign. Some radioes are easy to troubleshoot using simple tools as - its very own speaker. Some radioes oftenly get mishandled, they'll bear the looks of abuse and frustration ! When I was growing up radioes were placed in a sitting room at a high level and with some sort of cloth over the pricy precious item. The messege was clear, keep off !
Parasuraman S
December 7, 2025 at 9:14 pm
Very interesting to read your comments packed with experiences! Many thanks!
Philip
December 8, 2025 at 5:09 pm
Thank you sir for your kind respond. Referring to my comments, I had written about a certain IC ...936... well its a jargon unknown to you for IC-KTO936MB. Now, try even harder to understand my laymans explanation here. When a radio mainboard is held such that the small dot mark on the IC is at the upper left corner of the IC, the first two IC pins nearest the dot, have tracks connecting them to a switch. Which in my own thinking is Ucc connection. This is not the case with the IC in the radio I was brought to repair. Infact the fast three pins have no track connections. The easily noticed similarity when compared with four other radio mainboards is that all ICs bottom left pin connections run to the middle pin of 3 pins of a GANG (component). So without an identification number, replacing the IC with KTO936MB will purely be trial and error. No, not your student, Engr Parasuraman. DIFFERENT ISSUE; WHAT ARE THE BEST POINTS ON A RADIO MOTHERBOARD TO CONNECT A USB BOARD/MODULE WITH THREE UNMARKED CABLES ?
Parasuraman S
December 8, 2025 at 10:48 pm
Kindly refer to one of my articles: https://jestineyong.com/restoration-and-modification-of-panasonic-rx-cs730-two-in-one/
Thanks again for some more peculiar experiences shared!
Adam S
December 8, 2025 at 7:20 pm
More excellent repairs, Parasuraman!
Although I am worried about your satisfaction collection bag - I'm hoping it is huge as it must otherwise be overflowing or bursting at the seams by now!
Parasuraman S
December 8, 2025 at 10:50 pm
It is a self-adjusting type and can accommodate as much as we put in, expanding its belly like a python! (LOL) Many thanks for your encouraging and hilarious comments!
Philip
December 9, 2025 at 2:18 am
I'm sorry for having delayed to send an extension of my explanation. When receiveing the radio from a fellow technician, it was in pieces. solely for extracting spare parts. He decided that the radios dead condition was no longer going to be the cause of a splitting headache for him.Just as much, the real radio owner, for the sake of peace of mind had given up and abandoned it. But one day, playfully kind of, i joined the two boards through the cables which were still intact. I then fed power to it using a 5V DC output module connected to the 2200uF16V input power capacitor pins. It was lifeless when switched on.To cut a long story short due to limited space, both the collector and emitter pins of the regulator ic 7533-1 were short circuited. The two tracks that were connected to the regulator pins run parallel all the way to pins 6 and 7 of the mystery IC. Every single component attache to the two tracks indicated a short. Cutting the track at the foot of pin 6 made the short to vanish. Ghost-host IC !
Parasuraman S
December 9, 2025 at 9:43 pm
Very unique and interesting experience!