
Fungus Attack And Failure Of Crystal Brought Back This Yamaha Receiver Amplifier RX-V485
This Yamaha Amplifier had visited me in September, 2023 about which I have submitted a report here vide link provided:
https://jestineyong.com/intermittent-on-off-problem-solved-in-yamaha-rx-v485-receiver-amplifier/
There was a comment by an expert which reads like this: Your dedication and hard work always pays off even when you this time didn’t need to replace a single e-cap (Lol)!
The Amp revisited me in August, 2025 in dead condition. Let us look at a picture to refresh our memories:
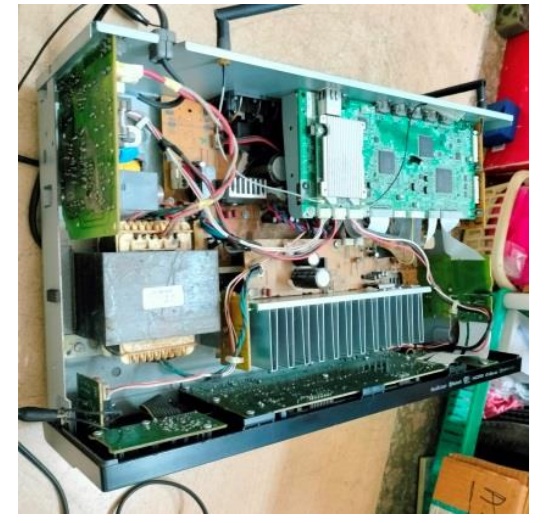
As you can see, the AC in SMPS board is fit on the left side top, exposing the dangerous shock hazardous portion! If we inadvertently happen to touch any of the live section, while shifting or moving the Amp for service check-ups, we can expect to get a ‘juicy’ shock, which could even be lethal! Since my service table has an isolation transformer with an MCB and I always wear protective footwear and many times a pair of flexible rubber gloves, I stand less chance to experience it. Though, the case is more or less same with all the sets we handle for service, fixing the PCB exposing the dangerous portion on such a place is not expected from an internationally reputed company like Yamaha! There was no protection sheet also there, which is commonly found in such cases!
I discharged the main cap for any stored voltage and removed the PS PCB and inspected its condition. Look at what I found:

Such massive attack of fungus could cause corrosion too! So, I removed the tank capacitor and look at what I found in the last picture above. I had enough reasons to involve myself for replacement of all e-Caps in the PS Board, which I did happily. I did find a few other caps with out-of-range readings. After finishing that work and cleaning the board thoroughly, Fixed the PS Board back and applied power. But the set remained dead. Since set was not even going to standby mode, we need to suspect secondary power supplies on the Main Board. The secondary power supplies of 3.3V & 1.8V were ok. Then checked the voltage at the crystal point. The voltages were present.
When I checked for oscillation, it was absent. On suspicion, I switched off the set, waited for a few minutes and switched on the set, keeping the oscilloscope probe on the crystal. The oscillation was just starting and immediately shutting off. The next possibility was leakage of press to on switches and/or fungi attack in the front control-display panel. Removed the front portion and indeed there was fungi attack in a few places. Cleaned the board thoroughly. Replaced all press-to-on button switches and e-Caps in the panel in order to avoid opening this portion again in the immediate future. But set maintained status quo! Naturally, the suspicion was on the crystal. When I looked at the service manual, I could gather the number of this SMD resonator as: 12MHz CSTCE12M0G55. I downloaded the datasheet from the following link:
https://www.alldatasheet.com/datasheet-pdf/pdf/1817425/MURATA1/CSTCE12M0G55-R0.html
Further probing revealed that this was a discontinued product. Then I studied the structure of the crystal from the datasheet, which mentioned two 33pF caps connected from both ends to make a leg in the middle, which was found grounded. I removed the crystal and checked the PFs and this is what I found:
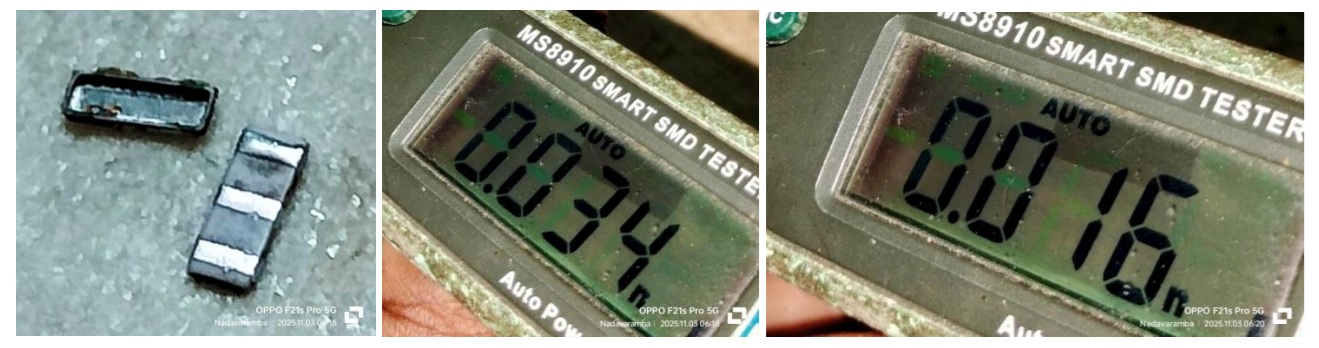
As you can see, while one side pF was ok, the other side showed signs of short. So, the culprit was failure of this crystal.
I took one 12 Mhz two pin metal resonator and connected two 33pF caps from both sides to make a three pin connection. Temporarily connected it to the board. Let us have a look at the crystal and the make shift arrangement done and the result when applied power:
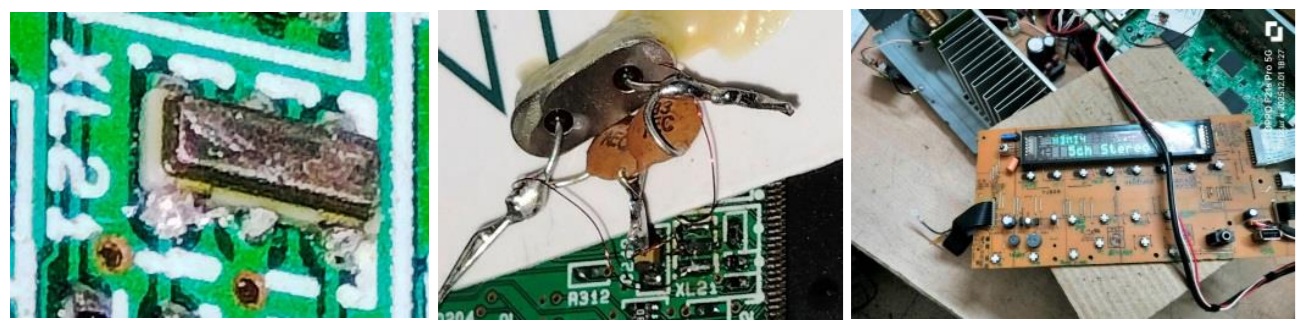
As you can see from the third picture, the set got on and I left it connected with an audio input and headphones as load and allowed it to be in that condition for a couple of hours. Any set that has not been used for a prolonged time should be put to such soaking tests in order to warm it up and clear off residual fungi. Since replacement part of the SMD resonator was not available and equal one had to be imported which would not only be prohibitively costly but also time consuming, I let the set be in this condition. I applied Fevibond (a type of rubber glue) in a few places in order to hold the crystal in place.
Assembled everything back. Bought one packet of moisture absorbing sachets and placed them in a few places with paper tape. Again tested the set for several hours with intermittent manual switching off and on. Also did a cold start next day morning and ensured that set was working perfectly well. Let us have a look of related pictures:
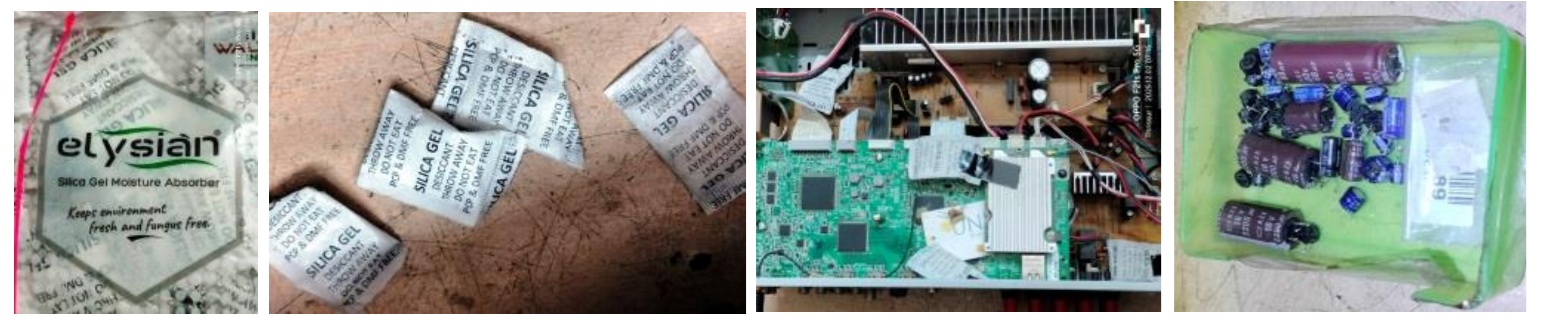
Mission accomplished with great satisfaction getting added to the prestigious collection bag, with the additonal satisfaction of e-Cap replacements, though partial!

This article was prepared for you by Parasuraman Subramanian from India. He is 76 years old and has more than 30 years’ experience in handling antique equipment like Valve Radio, Amps, Reel Tape Recorders and currently studying latest tech-classes conducted by Kerala State Electronics Technicians’ Association. He has done graduation in BBA degree, private diploma in Radio Engineering and retired as MD of a USA company. Presently working as Consultant to Hospital and other institutions.
Please give a support by clicking on the social buttons below. Your feedback on the post is welcome. Please leave it in the comments.
P.S-If you enjoyed reading this, click here to subscribe to my blog (free subscription). That way, you’ll never miss a post. You can also forward this website link to your friends and colleagues-thanks!
You may check on his previous article on Restored An Ant Infested CCTV Video Recorder And Adaptor – RLN8-410 & 2AAL090R
 (36)Dislikes
 (0)
(0)
16 Comments
Leave a Reply





Kevin Davison
July 25, 2026 at 6:13 pm
Fantastic. Your repairs are always brilliantly implemented and highly educational for all. I love watching your work.
Parasuraman S
July 25, 2026 at 6:50 pm
Many thanks for your wonderful words of appreciation! It is very valuable, indeed!
Robert Spoon
July 25, 2026 at 8:52 pm
Parasuraman, your collection bag is enormous by now!
Parasuraman S
July 26, 2026 at 3:01 pm
That is now AI controlled and self-adjusting type! It has been upgraded to latest technologies! Ha! Ha! Many thanks!
Imoudu.O
July 25, 2026 at 9:16 pm
I wonder how u discovered how the two 33pf cap were connected internally inside resonator xl,checking datasheet,there's no internal diagram of xl.All the same as usual u were able to fix it...ur bag is getting heavier every wk
Parasuraman S
July 26, 2026 at 3:02 pm
It is there in the service manual and also datasheet which I think I saw in element14 or digikey! Many thanks!
Imoudu.O
July 25, 2026 at 9:53 pm
Is there anyway crystal xl can be tested without the use of an oscillator?
Parasuraman S
July 26, 2026 at 3:03 pm
I think it should show some reading in analogue multimeter in AC mode. I am not sure! Please take help of AI.
Albert van Bemmelen
July 25, 2026 at 9:58 pm
Sorry to see that you this time had to replace all bad caps with the fungus infected pushbuttons and the 12MHz resonator. I hope that those silica gel packs do not cause any short circuits in time when they get too wet after collecting maybe too much moisture?
The link to the datasheet failed to give the right quartz/resonator but this link showed the right one:
https://docs.rs-online.com/a47c/A700000006419064.pdf
Parasuraman S
July 26, 2026 at 3:05 pm
Many thanks for your expert comments, dear Albert! Let us hope my school classmate need not have to bring it to me again!
Mark J
July 26, 2026 at 2:54 am
well done Parasuraman. That was good idea using moisture absorbing sachets. Thank you fro sharinig.
Parasuraman S
July 26, 2026 at 3:05 pm
Many thanks, dear Mark!
Jim
July 27, 2026 at 1:56 am
Wow, That unit must have been in a damp basement to draw that much moisture, great job replacing all the caps , Yamaha is a fantastic product. I just did some work on a Yamaha DSP 1 that was 28 yrs old and still great.
Parasuraman S
July 28, 2026 at 2:06 pm
Glad to hear! The humidity plays an important role. Many thanks for your comments!
Yogesh Panchal
July 27, 2026 at 3:36 pm
Sir,
This is an interesting job that requires years of experience and knowledge. Such databases and options didn't exist in the past—yet technicians were still capable; today, even if you can find the database, the parts themselves are often unavailable.
Parasuraman S
July 28, 2026 at 10:35 am
The bitter truth! But unavoidable! Many thanks for your comments, Yogesh Bai!