
How To Repair Laptop Batteries
A few days ago I started repairing Laptop Batteries. And in particular the modern Smart Battery Packs. Below my first Pack opened before Repair and Reset. A BQ80201 Controller Board for the Acer Aspire 9411 AWSMi 17 inch Dual Core Laptop. Which didn’t take much time to open.

These packs can’t be fixed by just replacing the 18650 Li-ions by inserting new cells like was still possible with the old Battery Packs (Mostly NiCad and NiMH Packs). Because with the introduction of the Li-ion Battery it is controlled by an intelligent controller Board that keeps track of the Battery temperature, Over voltage when charging, Over current, and prevents Exploding or dangerous Fires . Because Li-ions are very Powerful we need this safety Controller Board as recently was big news when the Samsung Galaxy 7(? I am not familiar with all those new Smart Phones) was cancelled because it caught fire or exploded. And it had cost millions to cancel that Model out of safety concerns. And apparently Li-ion Batteries become very unstable when they get overheated.
I encountered a lot of problems that made it almost impossible for me to repair/fix a Bad Smart Battery at first. I will summarize these points of concern below:
- Smart Batteries are read and programmed by using the Philips I2C protocol. Which involves using the 3 wires SDA , SCLK, and GND. And an I2C Adapter Interface.
- When we only replace the old Batteries we will notice that when we insert the ‘repaired’ Pack back into the Laptop, it will protest that the Pack is still Bad and it will not charge correctly either. Because the old BAD Pack data is still stored in the Eeprom on the Controller Board.
- That’s why we also need to reset/reprogram the previous mentioned Eeprom too. Because the Eeprom on the Controller Board still contained for instance the old Production Date and the Cycle Count of times Charged etc.
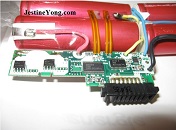
Below another peek into the opened Acer Battery Pack (A Sanyo 3UR18650Y-2-QC236 Battery).
Reading the Pack Data and resetting/reprogramming can be easily done with the Full version of the program BE2WORKS. The free demo version only Reads Battery Pack Data. The Full version is not cheap but when we take in account that a single Replacement Battery Pack already easily costs 30 to 60 Dollar/Euro. We earn that investment back after repairing/resetting about 5 Battery Packs.
- Because every Battery Pack Connector needs another connector Cable we need to make different versions. Sadly we have to investigate the information of the Connector pins ourself. Like the 7 pins Connector I had to use for my Acer Aspire 9411ASMi Laptop Battery Pack. And my brother’s Acer Aspire 5520G Battery Pack had the same connector but only 10.8V instead of the 11.1V that my Pack had (both Packs about 4400mAh).
- I started with the BE2Works demo and therefore had bought the cheap CP2112 USB Adapter to be able to test reading the Battery Eeprom Data. Without that Adapter present the Program will quit. But before reading the Pack by I2C communication is possible we first have to find out the position of the NTC resistor on the Connector. And after I connected that pin to GND the Battery could be read by BE2WORKS. And if the Pack is still in sleep mode we also have to shortly apply an external DC voltage of about 11V onto the Plus and GND connector pins.
- Because there was no 7 pin connector Data to be found I started by checking the Plus and GND pins first. And to read out the Eeprom we don’t need to connect the Plus of our Battery Pack to our CP2112 USB Adapter to prevent damage to PC or Adapter. After that I checked with my digital Meter between all pins (except the Plus!!) to Ground if I could measure about 10Kohm that represents the temperature measuring NTC. And connected that pin permanent with GND (on the Connector). And a self made 3 wire connection Cable from the Gnd connection of the CP2112 Adapter was connected to the Battery connector. And the other two wires also from the JP2 connector on the CP2112 represent SDA and SCLK. The CP2112 will be recognized by Windows without having to install any driver.
- To prevent blowing up a one-time 4 legged Fuse on the Controller Board that is placed in the Plus Battery Pack connection on the Controller Board, we have to start removing old Batteries by starting removing the Plus wire first, than the lower next Plus, until the last Wire the GND can be removed .
And when connecting new Batteries we for the same reason start in the opposite sequence starting with the Battery GND connection on the internal Controller Board first, going up to the next higher Battery wire, until we finally end with connecting the Plus of the Whole Battery Pack, being the last wire left to connect.
(with 3 x 2 Battery Cells we have to connect 4 wires in total). The 4 legged Fuse (in my case a 12AH3 type Fuse) will get blown if the controller thinks that the Battery is tampered with. Like when the Battery Voltages are connected in the wrong sequence. The Fuse is burned by a controlled FET that heats a resistor inside the Fuse that will immediately open the Fuse. And the Battery Pack Plus is removed from the circuit in the process. All for safety reasons. 400 of these Fuses only cost about $67 and buying only five of them is also possible. Some say that to prevent this from happening we better at forehand Reset the Controller by connecting that pin to Ground. But if the Protection Flag in the Controller is already Set, the Fuse will probably blow as soon as the Cells are reconnected.
<= The 4 Legged 12AH3 One-time Fuse.
The Battery Connector specs of my 2 now repaired and reset 7 pin connector Packs are as follows:
+ + NTC SCLK SDA – – (gnd)
| | | | | | | <= (7 PIN CONNECTOR)
And as said we do not use the Plus (+) of the Battery Connector other then only for activating the Battery when it is in SLEEP mode as described under point 5.
Before we use and replace the old Li-ions 3.7V (2600mAh) Cells by new ones we have to Spotwelder them with pure Nickel strips onto their contacts. In this case 2 in parallel and that 3 times in Serie. (Parallel doubles the Packs given current). Overheating the Cells by Soldering could make them explode or shorten their life span. (I use a 709A+ Spot Welder for which I had to replace my L16A Weber Fuse automate by a C16A type because the inrush current of the 709A+ was often simply too high).
A Pack with 3 x 2 cells gives about 2 x 2200 mAh, at a voltage of 3 x 3.7 Volt = 11.1 Volt. (In case of my Pack from a Acer Aspire 9411ASMWi 17 inch Laptop).
And in case of my brothers 3 x 2 Cells Pack with another Pack controller, only 10.8V at 4400mAh (Acer Aspire 5520G).
As mentioned before we have to make another I2C Cable to connect to our CP2112 Adapter for any other Battery Pack Connector we encounter. I already ordered the 5 and 9 Pins Male Battery Plugs in case I have to repair/reset those Battery Packs in the near future too. And these are the Chips BE2WORKS can Reset/Reprogram and read: BQ208X, BQ20ZXX, M37512, BQ8030, R2J240, MAX1781, BQ80201, SN8030, BQ20869, BQ30Z55. Below my Brothers old BAD Battery Pack for his Acer Aspire 5520G that costs at least 30 to 60 Dollar/Euro new to replace the old one.
And it is good to know that BE2WORKS is able to RESET the PFF (Protection Fuse Flag). But better prevent the above mentioned trigger moments that if they occur set this 12AH3 One-Time Fuse.
As you can see it was still the old BAD Battery Data that is located in the Eeprom. (Cycle count: 223). And it already had lost about 50% of its original Capacity.
After the internal 12AH3 Fuse is blown the BE2WORKS communication with the Battery controller isn’t possible. So we first have to restore that 12A Fuse by placing a short wire over it or by placing a new Fuse. (I used a 0.1 mm thin wire. But I now know how to prevent blowing these Fuses because the Forum and the Site of BE2WORKS were unclear about this subject. And I was told to examine the Controller specs because as they said their program didn’t cover hardware questions. Which didn’t help at all. So now after reading this article any Reader can skip these questions that prevent using the BE2WORKS program the right way!)
About repairing and replacing old Smart Battery Packs and the price of the Li-ion Cells:
I previously bought 10 of them for about $25/Euro. And those 18650 Cells were all 2600 mAh Capacities (or even more up to 2800 mAh!). The pink/purple Li-ion were original Samsungs according to the Seller!
Which made a big difference quality wise because those 3.7V Cells with names as GTF (9900mAh according to the seller) or Ultrafire (9800 mAh) were a big disappointment. The GTF only gave 963 mAh Capacity, and the Ultrafire cells only 463 mAh !!! To end this article I finally will give some photos of the inside of my brother’s Battery Pack (a Sanyo AS07B31 Pack). Keep in mind that for the same Laptop there are equally useable Battery Packs from different Manufacturers with different Controller Boards but with the same Connector. In case of my Brother’s Battery Pack it took me a lot of time just to find a decent way to open it. It was heavily glued together with double-sided tape, to the Batteries and to the Case. And resetting the BQ 8030 chip took a lot more time compared to my Pack with a BQ 80201 chip. The Eeprom data had to be saved as .bin file (by clicking on the Floppy Disc icon) afterwards. These chips were not sealed, but in case they are BE2WORKS also knows more than 700 Passwords to unseal them. Below the Controller Board with the BQ 8030 DBT chip. And the next Photo shows the position of the 12AH3 4 legged Fuse. Both Photos also show the black wires with the Temperature Sensors that were glued to 2 of the Cells. As can be seen on the Photo after that. And the last Photo shows how in my old Acer Aspire Battery Pack the Wires were connected to the old bad Battery Cells. After opening and removing the Batteries and the Controller Board entirely from the Pack. So If you start by repairing and resetting your old Battery Packs you now know what NOT to do! I hope it was a useful learning experience.
I also bought this complete set of different universal Battery Pack connectors to be used in combination with BE2WORKS which also could be of interest to many readers. https://nl.aliexpress.com/item/Professional-Universal-External-notebook-Laptop-Battery-connectors-for-the-battery-charger/575654945.html
And if I not already told this before, BE2WORKS isn’t capable of reading the Controller Board without internal Batteries connected! Which is the same effect as when the 12AH3 Fuse is blown. And Before anything else ! Be extremely careful with connecting anything to the 18650 Batteries , cause in an unattended moment one of my connection wires short circuited and got up in smoke instantly!
Albert van Bemmelen, Weert , The Netherlands.
Please give a support by clicking on the social buttons below. Your feedback on the post is welcome. Please leave it in the comments.
P.S- If you enjoyed reading this, click here to subscribe to my blog (free subscription). That way, you’ll never miss a post. You can also forward this website link to your friends and colleagues-thanks!
Note: You can read his previous repair article in the below link:
https://jestineyong.com/650-watt-atx-power-supply-shutdown-problem-solved/
 (218)Dislikes
 (5)
(5)
142 Comments
Leave a Reply


Waleed
February 1, 2017 at 8:57 pm
thanks for sharing your repair experience with us. on the other hand, is it worth it to be repaired? if want to replace all these batteries, that is going to cost..they are many laptop batteries out there for the price of 75 dollars each that can be ordered online from the manufacturing company.
Albert van Bemmelen
February 2, 2017 at 3:15 am
75 dollar isn't exactly cheap either Waleed. And for about less than 3 times that price you own BE2WORKS. And not for all laptops are new replacement Battery Packs available why I chose to start repairing these bad packs myself. And the packs I repaired with this method are of course as good as the quality 18650 cells I am able to buy which is often beter than new packs bought.
Paris Azis
February 1, 2017 at 10:28 pm
Good job, Albert, very complicated as well, needing also special equipment and software.
Easy to understand now why people avoid to perform cells' replacement in worn out battery packs...
Thanks for sharing this interesting information.
Albert van Bemmelen
February 2, 2017 at 3:53 am
Indeed Paris, I completely agree that it doesn't make repairing any easier. And not all available Battery Packs like your Dell Battery Pack Controller is BE2WORKS able to fix. As we established in our emails the BQ29330 (original Pack), and the SH79F329AX (imitation Pack) in your Dell are not the right chips to reflash/reprogram. According to the guys from BE2WORKS these are not because there most be another FuelGauge chip from TI. And the previous mentioned chips only protect the 18650 Cells. The SN80305 is the correct chip but is sadly not yet supported or I must hear otherwise from them. But as soon I get an upgrade of BE2WORKS that can program this chips I'll let you know immediately of course! Sorry I couldn't help you fixing your Packs too, Paris.
David Ujcic
April 9, 2020 at 9:48 pm
Thanks. I managed to find full version download for free.
Parasuraman S
February 1, 2017 at 11:12 pm
Oh! My God! It will take many days before I can digest all that technical stuff packed in this unique article! Great efforts and very informative, though it goes above my head, at-least for the time being!
Albert van Bemmelen
February 2, 2017 at 4:04 am
That is how I also felt a couple of days ago Parasuraman! When I tried to fix my Battery Pack and nothing worked because the blown Fuse prohibited any communication afterwards. And I had no clue what went wrong because I made no short circuit or something like that. But now that I know the things I wrote in the article it all makes completely sense to me! So I'm sure that if the money investment to start is no issue for you, it won't be as complex as it looks.
Joop
February 1, 2017 at 11:51 pm
interesting article. thanks for sharing Albert.
Henry Thomas
February 2, 2017 at 1:17 am
Great and rare information the article is well presented by the author and straight forward, easy to follow. The only thing that it's better to buy a new battery online. The repair is too expensive to restore the battery. I replaced my HP laptop battery and it only cost $13.99. but article is great. Knowledge is power.
Albert van Bemmelen
February 2, 2017 at 5:05 pm
Knowledge surely helps us to prevent making errors before we start making them while doing any repairs. And you are right that money is always the limiting factor Henry Thomas.
ivan1
February 2, 2017 at 2:11 am
The information described above is absolutely useful, it explains the considerations that the manufacturers have had to protect the
Computers and users from battery knocks and drops or overloads
Protecting users from a possible fire as has happened with some cell phones Thank you Albert a big greeting from CHILE
Albert van Bemmelen
February 2, 2017 at 4:54 pm
Glad you liked it Ivan1. And hereby my greetings from The Netherlands to you!
Robert Calk
February 4, 2017 at 1:04 am
There is some work being done to make Lithium batteries much safer by replacing the liquid electrolyte with a solid sulfide-based electrolyte. You can read some info about the technology at this link. https://phys.org/news/2017-02-mechanics-lithium-sulfides-solid-electrolytes.html
Albert van Bemmelen
February 5, 2017 at 12:20 am
Thanks Robert. Hereby I add these Li-ion Battery 'Rules' which I found in a Book bought through Biblio.com on how to best handle these type of Batteries:
1.Charge Li-ions often, except if they are going to be stored for a long period. And avoid deep discharges.
2.Keep Li-ions cool, avoid leaving them in a hot car.
Never Freeze Li-ions ever!
3. If your laptop can work without battery and usually works on a power adapter then remove the battery and store it in a cool place.
4.Avoid purchasing spare Li-Ions for later use. And keep the date of purchase. Do not buy old stock even if the price is attractive.
A lithium-based battery has no memory effect which means you never have to discharge them to maintain capacity.
Li-ion batteries prefer a moderate discharge. Partial discharges produce less wear than full discharges representing a cycle less the loss of capacity.
The decline applies to all batteries but most to Li-ion batteries.
A discharge of up to 80% is the value equipment manufacturers handle in their calculations.
Li-ions also wear when not in use. Save batteries preferably in a cool place and at a loading of up to 40%. Never fully charged and discharge Li-ion if necessary before storage.
15 degrees celsius storage temperature is the temperature at which the manufacturers store them at a loading of up to 40%.
A Li-ion battery has a time clock that starts ticking the moment it leaves the factory.
The electrolyte slowly eats the positive plate away in the battery pack.
Until the internal resistance is so high that the battery will not deliver power anymore.
Cheers !
Jorge Marroquin
February 2, 2017 at 2:39 am
Thank you for sharing such interesting information.
I think the time, material, equipment and software that have to be invested for this type of repairs is very high. I recommend that if you do not have a group of batteries to repair, it is preferable to order a new battery online
Albert van Bemmelen
February 2, 2017 at 4:57 pm
You're of completely right Jorge. I already repaired 2 old back packs and a third one soon will follow!
Albert van Bemmelen
February 2, 2017 at 4:05 am
Thanks Joop, no problem ! Glad you liked it.
Mohammed Imraz Ali
February 2, 2017 at 5:11 am
Waoo
Very Good Article and very well explained
Albert van Bemmelen
February 2, 2017 at 5:08 pm
It makes me very happy that you liked it Mohammed Imraz.
Leo G Brown
February 2, 2017 at 7:35 am
This is an eye opener for me. I live in an area in Africa where it is not easy to get genuine laptop batteries at reasonable prices.
I have three dead laptop batteries and was hoping to resuscitate them by just replacing the Li- ion cells.
Now I know better.
It is a no go area for the novice.
Thanks for the detailed technical article.
It is appreciated.
Albert van Bemmelen
February 2, 2017 at 3:30 pm
Thank you Leo. Some people I know replaced the Battery Cells thinking it would make a new Battery and found out it didn't work afterwards. But they can still repair the problem if BE2WORKS supports their Batteries Controller chip. Just reset/reprogram the Eeprom and you do have a brandnew Pack!
Robbe
February 2, 2017 at 9:24 am
The way I open laptop battery packs and laptop PSU is by dropping a few drops of euro95 benzine, (regular gasoline or petrol) in the seam with a drop counter.
let it soak for a few minutes gently pry open
sometimes you need to do a few rounds of applying and soaking
they should open without using force
I've encountered batteries that are just glued together and glued + plastic clips
groeten
Robbe
Albert van Bemmelen
February 2, 2017 at 3:21 pm
Thank you Robbe for this Idea. I don't know if it is a good idea when the 18650 Battery are still fully charged the 100%? You could create a Fireball in a jiffy?
Li-ions are dangerous as they are, and Gasoline and Li-ions both are able to burn like Hell I guess. It is maybe like extinguishing fire with Gasoline when it goes wrong? I certainly wouldn't soak a Battery Pack in Gasoline for that reason. And it is mostly the whole inside area that is glued together onto all Cells. Which also in the same time makes the Plastic Case very sturdy on the outside.
Albert van Bemmelen
February 5, 2017 at 5:00 pm
By the way, If you ever have a device that starts to become very sticky on the outside like my TM-Brothers Mini Wireless Optical Mouse, do not throw it away! I've got a very good fix for you. To get rid of the deteriorated rubber on the outside's case instantly: just use the strong-smelling Ammonia,Ammoniac,Ammoniak (a strong-smelling gas made of hydrogen and nitrogen) to clean its surface perfectly! But just do not clean the optical lens with it! I just found out today that I am able to use this Mouse again without that annoying sticky outside.
Anthony
February 2, 2017 at 5:38 pm
Hey thanks for this article Albert ! I've never taken one of these apart and did not know too much about them really,
but your very detailed explanation as usual has taught me so much on this subject! They are certainly more
complex than I anticipated so thanks again Albert for writing this article and sharing it here for us to learn from.
Battery technology continues to evolve and it's important for all of us to keep up with the latest developments.
Best Regards Mr Albert !
Albert van Bemmelen
February 2, 2017 at 9:01 pm
Thanks, Anthony. Indeed this modern technology keeps evolving. And in the same time makes repairing more complex but for a good reason. Safety above all else should also be any Engineer's first rule to follow!
suraga Electronics
February 2, 2017 at 6:31 pm
Hi. Albert van Bemmelen,
Wow.. Excellent Repair job Really.
Thanks !
Albert van Bemmelen
February 2, 2017 at 9:38 pm
Thank you Mr.Suranga. I wonder though: did you rename your store name from Suranga to Suraga repair shop?
(;)
zaheedi farjan
February 3, 2017 at 1:16 am
Dear justine its really complicated to understand all these stuffat once its rather difficut but i appreaciate ur knowhow
Best regards
Zaheedi
Albert van Bemmelen
February 3, 2017 at 9:05 pm
Everything looks difficult at first Zaheedi. But after we dig deeper into the matter it will solve all if not most of our questions. And thanks to Jestine every new and unknown subject is made easier for everyone to read and learn in practice.
Like repairing SMPS/Power Supplies which is much easier as I would have thought about 5 years ago myself!
So just keep reading these Jestine Pages!
moshe jacobson
February 3, 2017 at 8:03 am
Albert, You this was truly a VERY WELL written & explained article. I learnt a lot about something i never knew could be done...thank you for that.
Albert van Bemmelen
February 3, 2017 at 4:15 pm
Thank you Moshe for the compliment! I'm very happy that the article will help anyone fixing old Battery Packs. And I hereby add some info that may be of help to you or other readers, but I've never used it so can't give any Help or advise about using it. With it I mean the Free program UBRT v5.xx (Universal Battery Repair Tools) from Robot_Labs that can be used with the rather expensive TI EV2300 Adapter or with the cheap Philips I2C LPT interface. But it won't be as easy to use as BE2WORKS is. (Although the possibilities of UBRT are extensive it also makes it much more difficult to use compared to the 'one-click' Eeprom Reset function in BE2WORKS).
And I know there is another Sotware that can be bought in Vietnam that can do the same as the above mentioned Programs, but I never used it or know its Price either, but if I convert the VN$ to US Dollar it must be in the same Price range as BE2WORKS is.
Robert Calk
February 4, 2017 at 12:36 am
Thanks, Albert. Very useful battery pack information.
Albert van Bemmelen
February 4, 2017 at 4:20 pm
Thanks Robert! We just go from Tektronix Batteries (your great Tektronix Story: Tektronix 2465A DV Oscilloscope Memory Backup Battery Replacement) to Laptop Batteries. (;)
Yogesh Panchal
February 4, 2017 at 7:01 pm
Excellent article! Albert.
Albert van Bemmelen
February 5, 2017 at 12:09 am
Thank you Yogesh! Your kind comment is appreciated!
Albert van Bemmelen
February 5, 2017 at 5:15 am
For those who are interested in buying the TI ev2300 Programmer, here the link to free software from TI that can be used to Reset/Reprogram several Texas Instruments BQ controller Chips:
http://www.ti.com/tool/bq20z45-r1_bqeasy-sw
It can be examined before buying the rather expensive TI ev2300 Programmer.
And by searching with Google also ev2300 Windows drivers and documentation can be easily found too.
Albert van Bemmelen
February 6, 2017 at 2:15 am
But according to the BE2WORKS site it is better to buy the TI USB-TO-GPIB Adapter ($75) because it supports all features of BE2Works like the CP2112 but probably with the option to also write external Eeproms:
https://store.ti.com/USB-TO-GPIO-USB-Interface-Adapter-EVM-P960.aspx
See also http://be2works.com/hardware/
Albert van Bemmelen
February 9, 2017 at 3:24 am
Here is another interesting link to a site that shows some Battery connectors for other computers:
http://powercartel.com/projects/packprobe/battery-connection/
Ulises Aguilar Pazzani
February 9, 2017 at 10:10 am
MR Bemmelen, great article, Sir You Are good
Albert van Bemmelen
February 9, 2017 at 5:23 pm
Thank you Ulises, I hope to think so!
Humberto
February 10, 2017 at 1:23 am
Wow! Albert, what a great repair you have done. Thanks for sharing with us your experiences.
Albert van Bemmelen
February 10, 2017 at 2:34 pm
Thanks Humberto. I am happy with the result too!
And I hope the 13 different Battery Connector Set with Jumper Wires as described in the article will arrive soon so I can continu my work on repairing other Battery Packs too. These Connectors have the advantage not only being for all types of Battery Packs but these also can be used without having to solder any wires onto them. Just by simply screwing any Wire or Jumper Wire on these Battery Connectors to connect them to the JP2 Pins of the CP2112 Adapter.
gerald
February 10, 2017 at 3:37 am
great article indeed,and youseful tips.I would be glad to fix my dead acer 9300 batteries(got 4 of them) with those tools you used.What kind of wires do you use btw with the cp2112 adapter?
Albert van Bemmelen
February 10, 2017 at 2:16 pm
I bought a cable set (anschluss-kabel) once at Conrad's, Gerald. But they apparently do not sell these anymore. I think however that these from Aliexpress are even better when you only use one side to plug onto the JP2 connecter and solder the wires to the Battery connectors after removing the plug on the other side. (I had to remove one plug from the Conrad cables too).
https://www.aliexpress.com/item-img/10PCS-26-26AWG-60-Cores-Flight-Control-Connection-Cable-Male-to-Male-Servo-Cable-JR-Flat/32529445398.html
I even think I will buy this set too just in case. Because they are very useful.
Albert van Bemmelen
February 10, 2017 at 2:53 pm
Althought the Cables on Aliexpress look the same Gerald, I am not sure however if they fit the JP2 size CP2112 Connector. Because 1.3mm thick Wires look bigger to me? Such thick wires are certainly not required for the I2C connection. (I do not own any RC controlled product to be sure).
gerald
February 17, 2017 at 7:30 pm
hi Albert,
i just received my usb adapter cp 2112 from be2works folks,and i wonder how it's supposed to be connected to the battery:on the other side of the adapter you plug the 3 wires gnd,sclk,sda but,what is their order?Is it (when adapter plugged in computer'usb port)from north to south:gnd,sclk,sda?
thks in advance,
gerald
Albert van Bemmelen
February 18, 2017 at 6:24 am
I had to find that out myself before too but the outer pin (closest to the edge of the board) of JP2 is the ground wire.
The middle pin of JP2 (going to R3 solder side) is SCLK, and the last pin to connect on JP2 (going to R2 solder side) is the SDA(ta) wire.
If your Battery can't be read you probably need to exchange both wires SCLK and SDA on the Battery connector.
You do not need the other CP2112 GPIO connections but a couple of them can be used to controll the LOAD on the Battery Pack. (I have not needed this yet and did not build that circuit with the LM317).
Let me know if it worked, Gerald!
gerald
February 18, 2017 at 7:11 pm
hi,Albert,
well,until now it does not work for me,even if i tried different batteries or inverted wires (sda and sclk).I even connected ntc with gnd pin on the connector.What did I wrong?Is it necessary to read the eeprom to unsolder the cells?
wish to know your point of view,
gerald
Albert van Bemmelen
February 19, 2017 at 3:50 am
You probably need to know what I2C controller chip is used in your Pack(s), Gerald. The only way to be certain what chip is used is to open the Pack if no information can be found otherwise.
It also happens for that same reason that new replacement Battery Packs are not recognized by the Laptop because a newer or less compatible chip is used. See also this link and my next reply:http://pcbattery-co-uk.batterie-pcportable.fr/laptop_battery_desc.php?id=175823
Albert van Bemmelen
February 19, 2017 at 3:36 am
I've just tried to reset a Dell J1KND 11.1V 48Wh Battery Pack with BEWORKS.
I am not sure about the Pinout configuration. And I haven't opened the already completely discharged Battery. That is why I carefully also had to connect the + and gnd pins to an external supply of about 11V (current limited). Anyhow it made no difference.
But after I read this link it probably explains that BE2WORKS does not program Packs if they have a bq8011 chip in it, see: http://www.elektroda.pl/rtvforum/topic1807639.html
And you then have to program the Eeprom manually by using a T20 programmer or another good programmer.
gerald
February 19, 2017 at 6:00 pm
hi,Albert,
I've just posted a mail to be2works's folks because I wonder if the cp2112 adapter I bought is functional...or not!.They say we don't need a driver for the adapter to be recognized in Windows,but when I plug it in usb port without any wire on it ,Windows XP,7,10 either says:usb device not recognized.Same thing in apple or linux.Is yours immediately operational when plugged ?
thks,
gerald
gerald
February 19, 2017 at 8:10 pm
hi Albert,
received a mail from be2works's folks advising me to try to resolder the chip on the adapter,which doesn't help me however.(Nothing at home able to solder cms components like sil2112)
I think it's ending for my battery repair adventure,unless i assume to find a good adaptor.
gerald
Albert van Bemmelen
February 19, 2017 at 11:51 pm
Hi Gerald. Whenever I plug in my CP2112 adapter module it almost immediately gives a sound in Windows 7 that is recognized. You do not need to connect any plugs or wires to the CP2112 for that. It works great on my PCs. And I also hear a little beep after I disconnect it from the USB port! Both on my Aspire 9411AWSMi old Laptop as on my old Quad-core Desktop PC. On all newer OS PCs. (not tested on Win XP or 98 but it also could work).
So your Adapter must be defect somehow now?
Sorry to hear that! The CP2112 chip itself I'm afraid is only available in SMD packages and costs close to nothing.
gerald
February 20, 2017 at 2:59 pm
hi Albert,
the guy at Be2works says I killed the chip and there is no warranty.
For me it has simply never worked.So i'm thinking about buying the silabs adaptor,at less with a warranty!!!(or the Texas Instrument stuff as you mentioned it,but too expensive for my needs).
I found those cp2112 chips on ebay very cheap (5 euros by 2) but i'm not qualified for soldering them on pcb.
gerald
Albert van Bemmelen
February 20, 2017 at 4:05 pm
Understood. Buying the expensive TI or Silabs adaptor is rather useless if you do not use the Full version of BE2WORKS. And maybe you should try to solder a new chip on your adaptor board by first removing your old CP2112 chip with a hot air Solder Station, since it must be defect already. And with the use of Solder Flux Past, See:
https://nl.aliexpress.com/item/100-Original-HK-MECHANIC-35g-Sn63-Pb67-Solder-Paste-Flux-XG-50-For-Hakko-936-Saike/32340319141.html?isOrigTitle=true
you are able to solder on a new SMD chip by using an oven or by carefully applying hot air or IR heat onto the chip. Never tried it myself but you could give it a go because that is a simple way to do it.
gerald
February 22, 2017 at 10:54 pm
hi Albert,
just received a sample of sil cp2112 called cp2112-f02-gm on silicon labs website.Just a little difference with the chip on my adaptor:the numbers on the chip:f010r 1643+ on the adaptor f0101 1642+ on the chip i just received today(pretty small indeed).Does it matter?
I wonder if i will succeed soldering it...
thks for answer,
gerald
Albert van Bemmelen
February 23, 2017 at 4:00 pm
Okay Gerald, I hope you will succeed in soldering the surface mounted sil 2112 component!
If I correctly understood it is also possible to program these little interface converters, but they will work just fine unprogrammed for the USB I2C adaption they are used for.
Just let the applied heat (IR or Hot air Oven) 'suck' the 2112 with the solder paste and gravity onto the interface board. A solder Iron probably won't work because the contacts are ('bga') hidden under the component.
Good luck!
gerald
February 23, 2017 at 3:47 pm
hi Albert,
what do you think about Chip Quick to unsolder the sil cp2112?
Does it worths the cost?
Albert van Bemmelen
February 23, 2017 at 11:30 pm
Never used or needed Chip Quick, Gerald. I manage to solder or desolder almost anything without it. But before you solder your Sil 2112 you maybe could fix it in place by using some flux underneath the chip? That always works for me!
Albert van Bemmelen
February 23, 2017 at 4:25 pm
The operating temperature of this ingeniuos made little 24 pin QFN (4x4 mm) chip is -40 to 85 degrees Celsius, Gerald. But of course you probably need a higher temperate to liquefy the solder paste, so keep all components before and after as cold as possible and do not tremble the board before the solder is solid again. And maybe also use some aluminium foil to keep the other passive components from getting hot too. I hope to hear your possitive reply soon!
gerald
February 24, 2017 at 11:59 pm
hi,Albert,
I am looking for a hot-air station to help me solder this little piece of cp2112.What do you think about Aoyue int8208,or cheaper,the Wep/Baku 858d?
I saw also reviews on Kada 852d+ or Saike 909 (i don't remember the prices).
Give me some advice ,please.
Gerald
Albert van Bemmelen
February 25, 2017 at 3:57 pm
Maybe this one is a great tool and also one of the more modern types because the teflon heat tube is replaced by a Fan in the Heat Air Gun holder itself?:
BAKU-BK-878L2-led-digital-Display-SMD-Brushless-Hot-Air-Rework-Station-with-Soldering-Iron (about $43 on Aliexpress).
I myself own an older Teflon type Gordak G52A Hot air and solder iron Solder Station. And a second one similar.
And I was thinking of buying this one in the near future because it makes it possible to easily fix and repair even Apple and Smartphone pcb Boards and Hotfix BGA mounted parts like the one you are trying to replace on your I2C CP2112 Adapter:
http://www.ebay.nl/itm/141736018293?_trksid=p2057872.m2749.l2649&var=440854858570&ssPageName=STRK%3AMEBIDX%3AIT
But the 200 euro including shipping can still be expensive. The T862++ at least makes it possible to heat the component side of any small board very fast by IR and the Bottom Heater element and helps you to keep both hands free for other assembly jobs in the meanwhile. And you can adjust both temperatures digitally.
gerald
February 28, 2017 at 3:10 pm
Hi Albert,
I found on ebay the T862++ for about 200 euros.There is also the T862 a bit cheaper (about 175 with shipping).What's the difference between them?
gerald
gerald
March 4, 2017 at 12:46 am
Hi Albert,
I finally chosen this:http://www.expondo.fr/stamos-soldering-station-soudage-plaque-chauffante-basic-6125?c=661
Hope it will make the trick when I will try to solder cp2112(until now i just had a solder iron from conrad ,and a heat gun from Aldi)
Stamos seems very similar to yihua853AAA,made in china with german designers.
Albert van Bemmelen
March 5, 2017 at 7:17 am
Sorry for my late reply Gerald. The T862++ is quite efficient when you
need to solder small smd components also because of the Digital
adjustable IR Heater element, and separate bottom heating element.
It works in seconds and will not blow parts from your pcb board unlike
a hotair heater that has to blow to tranfer the heat. I hope it will
work for your CP2112 but it doesn't seem to be a cheap or better choice.
Although the T862++ is a bit more expensive it has the advantage that the
IR heater element presents. And the device you bought is maybe just
another Hot Air Station but is cheaper to replace when the hot air gun
needs to be replaced? My friend Chafik bought the T862++.
Albert van Bemmelen
March 5, 2017 at 7:31 am
If you want the very small CP2112 chip to stay in its right position
before applying hot air, we use some solder flux to keep the component in place just above the solder pads. It will then be kind of drawn into the solder by gravity when the temperature is right. The advantage of the hot air gun compared to the IR heater element is that there is no dangerous emission of light.
The IR heater has a little orange filter attached, to protect our eyes from the very strong light.
gerald
March 8, 2017 at 7:47 pm
Hi,Albert,
I received stamos hot-air station today.What's the correct temperature to disolder cp2112?and how much time does it take?
thanks,gerald
gerald
March 8, 2017 at 7:57 pm
Hi again,Albert,
I forgot two questions more:what should be the distance between the nozzle and the cp2112?And what should be the intensity of blowing?
i choose the nozzle bigger than the cp2112 (4mm latge) and no IR préheating plate.
thks,gerald.
Albert van Bemmelen
March 11, 2017 at 1:13 am
I can't tell you exactly the required distance Gerald. Because that also differs depending on how much air you use and also on the max temperature in the chip surface.
But better try it first beginning with a lower temperature or on another board as experiment to see if the solder starts going liquid well.
And if the temperature is right you naturally must use no more seconds as needed to spare the component(s) and the pcb. And not to much air because it will blow all components of the board.
Maybe also use a IR contactless temperature meter to keep track of the applied heat. Under no circumstance use a maximum temperature that exceeds the max temp as stated in the Datasheet of the Sil 2112!
Hope it will go well!
gerald
March 12, 2017 at 11:14 pm
Hi,Albert,
some news:success desoldering cp2112 with hot air (needed 300 degrees though,nothing possible under 250).But failed to solder the new one until now.In fact cp2112 is in right place (applied some flux on pcb.I did not apply solder because I thought there was enough in place),but still unrecognized in Windows.I think contacts are poor.Maybe will try another time but unlucky for the moment.
gerald
Albert van Bemmelen
March 13, 2017 at 6:39 pm
Understood Gerald. If your computer doesn't recognize the CP2112 adapter when attached to the USB port yet, it most likely is still defect somehow.
And probably there was enough solder but you maybe have to check with a USB microscope if the little chip makes good contact?
Albert van Bemmelen
March 13, 2017 at 1:14 am
PS: Gerald, the guys at BE2WORKS also told me previously that my CP2112 must have
gone bad after it didn't give any I2C data. But that only was because the
fuse in my Battery Pack had opened because of the wrong wiring sequence.
After repairing/replacing that fuse the I2C communication was restored!
It is all as explained in the article.
PS2: I am now also able to see the I2C datacommunication protocol between my CP2112 adapter and my Battery pack by using the LabNation's Smart Scope.
It has 2 analog scope inputs, 8 digital analyzer inputs next to other fuctions like decoding according to different communication protocols like I2C, RS232 and more. It even can show 1 analog signal together with 8 digital signals in Mixed mode. And has the ability to save signals, and also create Waveforms that a Waveform generator output can deliver. With the Smart Scope we are easily able to check if there is communication between devices or not. The Labtronic Scope still has some quirks but the software is freely upgraded when a new version is downloadable. And the Scope hardware shows things we just can't see on a normal analog oscilloscope.
Albert van Bemmelen
March 15, 2017 at 6:42 am
I have found new information about an old Asus +10.8V 4400mAh, 47Wh Battery Pack from a model Asus K52F laptop that was completely discharged and completely useless (after about 470 cycles!). Type Battery Pack is a model A32-K52.
Its 9 pin connector pins are as follows:
+ + T NC SCLK SDA NC - -
(T = temp, NC = Not connected)
Connect T with ground (-).
Because the Battery was totally drained I applied an external DC voltage on the + and - connector pins of about 11.9V to activate the internal electronics like was explained in the article. (Else the Battery pack stays dead and I2C will not work!). And limited the short current on my Wanptek KPS3010D to about a max of 0.2A.
After the external voltage is connected both voltage and current started to fluctuate between about 11.9V and 4.0V at a current between 0 and about 0.5A DC. (Even when the CP2112 or PC are not connected!). Likely because the bad 18650 Li-ions in the Pack drained the applied external voltage.(The fluctuating maybe stops after increasing the current but I do not want to risk blowing the fuse or other components).
And when the BE2WORKS still doesn't read or hangs we just close it and re-open it. That mostly will immediately improve reading the Pack.
Because we do not know what controller chip is in the Battery Pack without opening the Pack and because apparently the BE2WORKS software read the pack on more than one of the following settings, we still do not really know yet what setting will successfully reset the Pack:
It reads at all of the last 8 chipsettings of the BE2WORKS list and also shows the maximum resettable Capacity in mAh. And only reads the Pack at the first two on the list without showing the possible resettable Capacity.
If you do not apply an external DC voltage to a completely empty/drained Battery communication with the CP2112 or resetting the Battery chip is not possible!!
I hope this helps to understand what to do when the CP2112 doesn't work as expected!
gerald
March 14, 2017 at 8:11 pm
Hi Albert,
just to keep you in touch,solder cp2112 with hot air is now successful!I just melted some solder with flux using iron solder all around the qfn and that's it!
Now I can test be2works and see next step.
thks for all,
gerald
gerald
March 15, 2017 at 3:07 pm
Hi Albert,
I took a look at Labnation smartscope and it seems pretty nice and open way.For my cp2112 soldering,there is still problem.Now usb adapter is well plug and play on pc,but still unable to read any data on batteries.I thought it was possible with be2works demo version.I tried many combinations of clk and data wires without success.I think these contacts are poor on the usb adapter and will try to resolder them.Btw i am waiting for t862++ and i will see if it's better soldering,
gerald
gerald
March 15, 2017 at 4:52 pm
Hi Albert,
well it's ok now i can read the battery data.(I forgot to connect T wire to the ground).
I can manage to buy be2works for next step,
gerald
Albert van Bemmelen
March 15, 2017 at 7:44 pm
Hi Gerald, good to hear you had some progress and your CP2112 interface is finally working!
Reading Battery Packs with the BE2WORKS Demo should also be no problem!
(only resetting your packs can't be done with the demo version).
But keep in mind that if the Battery is totally drained/empty there is no I2C communication possible. (Read my previous post just above your last post).
I guess your previous hot air hot fixing machine was no good deal because you are thinking of buying the T862++ now too? I never needed one yet, and once hotfixed a laptop that had no video with my Hot air solder station. It still works fine!!
gerald
March 15, 2017 at 10:11 pm
Hi Albert,
finally my hot air station made the trick!But i was unsure for soldering under the chip,and was thinking for t862+++ a long time ago for repairing bgas in video cards or laptop but found it...expensive!
I'm about buying be2works full version now.Do you suggest installing it on laptop or in a tower?The demo version was installed in win7 9420 acer laptop for testing.
I am looking too for a microscope in order to better see what I do...
Albert van Bemmelen
March 16, 2017 at 12:07 am
Great Gerald! Well done! Before you buy BE2WORKS however, be sure
that the controller chips in your Battery Packs are supported by
the Software!
It would be a real shame if you pay about $200 for the program
and later found out you can't fix your batteries with it! (;)
Albert van Bemmelen
March 16, 2017 at 3:01 pm
Hi Gerald, how and on what system you install and use BE2WORKS
doesn't really make any difference.
New improved Batteries are coming from the inventors of the
Lithium Battery. The article is in German but you maybe can use
Google Chrome to translate it in English:
https://www.elv.de/controller.aspx?cid=727&detail=2852&refid=1703G1&ecmId=1900738261&ecmUid=15186959320&newsletter=Newsletter-%5BELV%5D+2017_03g1-15.03.2017
gerald
March 16, 2017 at 4:45 pm
Hi Albert,
thks for the article.So good news for the future of batteries business...
I am looking for a spot welder,what do you think of this one,on ebay?:
http://www.ebay.fr/itm/281740523852?_trksid=p2055119.m1438.l2649&ssPageName=STRK%3AMEBIDX%3AIT
gerald