
Return Of TECHLON-TCN-D2 Induction Cooker From Getting Written Off
This induction cooker was brought to me by a new customer, referred to by another recently added one, with the complaint that it became dead and was lying in the attic for many years and the customer wanted me to do what best I can to restore it as need arouse for its re-use in the kitchen. As soon as he opened the bag and took it out, one cockroach rushed out and before it could find a hiding place in my visiting room, I fetched Hit and sprayed under the Inverter Battery bench, upon which it came out and I sprayed again on it killing it instantly.
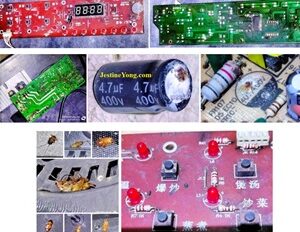
We do not have even a single cockroach in our home and we were very particular in maintaining it that way. I told the customer that definitely the cooker is a haven for the cockroaches and I may have to first take it to the car porch armed with not only the cleaning tools but also the Hit spray. Following pictures would speak for itself without a need for an explanation:
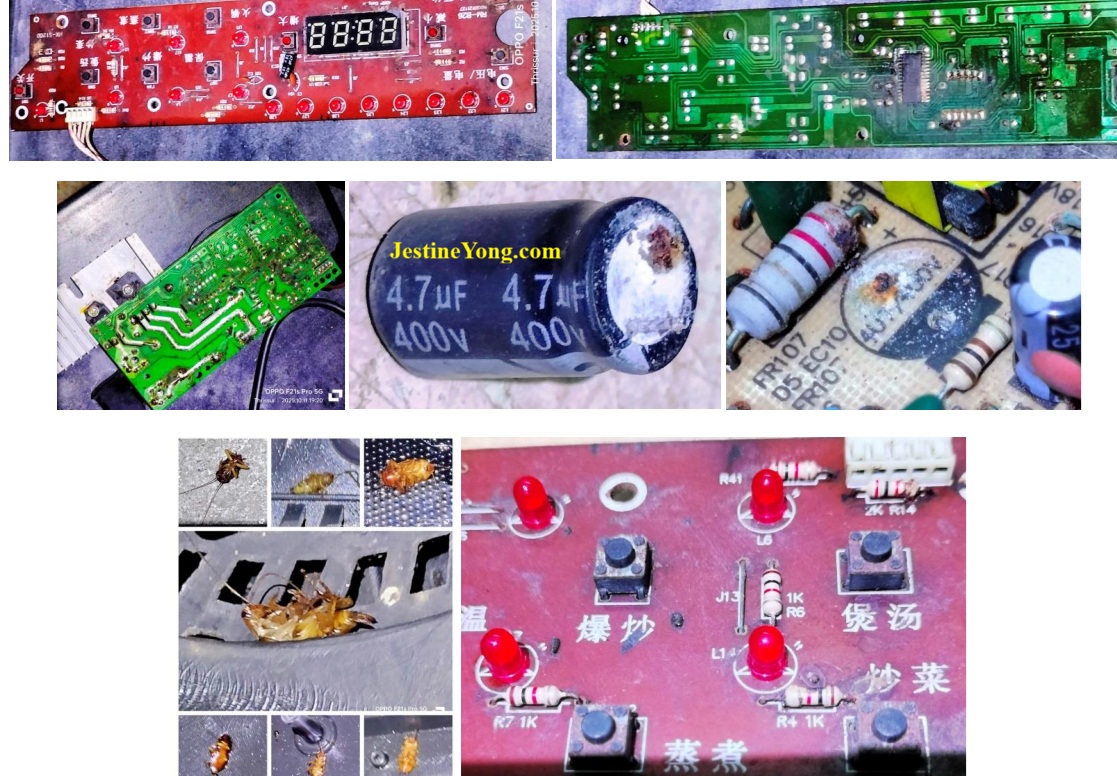
As you can perhaps make out, the entire board was having cockroach shits all over, rust formations, because of which a few components were missing! The boards looked disgustingly shabby. I could kill all the cockroaches found live inside, which you can see in the collaged picture above. First I thoroughly cleaned the boards using IPA with hard and soft brushes. Then took up the control panel first for a total restoration. Changed all the push to on rusted button switches.
Provided missing resistors looking at the values written underneath or near it. Replaced rusted jumper wires and leg rusted components. Did a thorough dry solder patch up. In many places the solder jumped out to my hands because it had got hardened like cast iron and a 400° temperature of the tip of the iron that I used for such purposes. Some nicks and pricks, here and there did happen, which I enjoyed like a boy lighting fire crackers! (LOL) Let us have a look at theboard after t hese strenuous jobs were over:

Then replaced all the electrolytic caps on the main board along with the rusted other components. Did a thorough retouch and cleaned the board. Replaced an open 22 Ohm ½ W resistor that provides input DC to Viper12A switching IC.

Click here to check out on the Electric Cooker, Induction and Oven Repair Guide
Removed the IGBT and checked and found that it had leaks. When I applied power to the temporarily connected boards through a series bulb, it remained lit at full indicating that the Viper was shorting, as all other components were thoroughly checked before that. So provided an 8 Pin socket and put a new one on it. Then once again applied powerthr ough a series bulb. I was glad to see the following result:
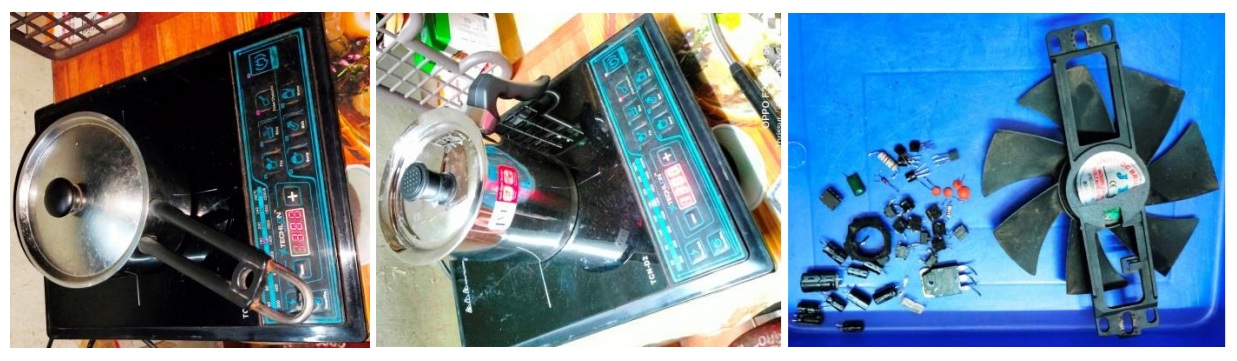
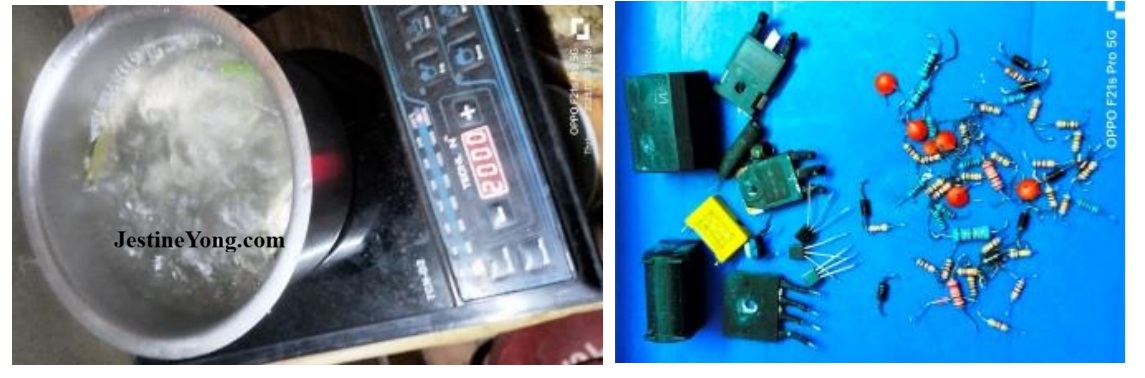
The buttons responded well indicating that the cooker has recovered from all abuses and neglect. Then disconnected, waited for all caps to get discharged and then replaced 8050, 8550 transistors, 18V Zener, 78L05 IC. These are routinely done as a preventive maintenance procedure. The fan had got rusted and did not turn even after dismantling it for cleaning and lubricating. It was getting stuck somewhere. So used a new fan. The high watt resistors were found to be showing correct value. I used a new IGBT and fit it properly in place. Then kept the boards back how it was before, kept the top and gave power keeping a vessel of water on top. Following was the result:

Having successfully boiled a glass of water, I fit everything back as how it was before and conducted a retest and found the cooker to be working very well. Polished outer side so well that it was shining like a new one! You can compare the following picture with the above to know the transformation.
Then transferred it to my kitchen and conducted repeated tests on two days and ensured that the cooker has regained its health! Mission accomplished with great vigour and enthusiasm.
The story continues…………………..
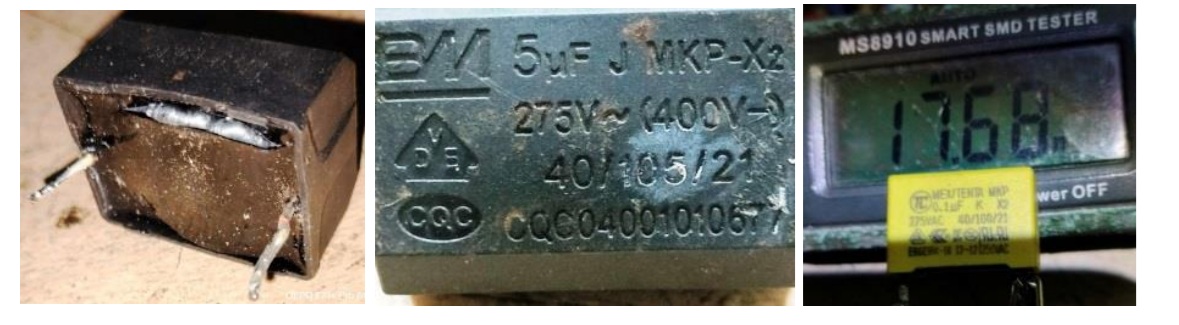
The IC (a short form being used for Induction Cooker) was reported to be dead once again after only a day and I went to customer’s home to check whether there was any problem in their power plug. Though there was slight variation in voltages, I could not find anything seriously wrong. Customer mentioned that the MCB tripped when this happened. I brought it home and checked the IC once again to know what went wrong. The damages were severe this time. The Black 5uF 275V AC/400V DC capacitor was found burst at the bottom, IGBT was dead short and 10A fuse had burst. On combing the circuit, I found EMI filter cap in the AC in section, value of which was 0.1 (100nF), showing 17.68 nF:
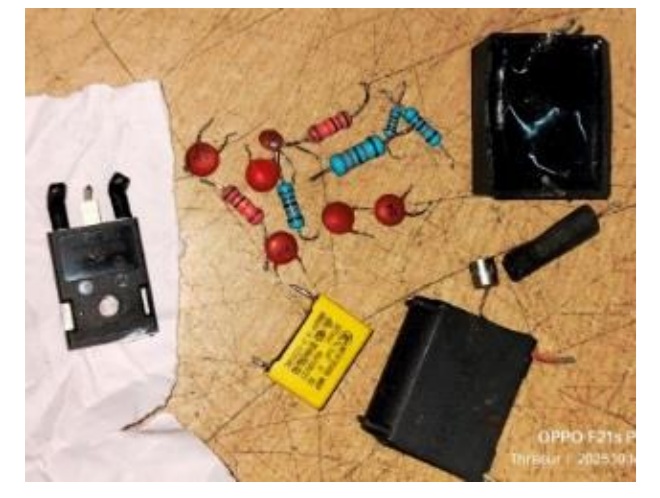
I replaced all these defective components (which includes 8050/8550 transistors also) and also the fixed caps on the board along with a few suspected high watt and low watt resistors, which can be seen from the following photograph:
After fixing a new 25N120 IGBT, reassembled the boards and tried boiling water for testing. The IC worked for a few minutes and showed E6 error. Since E6 in this IC was an error related to temperature sensing, I replaced the control pot (500 Ohms) adjusting it to just half (250 Ohms) and also replaced the temperature sensors at the top coil as well as under the IGBT. But the E6 error was being shown after a few minutes of operation. As I got really wild, changed all the remaining components on the board like jumper wires, resistors and fixed caps and also the bridge rectifier. All other components were new. Now there were only the coils, main IC, SMPS transformer, the buzzer, panel IC and panel display that remained unchanged for obvious reasons. But even after this do or die war, E6 error looked at me and winked! I really got fed up and called one of my techie friends and sought his help to resolve this issue. I went to his shop and watched what he did with amazement. First of all he kept a soldering iron on top of the pot sensor and watched the voltage variation at the sensor input level to the uController, after some time the IC showed E5 error and therefore concluded that the E6 error was created by the sensor under the IGBT. So he removed the IGBT and put a new sensor in place of it as the ohms reading of the one which I had put was not normal. It was showing around 65K instead of around 72K. So a new sensor had become defective soon! What he did next was replacing the heat sink with a larger one from another discarded IC and making fresh holes for the IGBT and Bridge rectifier.
This solved the problem in the IC and he tested it with maximum temperature of 280 Degree shown on the scale (2000W) and the IC worked very well. He did not want to take any payment for the work immediately and wanted me to take the IC home and test it for a few days. Though I was sharing the videos of tests done by me in the home with the customer, he wanted me to check the IC using a larger vessel and heating set at 2000W. My friend told me to go ahead and do that also. Did that test also and it passed very well. I took the IC to the customer’s home and repeated the test at 2000W using the large vessel they normally use. It passed the test. I left it with the customer and told them that I would raise the bill for the extra work done only if it works at-least for a week. I settled the bill of my techie friend promptly. Here are the pictures of the final toll along with the proof for working:

This article was prepared for you by Parasuraman Subramanian from India. He is 76 years old and has more than 30 years’ experience in handling antique equipment like Valve Radio, Amps, Reel Tape Recorders and currently studying latest tech-classes conducted by Kerala State Electronics Technicians’ Association. He has done graduation in BBA degree, private diploma in Radio Engineering and retired as MD of a USA company. Presently working as Consultant to Hospital and other institutions.
Please give a support by clicking on the social buttons below. Your feedback on the post is welcome. Please leave it in the comments.
P.S-If you enjoyed reading this, click here to subscribe to my blog (free subscription). That way, you’ll never miss a post. You can also forward this website link to your friends and colleagues-thanks!
You may check on his previous article on Tuning Problem And Issues In AC Adapter Solved In PHILIPS Radio RL205/00
 (35)Dislikes
 (0)
(0)
14 Comments
Leave a Reply


Arun Kumar
June 20, 2026 at 5:16 pm
Hats off to you and your patience Sir,
Probably I would have returned it saying it's beyond my scope.
Parasuraman S
June 20, 2026 at 7:55 pm
Never give up easily; that is my motto! Many thanks for your comments!
Albert van Bemmelen
June 20, 2026 at 7:46 pm
After reading this very interesting induction cooker repair it left me with one question why this long dead and for many years lying in the attic cooker suddenly became important for the customer to have it fixed now?
Also because I suppose this customer already had a new replacement cooker in use all those years after this defect cooker was long ago discarded.
I guess that the method your techie friend used to get rid of the E6 temp sensor error will come in very handy when a future new ic temp calibration is needed!
Parasuraman S
June 20, 2026 at 9:28 pm
The war situation has brought a fear of shortage of gas and people started picking up all sorts of heating devices they can. This could be such a case. Many thanks for your expert comments, dear Albert!
Mark J
June 21, 2026 at 2:39 am
That induction cooker was really infested. Great job on the repair and restore Parasuraman.
Parasuraman S
June 21, 2026 at 12:05 pm
Many thanks, dear Mark!
Imoudu.O
June 23, 2026 at 4:11 am
Perhaps this's the most challenging IC you will ever repair,and new techniques learned from your friend I suppose.
Let me ask,if lg 32" is on/off by its self intermittently,what area should I fucus attention on?
Parasuraman S
June 23, 2026 at 7:01 pm
Filter caps, slave regulator ICs like 3.3V, 1.8V and 1.2V (if any). Jammed on/off button in Remote and control panel. Rest depends on on/off through opto, transistor etc. Many thanks for your comments and query!
Justice
June 23, 2026 at 12:52 pm
Mmmmm so interesting. Its true never give up. Thanks for sharing this wonderful article, lot to learn here.
Parasuraman S
June 23, 2026 at 7:01 pm
Many thanks for the time spent on comments! Glad to know it was useful!
Yogesh Panchal
June 23, 2026 at 3:59 pm
Good Fix! Sir
I don't know why, but it seems like cockroaches have become a source of income for technicians. Despite having protection circuits, many parts still fail. I fail to understand what their R&D department is actually there for. Anyway, that shouldn't be our concern, since we have to work to earn our livelihood.
Parasuraman S
June 23, 2026 at 7:02 pm
Ha! Ha! Thanks to all our indirect agents, then! Many thanks for your comments, Yogesh Bai!
Philip
June 24, 2026 at 7:06 am
In the cause of repair, your familiar systematic approach was put on hold, and, strangely, an unusual selected parts replacement style took over. That was quite unlike you, sir. Your normal CAPs early 'laying off' is excusable. In the LG solutions that you did well to point out, a thoroughly cleaning the boards exercise should as well never be overlooked, neither should the magic of entire resoldering be underrated. For 5 days I had run out of ideas for a NO SIGNAL problem in a Vitron 43 inch TV, yet the ignored very light layer of unsuspected fine dust on the single board was responsible for my frustration. USB was okey. How can the USB port be modified for normal video (yellow, red & white jack pins) connection? Maybe the devil just went for a sleep, I'm otherwise afraid it could make a dreadful comeback. All I know is USB pins - 5v, ground, 2 middle pins signal (open to correction).
Parasuraman S
June 24, 2026 at 4:35 pm
Many thanks for your elaborate comments and inputs!