
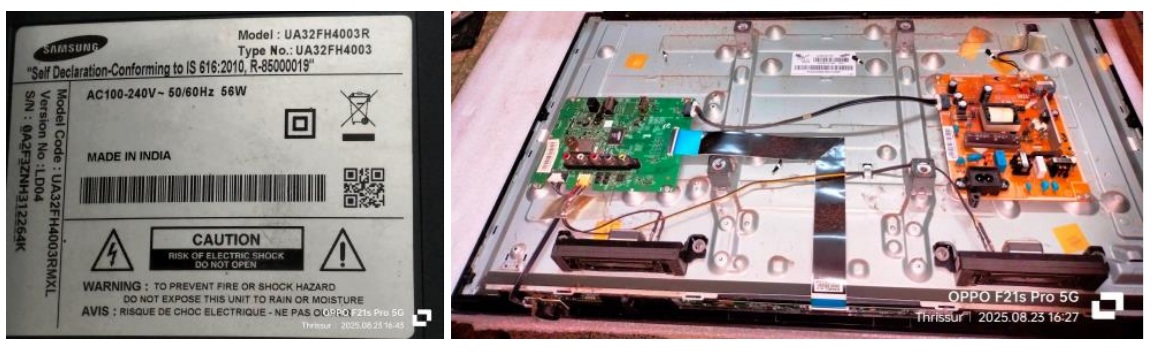
Importance Of Compatible LVDS Cable – Case Of Samsung LED TV Model UA32FH4003R

This TV was brought to me by a new customer, diverted by the auto driver who was hired by the customer to take her to a service workshop situated in a faraway place. Since the customer was in our residential area and the auto driver was my regular customer, he recommended me forsaking the portion of the charges he might have otherwise earned from the long trip. On inter action with the customer, I learnt that her parents and grandparents were known to us very much and I introduced her to my wife and they exchanged a few nostalgic memories. It was a pleasant surprise! She then remembered that I had repaired a Radio for her grandparent and that was still working very well. But she was not aware of my servicing TVs etc. until the auto-driver suggested. Anyhow, it happened to be my day! (Ha! Ha!)
The complaint reported by this customer, who had exposure to Electronics Servicing (another strange co-incidence) which was a part of her curriculum, was that smoke came out of the TV while watching and it went dead. The TV was lying unused for many months and it developed this problem after working only for a couple of days. On opening, I saw a lot of dust, dirt and cobwebs inside the TV, which I cleaned thoroughly after taking the TV out to the Car Porch.

Click here to check out Humphrey’s ebook on LED TV Panel Repair
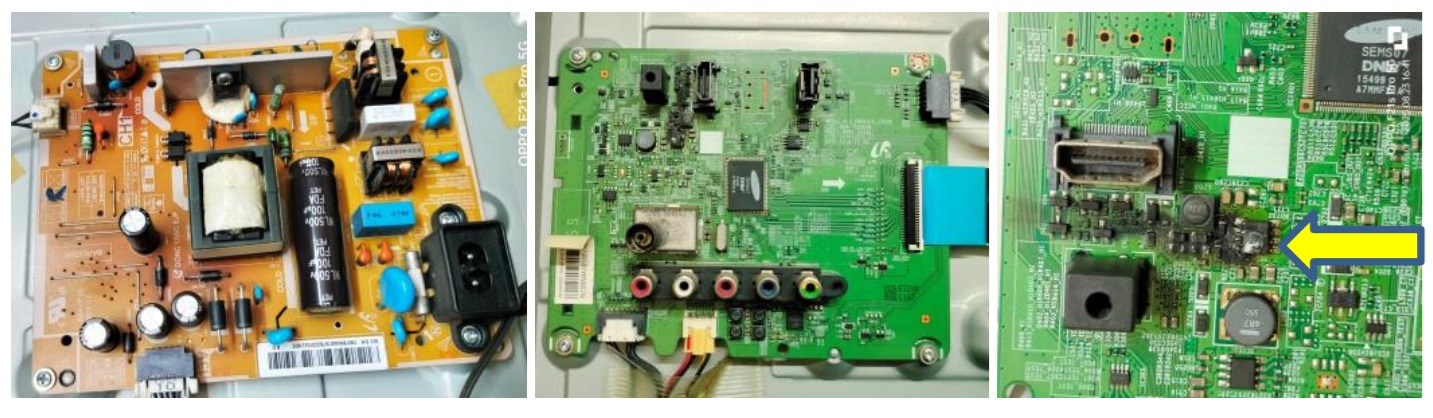
Though I suspected the power supply, the burn marks on the mother board indicated that the board had a lightning strike through the HDMI cable. The PS was found ok with 13V and backlight working. Let us have a look at the boards:
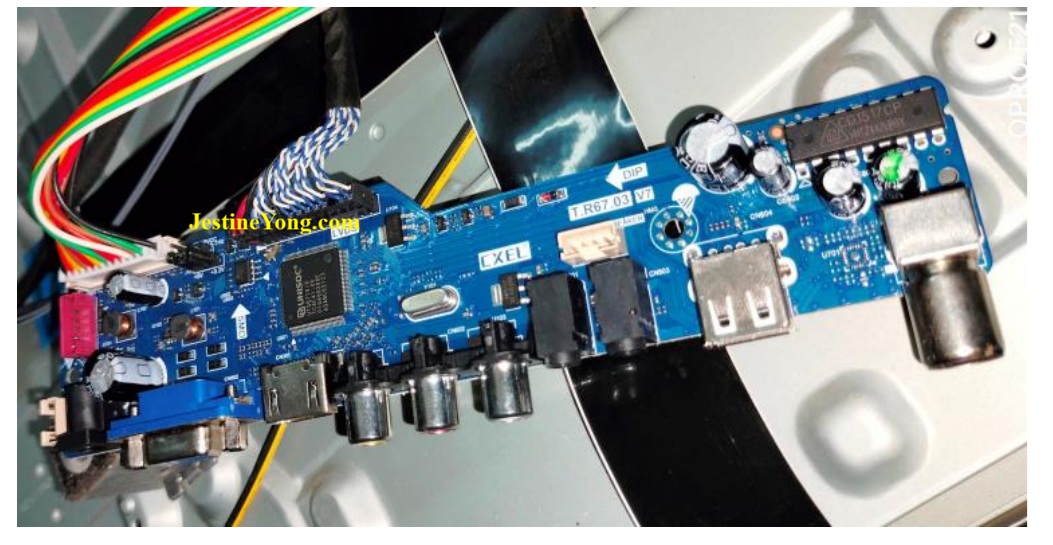
Looking at the burnt marks, I felt customer was lucky that it did not cause a fire hazard! As the µcontroller would definitely have gone and a few other components were also damaged and also because of a double sided PCB, attempt to revive the board was abandoned, as agreed by this understanding customer. Before I sought availability of a replacement board, I wanted to make sure that the panel was working for which I tried to use the Universal Board picture of which is given below: (There are plenty of videos how to use a U11 board which we can get on google search)
My techie friends gave me the input that the panel was working on 12V. I inserted the jumper pins for this output in the U11 Board. Since a 30-pin LVDS cable was used in the TV, I had to find an interconnecting cable that would fit into the connector on the Scaler Board. I had one that looked to be ok, but the positive side was on its right, whereas the requirement was connection with positive side on the left.
So, I peeled off the cotton tape at the flexible connector end and exposed the connector, which looked like the other side connector in the U11 board. Then removed the FC and flipped it so that the positive supply would be on the left when inserted. Let us have a look of these:

Descriptions of the above pictures: (1) The original LVDS cable MB side. You might notice that there are 10 pairs of data lines which indicate that the board connection is for Full HD. In this connector the 12V supply lines were given to pins 1 to 5. Pin 6, 7 & 8 were the ground pins. (2) This is the number of the LVDS and this is the side that goes into the scalar board. Kindly take a note of the fuse at the extreme right indicating that the positive rail goes in that side. This is a very important aspect to be checked. (3) The other side of the LVDS cable that I picked up from my stock which goes to the scalar board. Kindly note that it looks like the same connector that goes to the U11 board, with only this piece of flexible cable at the other end. Since the panel was an HD ready and not full HD, only 5 pairs were required at the scalar board end. (4) The LVDS extension piece inserted into the scalar board connector with its read (B+ 12V) wire on its left.
After doing all these exercises, when I applied power, following was the result:
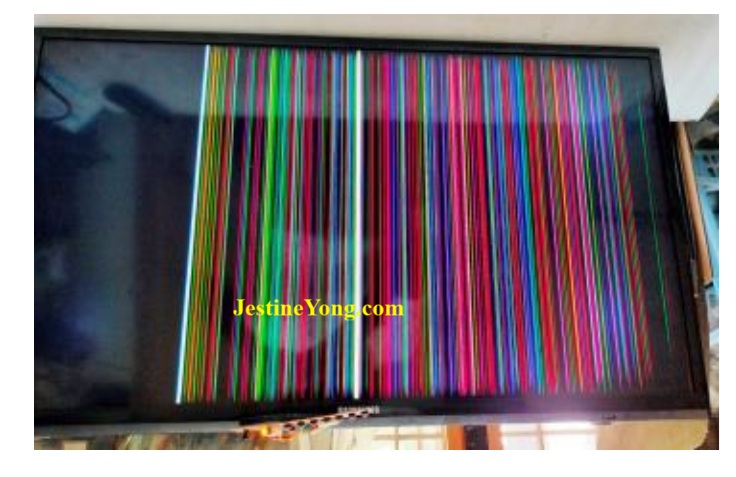
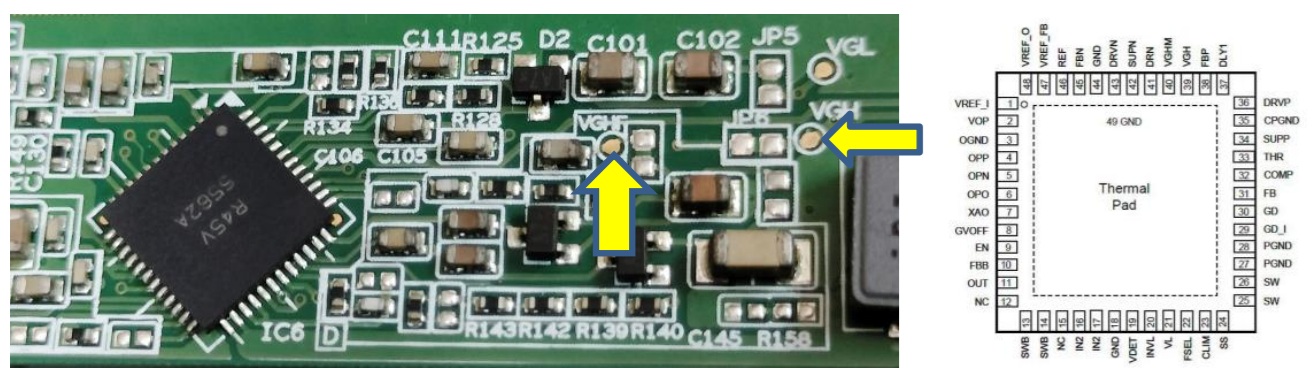
There was a blank portion on the left and plenty of lines from top to bottom on the rest of the side. So, I removed the front frame to gain access to the scalar board and checked the VGL, VGH, AVDD voltages. The panel had two side COFs too. I found VGH was missing. That was the reason for this result. Anyhow, as one of my techie friends told me to get a different type of LVDS cable that has its red wire on the left, I fetched one for Full HD and another for HD Ready. Then replaced the LVDS with the full HD as I thought since all the 30 pins of the LVDS cable were used in the original, that would be better. Then the display came on with RGB screen changing which is an indication that somehow without any specific reason, the panel recovered from its ‘coma!’ In all probability the lightning would have driven the IC (5562A) to protection mode which got released when signals came in from all pins! Why this conclusion? The VGL was found generated and reading a little above (-) 6V. VGHF was showing around 33V. This voltage goes inside the IC and comes out as VGH which should be around 27V. Let us have a look at the IC and its circuit on the scalar board:
Anyhow, all is well when it ends well! I replaced the full HD LVDS cable with HD ready. The resolution was adjusted to 1366×768, upon which the display was perfect. Having satisfied that there was no issue in the panel and it was working fine for a few hours, I ordered for the replacement board. The next issue on the TV was noise of some loose particles lying inside the TV, which was noticed while removing and transporting it. I too heard it when I shook the TV and knew very well that some domes of the LEDs had come out and lying loose. Since the front frame was removed to check the scalar board, removing the panel and checking the backlight was easier. First I fixed the domes back it its place with glue. The domes had three protruded portions and slots for its seating on the LED strip and these are stuck with glue. I also applied glue on the other LEDs also as a preventive maintenance. The lights were found brightly lit with even distribution all around. Following pictures would show you the loose domes and other related images:

I got the replacement board after a couple of days. The TV worked fine with the new board and I tested it for several hours before fixing the back cover.

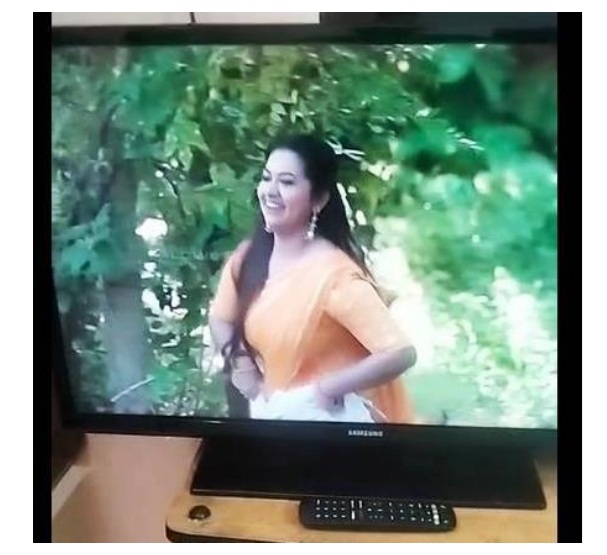
You can see the old board lying on the left side in the first picture above. The back cover was fixed on the next day after satisfactory run and customer collected it later. She was good enough to respond to my request to send a short video of the TV for my records and following picture is an extract from that.
Mission accomplished with intense satisfaction coated with experience and knowledge, getting gained.

This article was prepared for you by Parasuraman Subramanian from India. He is 76 years old and has more than 30 years’ experience in handling antique equipment like Valve Radio, Amps, Reel Tape Recorders and currently studying latest tech-classes conducted by Kerala State Electronics Technicians’ Association. He has done graduation in BBA degree, private diploma in Radio Engineering and retired as MD of a USA company. Presently working as Consultant to Hospital and other institutions.
Please give a support by clicking on the social buttons below. Your feedback on the post is welcome. Please leave it in the comments.
P.S-If you enjoyed reading this, click here to subscribe to my blog (free subscription). That way, you’ll never miss a post. You can also forward this website link to your friends and colleagues-thanks!
You may check on his previous article on Revisit Of SONY KDL-43W800D For A Different Reason
 (38)Dislikes
 (0)
(0)
11 Comments
Leave a Reply


Albert van Bemmelen
March 8, 2026 at 4:14 pm
Your tv repair knowledge again is outstanding! Thanks for sharing dear Parasuraman.
Hopefully fixing backlight led strips will become better accessible in the near future because having to remove the lcd panel on top first is always a high-risk procedure. Often described as a PITA (lol)!
Parasuraman S
March 8, 2026 at 6:00 pm
Ha! Ha! Many thanks for your expert comments, dear Albert!
Henrique Jorge G. Ulbrich
March 9, 2026 at 10:28 pm
I would not realize what is PITA.
Mark J
March 9, 2026 at 3:58 am
Parasuraman good article. Thank you again for sharing these.
Parasuraman S
March 9, 2026 at 12:41 pm
Many thanks, dear Mark!
Henrique Jorge G. Ulbrich
March 9, 2026 at 10:25 pm
Beautiful work, Parasuraman. Greetings.
Parasuraman S
March 10, 2026 at 1:44 pm
Many thanks!
Henrique Jorge G. Ulbrich
March 9, 2026 at 10:27 pm
Beautiful work, Parasuraman. Thanks and greetings,
Yogesh Panchal
March 9, 2026 at 11:07 pm
Good Job!Sir,
Accepting challenges to tackle problems is always a way to learn something new.
Parasuraman S
March 10, 2026 at 1:44 pm
Many thanks!
Tito Kanshulu
March 14, 2026 at 6:45 pm
Very good repair article Parasuraman. I like your thorough knowledge in explaining about these issues