
Pev Pro KV-80, 8-Channel Mixer Repaired After Catastrophic Failure!


Recently, I received a Pro KV-80 powered mixer from an international school here in Nairobi. The unit was completely dead — no signs of life. What followed was a layered repair process that reinforced several important amplifier troubleshooting principles.
In this post, I’ll walk through the failure symptoms, diagnosis process, and final repair — with practical lessons for technicians worldwide.
Initial Symptom: Completely Dead Unit
The mixer would not power on. On inspection, I found the main 5A fuse blown — and blackened inside. A darkened fuse is a strong indicator of a hard short, not a simple overload.

A blackened fuse in a power amplifier almost always points to: Shorted output transistors, Rail-to-rail short or Driver stage failure.

Click here to check out Humphrey’s latest ebook on Washing Machine Repair
After isolating the power amp section, I tested the output transistors (TTA1943 and TTC5200). And found each was Shorted C-E junctions. This confirmed a catastrophic output stage failure.

When output transistors fail, never stop there. I also checked: Driver transistors, Bias transistor, Emitter resistors, Base resistors and I found. Driver transistors damaged, Bias transistor compromised, two emitter resistors burnt 5 Watts 0.33 ohms and One 120Ω resistor completely burnt
That 120Ω resistor likely limited further destruction — it sacrificed itself.

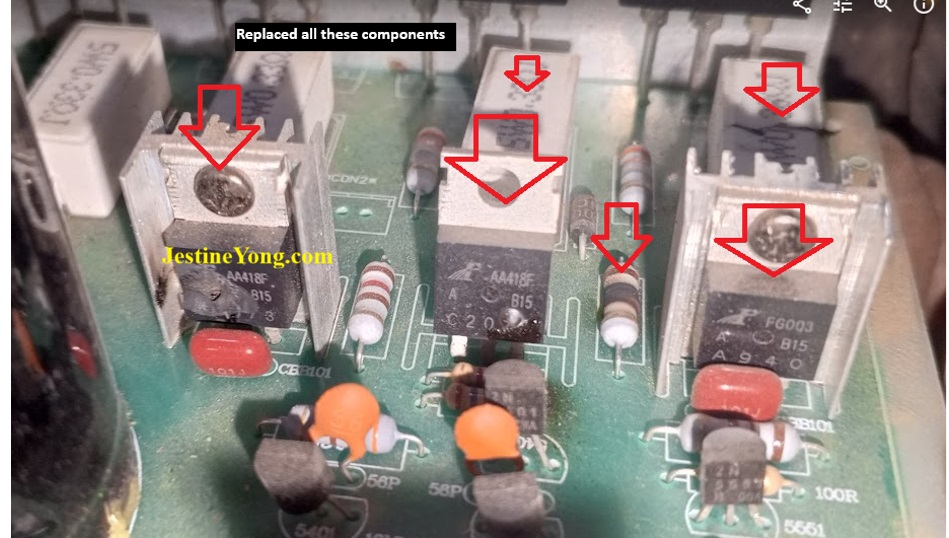
Instead of replacing only the visibly damaged parts, I: Replaced all four output transistors (as matched pairs), Replaced driver transistors, replaced bias transistor, Replaced burnt emitter resistors and 120Ω resistor
This prevents future instability and repeat failures. This is critical: Never partially rebuild a damaged output stage.
After rebuilding the amplifier section, the mixer powered on safely. But there was still no audio output. Power rails were present. Display was working. Protection system seemed stable.
The issue turned out to be unexpected: The ±15V preamp connector was loose.
This caused:
- No signal processing
- No audio reaching the power stage
- A false impression of deeper failure
After securing the connector, audio returned perfectly.

This repair also reinforced the importance of: Speaker protection relay, DC detection circuitry, Bias stability.
After replacing all components, I verified: Proper DC offset at speaker output, Stable idle temperature, Relay engagement after power-on delay, only after confirming stability did, I reconnect speakers.
Here are key takeaways from this repair:
1️⃣ A black fuse = serious short
Never just replace it.
2️⃣ Replace output stage as a system
Outputs, drivers, bias, emitter resistors — treat them as one network.
3️⃣ Check low-voltage rails
Missing ±15V can mimic deeper amplifier faults.
4️⃣ Always inspect connectors
Mechanical faults can hide behind electrical failures.
5️⃣ Confirm DC offset before speaker connection
Protect the client’s speakers at all costs.
Final Result
After full rebuild and testing: Stable power-up, Relay engages correctly, clean audio output, no overheating, Balanced DC offset, the mixer is now back in service and operating perfectly.
If you’re a technician facing similar amplifier failures, remember: Catastrophic faults require systematic rebuilding — not quick part swaps.

Humphrey Kimathi is from Nairobi Kenya and the author of:
1) Washing Machine Repair Made Simple
4) Lcd-Led Television Repair Guide
5) LCD-LED Television Repair Cases/Tips Volume 02
6) Microwave Oven Repair Made Easy
Please give a support by clicking on the social buttons below. Your feedback on the post is welcome. Please leave it in the comments. If you have electronic repair articles to share with us, please contact us HERE.
P.S- If you enjoyed reading the above article, click here to subscribe to my blog (free subscription). That way, you’ll never miss a post. You can also forward this website link to your friends and colleagues-thanks!
Note: You may check out his previous post on Kenwood Amplifier Model KAC-629S – Dead but Now Repaired!
 (43)Dislikes
 (0)
(0)
19 Comments
Leave a Reply


Parasuraman S
February 21, 2026 at 5:19 pm
A highly professional and authoritative troubleshooting and fix, which only masters like you can handle! Many, many thanks for the wonderful article, lessons and tips and guidance.
Humphrey Kimathi
February 22, 2026 at 3:40 am
Thank you so much for your kind words — I truly appreciate it.
I’m glad the article, lessons, and tips were helpful. If it encourages even one technician to approach amplifier faults more methodically, then it has served its purpose.
Thank you again for taking the time to read and comment — it means a lot.
Albert van Bemmelen
February 21, 2026 at 5:29 pm
Good job and well explained! I suppose fixing these class A, AB ,C or D Amplifiers/Mixers is harder because they mostly do not have any useful available matching servicemanual at hand.
Humphrey Kimathi
February 22, 2026 at 3:43 am
Thank you — I truly appreciate your observation.
You’re absolutely right. Troubleshooting Class A, AB, C, or D amplifiers without a proper service manual can be challenging. In many real-world cases, especially with commercial mixers, schematics are either unavailable or do not exactly match the production revision.
In such situations, the key is understanding the architecture rather than relying only on documentation. Once you can identify the major blocks — power supply rails, driver stage, bias network, output stage, and protection circuit — the amplifier becomes much easier to analyze, even without a schematic.
Most catastrophic failures follow similar patterns regardless of class:
Output stage shorts
Driver stage stress
Burnt emitter resistors
Protection activation
When you approach it systematically, the absence of a manual becomes less intimidating.
Thank you again for your valuable comment — discussions like this strengthen the global repair community.
Yogesh Panchal
February 21, 2026 at 5:38 pm
Good Job! Sir
Detailed inspection is good practice for quality work & retain customers' trust.
Humphrey Kimathi
February 22, 2026 at 3:46 am
Thank you very much for your kind words.
You are absolutely right — detailed inspection is not just about fixing the immediate fault, but about ensuring long-term reliability. In power amplifiers especially, secondary damage is common, and overlooking small components like emitter resistors or bias parts can lead to repeat failures.
Quality work builds confidence, and customer trust is earned when repairs are stable and dependable over time.
I truly appreciate your encouragement and thoughtful comment.
George
February 22, 2026 at 1:28 am
When dealing with stereo designs it is always a good idea to replace all outputs and drivers to maintain balanced performance when you encounter shorted outputs. Replacement devices are rarely the same exact specs as original ones.
Humphrey Kimathi
February 23, 2026 at 12:16 am
Good point In cases of shorted outputs, replacing the full set can definitely help maintain symmetry between channels, especially where matching is critical. I always evaluate the condition of the remaining devices before deciding the best approach.
Mark J
February 22, 2026 at 3:21 am
Humphrey good article very informative.
Humphrey Kimathi
February 22, 2026 at 5:25 am
Thank you so much for your kind words — I truly appreciate it.
I’m glad the article, lessons, and tips were helpful. If it encourages even one technician to approach amplifier faults more methodically, then it has served its purpose.
Thank you again for taking the time to read and comment — it means a lot.
Jim
February 22, 2026 at 7:23 am
Great! .. Very well in depth repair, I like the way you go through all stages of amplifier. Nice repair!
Humphrey Kimathi
February 23, 2026 at 12:13 am
Thank you so much! I truly appreciate your kind words. I always believe in going step by step through every stage to ensure the repair is thorough and reliable. Glad you liked the process!
Imoudu.O
February 23, 2026 at 3:40 am
When I read through it,it seems like an e-book to me,though when I repair such device,i usually replace shorted transistors only,but now I have learned a lesson from this acticle,hope we will seeing more from you,thanks very much friend
Humphrey Kimathi
February 23, 2026 at 10:32 pm
Thank you so much, my friend! I truly appreciate your honest feedback.
Yes, many of us used to replace only the shorted transistors — it works in some cases — but as you've noticed, going a bit deeper helps improve reliability and long-term performance. That’s how we all keep growing in this repair journey.
I’m really glad you found value in the article, and I’ll definitely be sharing more practical insights soon. Thanks again for your support!
Waleed Rishmawi
February 23, 2026 at 3:53 pm
repairing such devices is not a easy walk and surely not an easy fix. thanks for the step by step proecess to the repair. yes I do agree not just to replace the bad parts but replace everything in that faulty area which is the best way to go ..thanks for sharing and have a blessed day
Humphrey Kimathi
February 23, 2026 at 10:34 pm
Thank you so much for your thoughtful comment!
You’re absolutely right — repairing these devices is never an easy walk. It takes patience, careful diagnosis, and sometimes going beyond just the obvious faulty parts. Replacing everything in the stressed or faulty section really helps ensure reliability and prevents repeat failure.
I truly appreciate your support and encouragement. Wishing you successful repairs and a blessed day too!
MP
February 25, 2026 at 12:19 am
A loud bang comes after a long silence. Thanks for a spectacular reappearance following a prolonged disappearance. Excellent technical lesson ! But for me, with blank plctures. All the same congratulation, man from our Kenyan capital city, Nairobi. Welcome all !
Humphrey Kimathi
February 26, 2026 at 12:57 pm
Thank you so much, my brother!
Yes, it was indeed a “loud bang after a long silence” — sometimes we disappear into the workshop for deep repairs, but we always come back stronger!
I truly appreciate your kind words and encouragement. Sorry about the blank pictures on your side — I’ll double-check that so everyone can follow the lesson clearly. Technical repair is best when we see every stage step by step.
Greetings from Nairobi, Kenya — and thank you for the warm welcome back! More practical lessons coming soon.
Stay blessed and keep repairing!
MP
February 25, 2026 at 3:52 pm
I got pictures when using a different phone. I Hope soon to buy one of your books, I have a feeling that its a must !